

Ingredients
Method
Step 1: Create Your Golden Roux Base
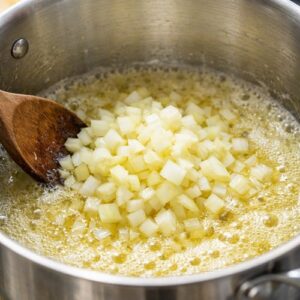
- Start by melting your salted butter in a large soup pot over medium heat. Once it's foaming—and this visual cue matters—add your chopped yellow onion and cook for about 2 minutes, stirring frequently. You're not going for caramelization here; you just want to soften the onion slightly and release its natural sugars. Watch how the onion becomes translucent at the edges—that's when you know you're ready for the next layer. Now add those sliced mushrooms. I know mushrooms seem like they'll be dark and dull, but here's a professional secret: they release their moisture first, then brown slightly, creating this gorgeous umami-rich base that signals to your brain this is serious, flavorful food. Stir occasionally and let them cook for about 3 minutes until they've released their liquid and started to golden slightly. Add your minced garlic and fresh thyme leaves, stirring constantly for about 60 seconds. You want to bloom these aromatics in the butter and mushroom juices. This is where your kitchen starts smelling like an Italian grandmother's home. Sprinkle your all-purpose flour over this mixture and stir continuously for 2 minutes. The flour will coat everything lightly and begin to create a paste—this is your roux, and it's what will give your soup its silky texture without needing cream.
Step 2: Build the Broth Foundation
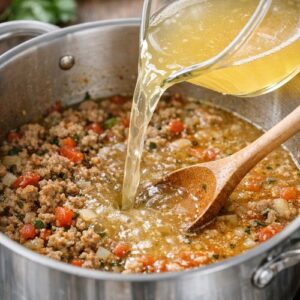
- Slowly pour in your 6 cups of low-sodium chicken broth, stirring constantly to prevent lumps from forming. This is the moment where your soup goes from dry ingredients to a living, breathing liquid. You'll see the flour dissolve and the broth transform into something glossy and rich-looking. Add your dried oregano and a generous pinch of kosher salt and black pepper. Bring the whole pot to a gentle simmer over medium-high heat. While that's warming, place your boneless chicken breasts on a cutting board and slice them into bite-sized pieces—about 1-1.5 inches. This is important for both visual appeal and eating experience. Small pieces mean they cook faster (helping you stay on the 30-minute timeline) and they distribute throughout the soup instead of creating one big protein centerpiece.
Step 3: Add Protein and Pasta
- Once your broth reaches a gentle simmer, add those chicken pieces directly to the pot. Stir occasionally as they cook. They'll turn from pink to white—that's your visual cue they're cooking through. After about 3-4 minutes, when the chicken is nearly opaque, add your broken lasagna noodles. Breaking the noodles creates this rustic, interesting texture in the final soup rather than having long strands that get tangled. Plus, they cook faster in smaller pieces, keeping us on schedule. Let everything simmer together for about 4-5 minutes until the pasta is just starting to soften but still has a slight bite to it. Taste your broth at this point. Does it need more salt? More pepper? Adjust to your preference—this is before we add the cream and cheese, so it's the easiest moment to balance your flavors.

Step 4: Introduce Creaminess with Intention
- Reduce your heat to medium and pour in your whole milk slowly, stirring gently as you go. I use whole milk instead of heavy cream because it creates that luscious mouthfeel while keeping the soup feeling lighter and more brothy—it's the dietitian in me believing that creamy doesn't have to mean overly heavy. Watch how the color changes as the milk incorporates. The broth shifts from golden-brown to a warm, inviting cream color. Once the milk is fully incorporated and the soup is creamy, begin adding your shredded provolone cheese and grated parmesan, stirring constantly. Add them gradually—about a quarter cup at a time—making sure each addition melts completely before adding more. This prevents clumping and creates that silky, melted texture where the cheese becomes part of the sauce rather than separate strands.

Step 5: The Spinach Moment (The Green Game-Changer)
- Here's where the presentation transforms. Add your roughly chopped baby spinach to the pot. At first, it looks like you've added way too much—the pot is overflowing with green. But within 60 seconds of gentle stirring, it wilts down dramatically, creating this beautiful jewel-tone swirl throughout the cream-colored broth. This visual transformation is part of what makes this soup so special to serve. It's not just delicious—it's a mini cooking show right in the pot. Keep stirring gently as the spinach wilts. You want to distribute it evenly so every bowl gets those gorgeous green ribbons. Taste the soup again. Adjust salt and pepper to taste, and add a quarter teaspoon of red pepper flakes if you like a subtle heat.

Step 6: The Fresh Herb Finish
- Just before serving, remove the pot from heat and tear your fresh basil roughly over the top of the soup. Never add fresh basil during cooking—the heat destroys its delicate color and flavor. Stir it in gently so some of it wilts but some stays bright green. This final herb addition adds a fresh, aromatic brightness that makes people pause mid-spoonful and say, "What is that amazing flavor?"

Notes
- Lighting is everything - Shoot this soup near a window with natural light coming from the side or slightly behind the bowl. The cream-colored broth glows beautifully in natural light, and you can actually see the spinach's jewel-tone color pop. Avoid harsh overhead lighting, which flattens everything.
- Shoot at the right moment - Capture the soup within 2-3 minutes of ladling. At this point, the heat is still rising (creating beautiful steam), the colors are at their most vibrant, and the cheese is perfectly melted. After 5 minutes, the soup starts cooling and the visual appeal diminishes slightly.
- Use negative space intentionally - Photograph the bowl against a simple, neutral background. A warm-toned linen or wood surface complements the golden-cream color of the soup. Include a simple wooden spoon in the frame if you want to add context without overwhelming the image.