
Ingredients
Method
Step 1: Season Your Beef and Get Your Skillet Ready
- Pat your beef pieces dry with paper towels. This is crucial—wet meat won't brown properly; it'll steam instead. Dry meat equals brown crust equals flavor. Once they're dry, season all sides evenly with salt and the optional garlic powder. I like to do this about five minutes before cooking so the salt can start breaking down the muscle fibers (dry brining begins immediately). Place your largest non-stick skillet over medium heat. Let it warm for two minutes—you want it genuinely hot before you add oil. This matters because cold pans mean slow browning, which means you lose moisture and color.

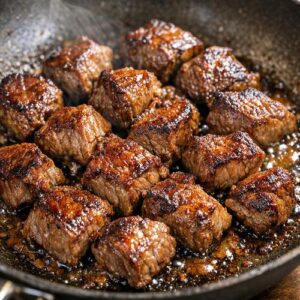
Step 2: Brown Your Beef for Maximum Flavor
- Spray your hot skillet lightly with cooking spray. I use three short bursts, which gives you about one teaspoon of coverage. Add your beef pieces immediately—you should hear them sizzle. Do not move them for at least three minutes. That immobility is what creates the brown crust (a process called the Maillard reaction—the chemical change that creates new flavors). After three minutes, flip each piece and brown the other side for another three minutes. You're looking for a deep golden-brown color, almost amber. Some pieces will brown faster than others depending on thickness—that's normal. Once both sides are brown, transfer all beef to a clean plate. Don't worry about cooking it through; you're just getting color now.
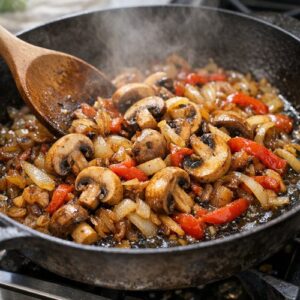
Step 3: Sauté Your Vegetables Until They Start to Caramelize
- Your skillet should still have fond (those browned, stuck-on bits) from the beef. Don't wash it. Add your sliced onions and peppers directly to the hot skillet. You may notice a bit of sticking initially—that's the fond dissolving into your vegetables, and it's flavor gold. Sauté for about three minutes, stirring occasionally, until the onions begin to soften and the peppers brighten in color. If you're using mushrooms, add them now and stir everything together. Mushrooms release water, so you'll see the pan become slightly wetter—that's expected. Cook for another minute, letting the mushrooms release their liquid. The mushroom liquid is pure umami and goes into your braising liquid.
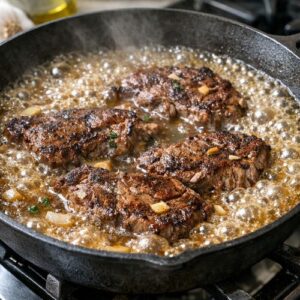
Step 4: Add Broth and Return Beef to the Skillet
- Pour your beef broth into the skillet slowly, stirring gently as you pour. You'll see the fond fully dissolve into the liquid, turning it rich and brown. Then add the water. The combination should just barely cover your beef pieces when you nestle them back among the vegetables. Return your beef pieces to the skillet, arranging them so they're mostly submerged but not stacked on top of each other. Bring the whole thing to a boil—you'll see vigorous bubbling around the edges. This moment is important because it kills any surface bacteria and helps proteins fully denature. Once you see the boil, reduce your heat to low, cover the skillet with a lid (or foil if you don't have a lid), and let it simmer gently.
Step 5: Braise Low and Slow Until Beef is Tender
- This is where patience becomes your secret weapon. Let the beef braise undisturbed for about forty minutes to forty-five minutes. The gentle heat breaks down the collagen in the connective tissue, transforming it into gelatin. The vegetables soften completely and release their sugars into the braising liquid. There's virtually no active work here—just time. At the thirty-five minute mark, you can carefully lift the lid and check that your liquid is still gently simmering (tiny bubbles breaking the surface). If it's boiling vigorously, lower the heat slightly. If it's gone quiet, raise the heat just slightly. You want a bare simmer. To check for doneness at forty minutes, pierce a piece of beef with a fork. It should slide through with almost no resistance. If you feel firmness, give it another five minutes and check again.
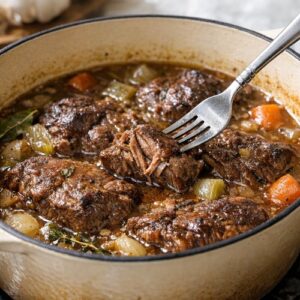
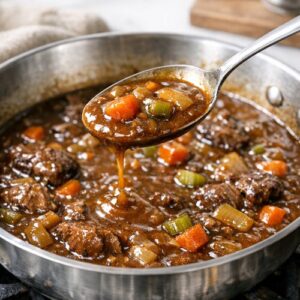
Step 6: Make Your Gravy and Finish
- Once your beef is fork-tender, carefully transfer the pieces to a serving platter or shallow bowl. Tent them loosely with foil to keep them warm. Now we make the gravy magic happen. In a small bowl, whisk together your water and cornstarch until there are absolutely no lumps. This is your slurry, and lumps mean lumpy gravy. Place your skillet (with the braising liquid and vegetables still in it) over medium heat. Once the liquid comes back to a gentle simmer, slowly pour in your cornstarch slurry while stirring constantly with a wooden spoon. Constant stirring prevents lumps and ensures even thickening. You'll see the gravy go from thin and watery to thick and coat-the-spoon consistency. This usually takes sixty to ninety seconds. The gravy should look glossy and rich, with the vegetables distributed throughout. Taste it now and add a pinch of salt or pepper if needed. Pour this beautiful gravy over your beef and vegetables, letting it pool around everything.
Notes
- Starting with cold beef - If your beef goes straight from refrigerator to skillet, the outside will brown before the inside starts cooking, creating a tough exterior. Always let it sit at room temperature for fifteen to twenty minutes. This sounds small, but it changes everything about the final texture.
- Adding too much water to your braising liquid - I see people thinking "more liquid equals more tender beef," so they add extra water. Too much liquid means your gravy never reduces properly and tastes thin and watery. Stick to the recipe's liquid ratios. The beef releases its own moisture as it cooks, which concentrates your flavors.
- Moving the beef around during browning - Every time you flip or move meat, you interrupt the crust formation. Resist the urge. Let that first side sit for a full three minutes. Patience creates the flavor foundation.
- Skipping the cornstarch slurry step - Some people try to thicken gravy with just cornstarch straight, which lumps immediately. Mixing cornstarch with cold water first creates a stable suspension that thickens smoothly when added to hot liquid. This is classic technique that prevents disappointment.