Beef Shoulder Steak Recipe
This post contains affiliate links. As an Amazon Associate I earn from qualifying purchases.
I remember standing in my kitchen on a rainy November evening, watching my parents arrive for dinner with my younger brother. My mom had always made beef shoulder steak for our family gatherings—nothing fancy, just honest food that made everyone linger at the table longer than planned.
That night, I promised myself I’d master her technique but make it faster, lighter, and even more flavorful. What I discovered became the foundation of how I approach home cooking today: the most memorable meals aren’t about complexity; they’re about technique, timing, and knowing how to coax maximum flavor from humble ingredients.
This beef shoulder steak recipe does exactly that. Whether you’re feeding your own family or trying to impress dinner guests without hours of prep work, this dish delivers restaurant-quality tenderness and a savory gravy that makes everyone ask for seconds.
Like my family dinners taught me, great food brings people together—and blade beef recipes are proof that the best meals don’t need to be complicated.

Beef Shoulder Steak Recipe: The Weeknight Showstopper That Actually Saves Time
That November dinner changed how I think about beef shoulder steak. My mom’s version took three hours of stovetop tending. Mine cuts that to forty-five minutes of mostly hands-off cooking—which means I’m present, not stressed. I’m standing at my sink talking with guests, not hovering over a pot. The beef becomes impossibly tender, the vegetables caramelize into the gravy, and you get that same golden-hour warmth my family has always loved, but on a weeknight schedule.
When to Make Beef Shoulder Steak Recipe
I’ve built this recipe into my rotation for moments when I need a dish that feels special but doesn’t demand special occasion timing. There’s flexibility here—it works for Tuesday nights when everyone’s fractured across different schedules, and it also shines when you want something reliable for entertaining. Let me show you the moments where this becomes your go-to:
- Weeknight dinners when you need comfort without complexity – The forty-five minute timeline means you’re eating at a reasonable hour, not 8 PM. I can have this plated by 6:30, which matters when kids have homework or you have evening plans.
- Entertaining friends or family without a full afternoon of prep – This looks and tastes like you spent all day cooking. Your guests won’t believe you started an hour before they arrived. The gravy is the real showstopper here.
- Fall and winter gatherings when people crave warmth on the plate – There’s something about braised beef when the weather turns. This hits that psychological comfort need that lighter dishes can’t touch during cooler months.
- Meal prep for the week ahead – This reheats beautifully, which means you can make a double batch on Sunday and have restaurant-quality lunches waiting all week.
What Makes This Beef Shoulder Steak Recipe Special
From my work as a registered dietitian, I know that beef shoulder steak gets overlooked. It’s not a premium cut—the budget is usually the appeal. But here’s what most people miss: this cut’s connective tissue (collagen) breaks down into gelatin during braising, which creates natural body and richness in your gravy without cream or flour thickeners. You’re not compensating for an inferior cut; you’re using a cut’s inherent structure to your advantage.
The magic happens in the braising liquid. I use just beef broth and water—no cream, no wine—but the combination of sautéed vegetables, the beef’s own collagen, and a simple cornstarch slurry creates a gravy with actual depth. The vegetables release their sugars as they cook, the onions soften into almost-jam texture, and the peppers add color and natural sweetness. This isn’t fussy cooking. It’s efficient technique meeting ingredient knowledge.
What elevates this above everyday beef is the browning step. Those browned bits stuck to your skillet (what we call fond) contain concentrated umami. When you deglaze with broth, you’re capturing months of the cow’s flavor into your liquid. That’s restaurant technique in a home kitchen, and it’s why the final dish tastes like you’ve been simmering it all day when you’ve barely been hands-on for thirty minutes.
Scaling for Your Crowd
One of the questions I hear most from people entertaining at home: “How do I make this bigger without making it complicated?” I’ve scaled this recipe up and down for everything from a dinner for two to feeding fifteen people at a potluck. The beauty of braising is that it scales almost linearly—you’re not fighting chemistry; you’re just adjusting volumes and timing.
- For 2 people – Use ½ pound of beef shoulder steak, cut into 2-3 pieces. Use ¼ large onion, ½ green pepper, ½ cup mushrooms, ¼ cup broth, 2 tablespoons water, and ½ tablespoon cornstarch. Cooking time stays the same (forty-five minutes), but in a smaller skillet, everything cooks more evenly. This is perfect for a weeknight date night at home.
- For 4-6 people – This is the recipe as written. One pound of beef, one skillet, and you’re set.
- For 8-10 people – Double everything. Use two skillets and stagger your browning. Brown all beef in the first skillet, then brown in the second skillet while the first braises. The vegetables go into both skillets proportionally. Total time is still under one hour because braising happens simultaneously.
- For 12+ people – Triple or quadruple the recipe. At this point, I recommend using my oven method: brown the beef in batches on the stovetop, then transfer everything (beef, vegetables, liquid) to large Dutch ovens or roasting pans. Braise at 325°F for forty-five minutes instead of on the stovetop. Oven braising is more forgiving for volume and frees up your stovetop for sides.
The Ingredients
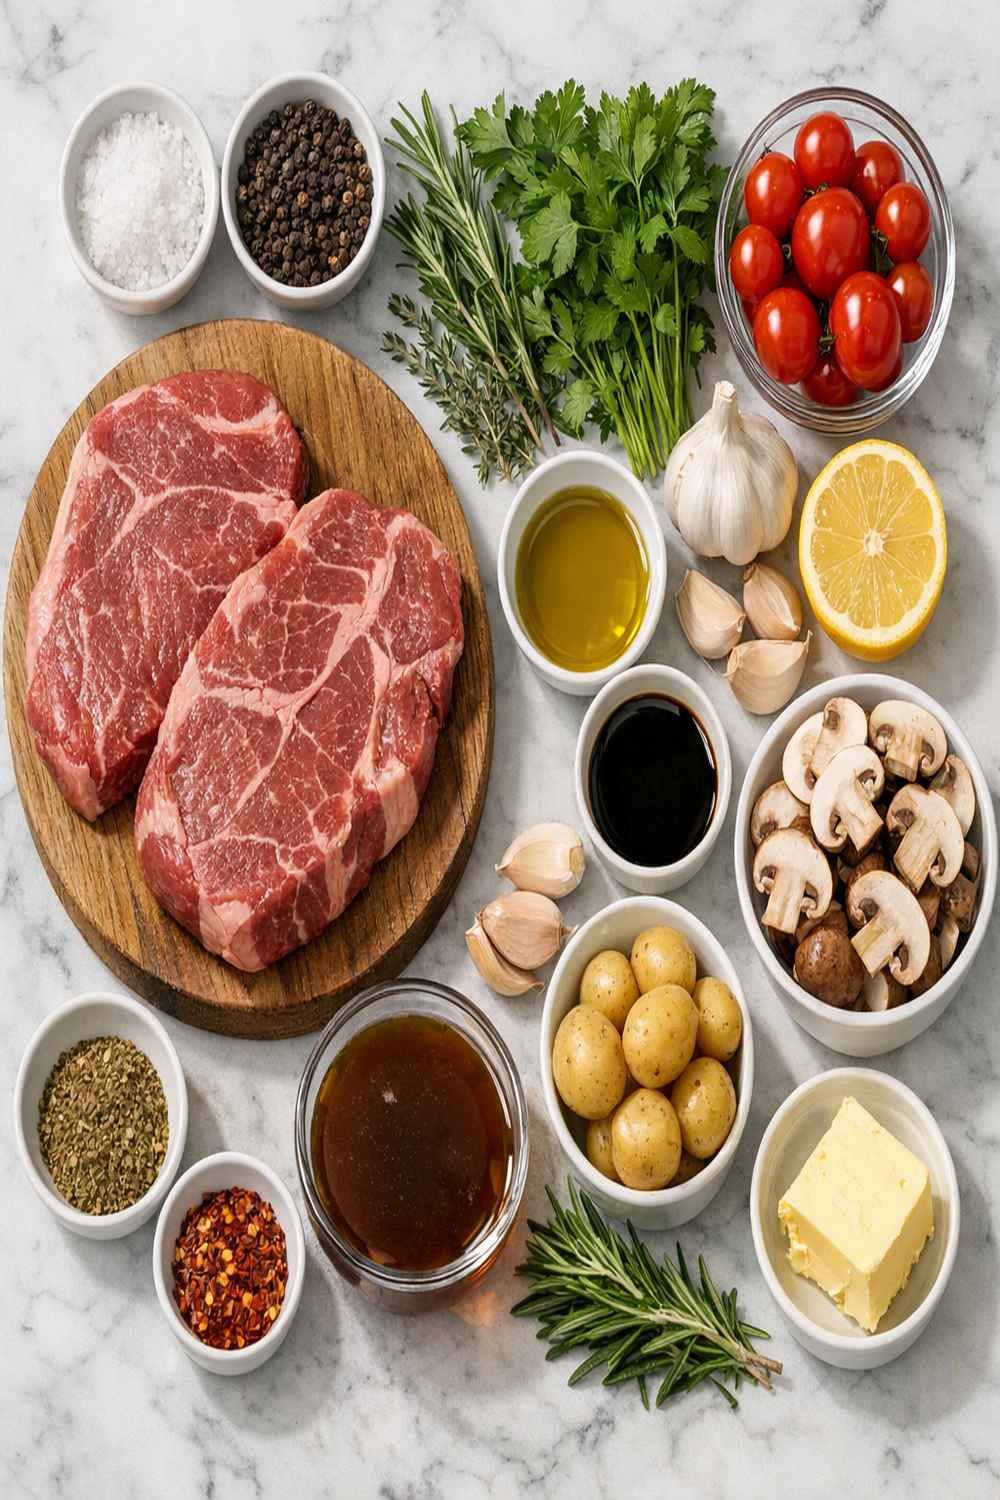
Here’s what you’ll need to transform an affordable cut into something your guests will remember. These aren’t exotic ingredients—they’re items you probably already have or can find at any grocery store. I’ve included notes on where quality matters and where you can be flexible:
- 2 tablespoons neutral cooking spray or light oil (I prefer spray for portion control and even coating; olive oil’s low smoke point makes it unsuitable here)
- ½ teaspoon garlic powder (optional but recommended; fresh garlic burns too easily during browning)
- 1 cup fresh mushrooms, sliced (cremini or baby bella have more earthy flavor than white button mushrooms; optional but highly recommended for umami depth)
- ¼ cup filtered water (this dilutes the broth to prevent over-salting as it reduces)
- 1 tablespoon cornstarch (this is your thickening agent; arrowroot powder is a gluten-free alternative with identical results)
- 1 large onion, halved and sliced into thick half-moons (yellow onions have better sweetness than white; don’t use sweet onions here—they become too sugary)
- 1 pound boneless beef shoulder steak or chuck steak, cut into 4 serving-size pieces (look for pieces that are roughly 1.5 to 2 inches thick; ask your butcher to cut them from the shoulder if they only have thin-sliced)
- 1 large green bell pepper, sliced into ½-inch strips (or use a mix of red, yellow, and green peppers if you want visual appeal; frozen peppers work well and are actually more nutrient-dense than hothouse varieties)
- ¼ teaspoon freshly ground black pepper (added at the end for maximum flavor impact)
- ½ cup unsalted beef broth, preferably low-sodium (homemade is ideal, but quality boxed broth works; avoid overly salty versions, which concentrate during braising)
- ½ teaspoon kosher salt, plus more to taste (Diamond Crystal brand dissolves more evenly than table salt, which is important for even seasoning)
Ingredient note: The beef shoulder steak’s quality matters here because you’re using a small amount. If possible, buy from a butcher who cuts to order rather than pre-packaged. Ask for pieces from the shoulder (chuck) area, not the chuck eye roast. The difference is subtle but meaningful—shoulder steak has slightly better marbling for braising.
How to Make Beef Shoulder Steak Recipe for Your Occasion
I’m going to walk you through this step-by-step, but I want you to know upfront: this is forgiving cooking. You’re not making a delicate sauce or timing protein to exact doneness. You’re building layers of flavor and letting time do the heavy lifting. If your guests arrive fifteen minutes late, your beef is actually better—it’s had a few extra minutes to become more tender. That’s the gift of braising.
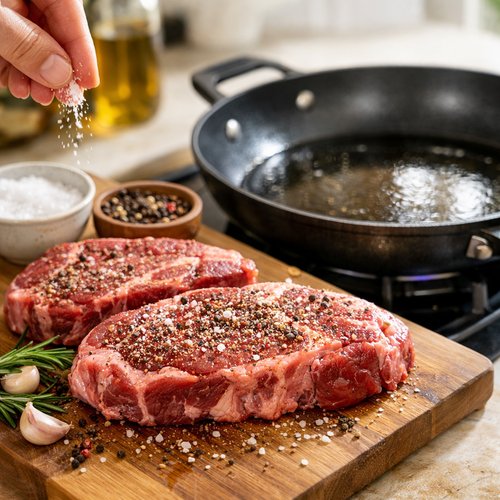
Step 1: Season Your Beef and Get Your Skillet Ready
Pat your beef pieces dry with paper towels. This is crucial—wet meat won’t brown properly; it’ll steam instead. Dry meat equals brown crust equals flavor. Once they’re dry, season all sides evenly with salt and the optional garlic powder. I like to do this about five minutes before cooking so the salt can start breaking down the muscle fibers (dry brining begins immediately).
Place your largest non-stick skillet over medium heat. Let it warm for two minutes—you want it genuinely hot before you add oil. This matters because cold pans mean slow browning, which means you lose moisture and color.
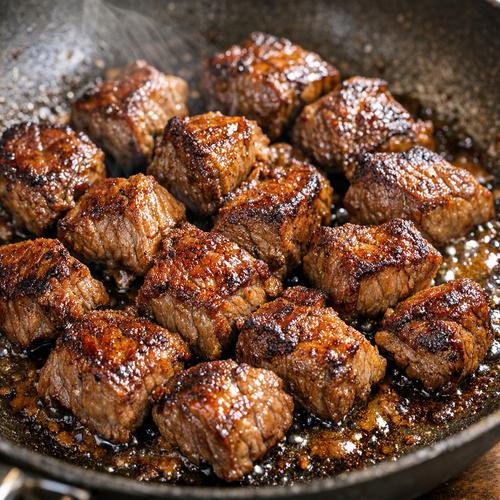
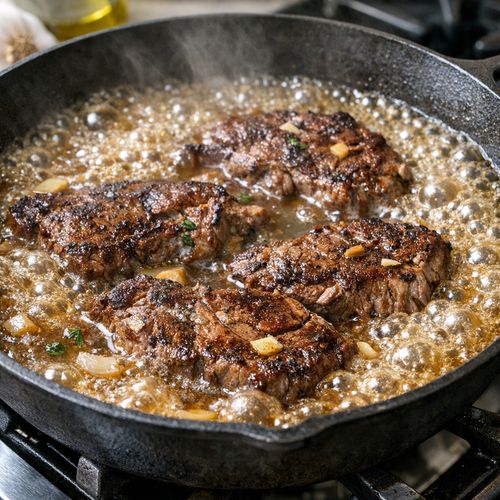
Step 2: Brown Your Beef for Maximum Flavor
Spray your hot skillet lightly with cooking spray. I use three short bursts, which gives you about one teaspoon of coverage. Add your beef pieces immediately—you should hear them sizzle. Do not move them for at least three minutes. That immobility is what creates the brown crust (a process called the Maillard reaction—the chemical change that creates new flavors).
After three minutes, flip each piece and brown the other side for another three minutes. You’re looking for a deep golden-brown color, almost amber. Some pieces will brown faster than others depending on thickness—that’s normal. Once both sides are brown, transfer all beef to a clean plate. Don’t worry about cooking it through; you’re just getting color now.
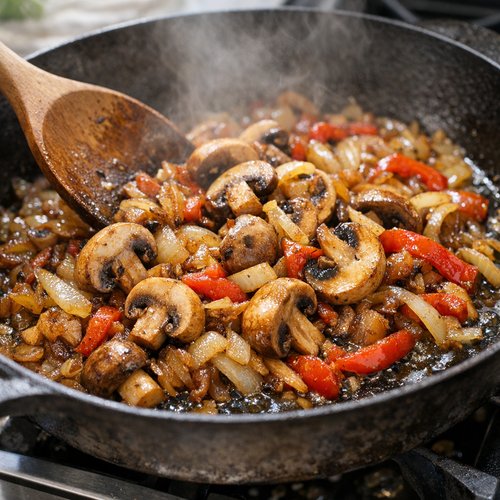
Step 3: Sauté Your Vegetables Until They Start to Caramelize
Your skillet should still have fond (those browned, stuck-on bits) from the beef. Don’t wash it. Add your sliced onions and peppers directly to the hot skillet. You may notice a bit of sticking initially—that’s the fond dissolving into your vegetables, and it’s flavor gold. Sauté for about three minutes, stirring occasionally, until the onions begin to soften and the peppers brighten in color.
If you’re using mushrooms, add them now and stir everything together. Mushrooms release water, so you’ll see the pan become slightly wetter—that’s expected. Cook for another minute, letting the mushrooms release their liquid. The mushroom liquid is pure umami and goes into your braising liquid.
Step 4: Add Broth and Return Beef to the Skillet
Pour your beef broth into the skillet slowly, stirring gently as you pour. You’ll see the fond fully dissolve into the liquid, turning it rich and brown. Then add the water. The combination should just barely cover your beef pieces when you nestle them back among the vegetables. Return your beef pieces to the skillet, arranging them so they’re mostly submerged but not stacked on top of each other.
Bring the whole thing to a boil—you’ll see vigorous bubbling around the edges. This moment is important because it kills any surface bacteria and helps proteins fully denature. Once you see the boil, reduce your heat to low, cover the skillet with a lid (or foil if you don’t have a lid), and let it simmer gently.
Step 5: Braise Low and Slow Until Beef is Tender
This is where patience becomes your secret weapon. Let the beef braise undisturbed for about forty minutes to forty-five minutes. The gentle heat breaks down the collagen in the connective tissue, transforming it into gelatin. The vegetables soften completely and release their sugars into the braising liquid. There’s virtually no active work here—just time.
At the thirty-five minute mark, you can carefully lift the lid and check that your liquid is still gently simmering (tiny bubbles breaking the surface). If it’s boiling vigorously, lower the heat slightly. If it’s gone quiet, raise the heat just slightly. You want a bare simmer.
To check for doneness at forty minutes, pierce a piece of beef with a fork. It should slide through with almost no resistance. If you feel firmness, give it another five minutes and check again.
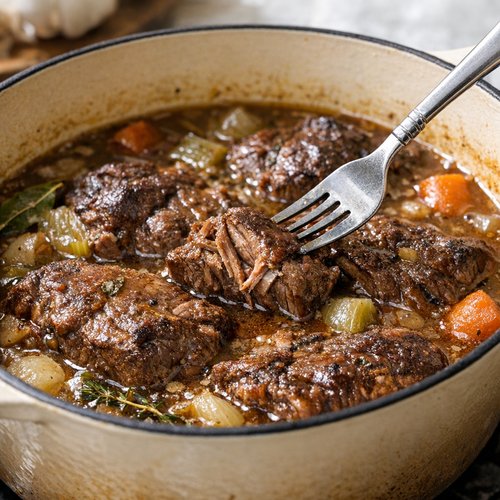
Step 6: Make Your Gravy and Finish
Once your beef is fork-tender, carefully transfer the pieces to a serving platter or shallow bowl. Tent them loosely with foil to keep them warm. Now we make the gravy magic happen. In a small bowl, whisk together your water and cornstarch until there are absolutely no lumps. This is your slurry, and lumps mean lumpy gravy.
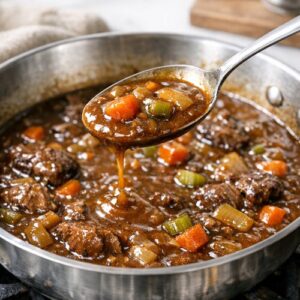
Place your skillet (with the braising liquid and vegetables still in it) over medium heat. Once the liquid comes back to a gentle simmer, slowly pour in your cornstarch slurry while stirring constantly with a wooden spoon. Constant stirring prevents lumps and ensures even thickening. You’ll see the gravy go from thin and watery to thick and coat-the-spoon consistency. This usually takes sixty to ninety seconds.
The gravy should look glossy and rich, with the vegetables distributed throughout. Taste it now and add a pinch of salt or pepper if needed. Pour this beautiful gravy over your beef and vegetables, letting it pool around everything.

Expert’s Nutritional Tip
Here’s something I always tell clients who think beef shoulder steak is inherently unhealthy: the braising process actually improves the nutritional profile. When collagen breaks down into gelatin, it creates natural glycine and proline—amino acids your body uses for joint health and gut integrity. You’re not just eating meat; you’re creating bone broth-like benefits without additional steps. The vegetables absorb the collagen-rich liquid, so they become nutrient-dense vehicles rather than side passengers. Every bite of pepper or onion is infused with beef umami and collagen. This is why braised dishes feel more satisfying on less food—your body recognizes the complete amino acid profile and stays fuller longer. Add the fact that you’re using minimal added fat (just cooking spray) and you have a dish that’s protein-rich, deeply satisfying, and actually supports your body’s structural needs.
Make-Ahead Timeline
As someone who cooks for groups regularly, I’ve learned that the right prep timeline removes stress and actually improves flavor. Here’s how I approach this when planning a dinner:
- Three days before – Buy your beef and store it in the coldest part of your refrigerator (the back of the bottom shelf, typically around 33°F). You can also buy your broth and vegetables now. Mushrooms are best bought the day before to minimize oxidation.
- One day before – Chop your onion and peppers, and store them separately in airtight containers. Don’t chop mushrooms yet; they oxidize quickly. You can also measure your cornstarch and water into a small bowl and cover it. This saves you maybe ninety seconds on cooking day, but it’s ninety seconds of breathing room when you’re hosting.
- Day of, 1 hour before serving – Remove your beef from the refrigerator to let it come closer to room temperature (about twenty minutes). Cold beef cooks unevenly. Start your recipe exactly forty-five minutes before you plan to eat.
- Day of, after cooking – Beef shoulder steak actually improves overnight. If you want to make this ahead, cook it fully, let it cool to room temperature, cover it, and refrigerate it. The next day, reheat it gently in a 300°F oven for about twenty minutes with the lid on. The flavors meld and deepen. You can safely store this for four days refrigerated.
Common Mistakes to Avoid
In my years of cooking and teaching others, I’ve seen several predictable stumbles with beef shoulder steak. Here’s how to sidestep them:
- Starting with cold beef – If your beef goes straight from refrigerator to skillet, the outside will brown before the inside starts cooking, creating a tough exterior. Always let it sit at room temperature for fifteen to twenty minutes. This sounds small, but it changes everything about the final texture.
- Adding too much water to your braising liquid – I see people thinking “more liquid equals more tender beef,” so they add extra water. Too much liquid means your gravy never reduces properly and tastes thin and watery. Stick to the recipe’s liquid ratios. The beef releases its own moisture as it cooks, which concentrates your flavors.
- Moving the beef around during browning – Every time you flip or move meat, you interrupt the crust formation. Resist the urge. Let that first side sit for a full three minutes. Patience creates the flavor foundation.
- Skipping the cornstarch slurry step – Some people try to thicken gravy with just cornstarch straight, which lumps immediately. Mixing cornstarch with cold water first creates a stable suspension that thickens smoothly when added to hot liquid. This is classic technique that prevents disappointment.
How to Present and Plate Beef Shoulder Steak Recipe
I grew up thinking presentation didn’t matter at family dinners—just scoop it onto a plate. But I’ve learned that how food looks affects how it tastes (our brains are powerful like that). You don’t need fancy plating skills for this dish to feel restaurant-quality. You just need a little intention.
- Use a shallow, rimmed bowl instead of a flat plate – The shallow walls contain your gravy without making it look like soup. The gravy should pool around the meat, not drown it. This also keeps everything warm longer because the bowl retains heat better than flat plates.
- Arrange beef pieces in the center and let vegetables surround them – Instead of mixing everything together in the bowl, use a slotted spoon to arrange the vegetables (especially the colorful peppers and mushrooms) around the beef. You want visual interest. Then spoon gravy over everything. This makes a simple home-cooked dish look intentional.
- Finish with a tiny grind of black pepper and fresh parsley if you have it – A pinch of freshly ground pepper (added after plating, so it doesn’t disappear into the hot gravy) and a small herb garnish transform this from “Tuesday dinner” to “I made something special for you.”
Seasonal Variations
While this recipe is timeless, I love adapting it with the seasons. Same technique, different flavor story:
- Spring and early summer version – Replace half the green pepper with fresh spring onions (the white and light green parts), add ½ cup fresh peas in the last five minutes of braising, and use half chicken broth instead of beef for a lighter feel. The peas add brightness and textural contrast. Use cremini mushrooms instead of the thicker mushrooms. This version feels fresher without sacrificing the richness you love.
- Fall and winter version (as written) – This is the version exactly as I’ve described. But if you want to deepen it further, add ½ teaspoon smoked paprika to the beef while browning and ¼ teaspoon dried thyme to the braising liquid. These additions deepen the earthy quality that feels perfect when the weather turns cold. You can also add ½ cup root vegetables (diced carrots or parsnips) with the peppers for more substance.
What to Serve Alongside Beef Shoulder Steak Recipe
This dish is filling on its own because of the vegetables and gravy, but I always build a complete menu around it. These sides complement without competing for attention:
- Creamy mashed potatoes – The starch provides textural contrast and gives the gravy something to coat. I use half potatoes, half cauliflower mash to keep it lighter while maintaining that comfort food element.
- Roasted green beans or asparagus – Something green and slightly crisp balances the soft, braised elements. Toss them in a tiny bit of garlic and lemon juice.
- A simple green salad with vinaigrette – The acidity cuts through the richness of the beef and gravy. Use a basic ratio of three parts oil to one part vinegar with Dijon mustard and shallots.
- Crusty bread or buttered egg noodles – You’ll want something to soak up the gravy. I usually choose noodles for plating elegance or bread for casual family dinners.
If you’re looking for more substantial sides, my black bean and rice burrito recipe pairs surprisingly well with this beef if you’re feeding a crowd with mixed preferences. And if you want to explore other beef options for future dinners, beef pasta crock pot recipes offer a different braising approach for variation.
Can I Store Beef Shoulder Steak Recipe?
Yes, and the storage is actually where this dish shines for meal planning. Braised beef improves over time as flavors meld, which is the opposite of many cooked dishes.
Refrigerator storage: Store the beef, vegetables, and gravy together in an airtight container for up to four days. The gravy will thicken slightly as it cools because the gelatin from the collagen congeals. Don’t panic—this is completely normal and actually a sign you’ve done it right.
Reheating: To reheat, place everything in a skillet over medium-low heat with a lid. Add a splash of water if the gravy seems too thick. Heat gently for about ten to fifteen minutes until it’s steaming. Or reheat in a 300°F oven for twenty minutes, covered. The slow reheating prevents the meat from becoming tough.
Freezer storage: You can freeze this for up to three months. Cool it completely, transfer to a freezer-safe container, and label with the date. Thaw overnight in the refrigerator before reheating. The long, slow thaw actually helps the flavors settle even further.
Nutrition Information
Based on USDA data for beef chuck and standard vegetables, one serving of this recipe (approximately one beef piece with vegetables and gravy) contains:
- Calories: 285
- Protein: 32 grams (this is a significant amount of complete protein with all nine essential amino acids)
- Fat: 12 grams (mostly from the beef; the braising liquid captures very little added fat because you use minimal oil)
- Carbohydrates: 8 grams (entirely from vegetables; no added sugar)
- Fiber: 1.5 grams (from vegetables and mushrooms)
- Sodium: 410 milligrams (this assumes low-sodium broth; use full-sodium broth and this rises to about 580 mg)
The nutrition profile makes sense for a braised dish: it’s protein-forward, moderate in fat without being lean (which is important for satiety and flavor), and free of added sugars or processed ingredients. The gelatin from the collagen contributes structure and satisfaction without appearing as a separate nutrient. This is whole food cooking at its most honest.
Ingredients
Method
- Pat your beef pieces dry with paper towels. This is crucial—wet meat won't brown properly; it'll steam instead. Dry meat equals brown crust equals flavor. Once they're dry, season all sides evenly with salt and the optional garlic powder. I like to do this about five minutes before cooking so the salt can start breaking down the muscle fibers (dry brining begins immediately). Place your largest non-stick skillet over medium heat. Let it warm for two minutes—you want it genuinely hot before you add oil. This matters because cold pans mean slow browning, which means you lose moisture and color.

- Spray your hot skillet lightly with cooking spray. I use three short bursts, which gives you about one teaspoon of coverage. Add your beef pieces immediately—you should hear them sizzle. Do not move them for at least three minutes. That immobility is what creates the brown crust (a process called the Maillard reaction—the chemical change that creates new flavors). After three minutes, flip each piece and brown the other side for another three minutes. You're looking for a deep golden-brown color, almost amber. Some pieces will brown faster than others depending on thickness—that's normal. Once both sides are brown, transfer all beef to a clean plate. Don't worry about cooking it through; you're just getting color now.

- Your skillet should still have fond (those browned, stuck-on bits) from the beef. Don't wash it. Add your sliced onions and peppers directly to the hot skillet. You may notice a bit of sticking initially—that's the fond dissolving into your vegetables, and it's flavor gold. Sauté for about three minutes, stirring occasionally, until the onions begin to soften and the peppers brighten in color. If you're using mushrooms, add them now and stir everything together. Mushrooms release water, so you'll see the pan become slightly wetter—that's expected. Cook for another minute, letting the mushrooms release their liquid. The mushroom liquid is pure umami and goes into your braising liquid.

- Pour your beef broth into the skillet slowly, stirring gently as you pour. You'll see the fond fully dissolve into the liquid, turning it rich and brown. Then add the water. The combination should just barely cover your beef pieces when you nestle them back among the vegetables. Return your beef pieces to the skillet, arranging them so they're mostly submerged but not stacked on top of each other. Bring the whole thing to a boil—you'll see vigorous bubbling around the edges. This moment is important because it kills any surface bacteria and helps proteins fully denature. Once you see the boil, reduce your heat to low, cover the skillet with a lid (or foil if you don't have a lid), and let it simmer gently.

- This is where patience becomes your secret weapon. Let the beef braise undisturbed for about forty minutes to forty-five minutes. The gentle heat breaks down the collagen in the connective tissue, transforming it into gelatin. The vegetables soften completely and release their sugars into the braising liquid. There's virtually no active work here—just time. At the thirty-five minute mark, you can carefully lift the lid and check that your liquid is still gently simmering (tiny bubbles breaking the surface). If it's boiling vigorously, lower the heat slightly. If it's gone quiet, raise the heat just slightly. You want a bare simmer. To check for doneness at forty minutes, pierce a piece of beef with a fork. It should slide through with almost no resistance. If you feel firmness, give it another five minutes and check again.

- Once your beef is fork-tender, carefully transfer the pieces to a serving platter or shallow bowl. Tent them loosely with foil to keep them warm. Now we make the gravy magic happen. In a small bowl, whisk together your water and cornstarch until there are absolutely no lumps. This is your slurry, and lumps mean lumpy gravy. Place your skillet (with the braising liquid and vegetables still in it) over medium heat. Once the liquid comes back to a gentle simmer, slowly pour in your cornstarch slurry while stirring constantly with a wooden spoon. Constant stirring prevents lumps and ensures even thickening. You'll see the gravy go from thin and watery to thick and coat-the-spoon consistency. This usually takes sixty to ninety seconds. The gravy should look glossy and rich, with the vegetables distributed throughout. Taste it now and add a pinch of salt or pepper if needed. Pour this beautiful gravy over your beef and vegetables, letting it pool around everything.
Notes
FAQs
Can I use a different cut of beef for this recipe?
You can, with modifications. Beef chuck roast (larger pieces) works beautifully but needs sixty minutes instead of forty-five. Chuck eye roast is similar. Chuck steak (which is what this recipe calls for) is ideal because it’s already the right size. I’d avoid premium cuts like ribeye or filet mignon—they’re too expensive to braise, and their tenderness is wasted on a slow-cooking method. Save premium cuts for quick-cooking methods like pan-searing. If you want to explore other chuck preparations, my beef chuck thin sliced recipe shows how to approach the same cut from a different angle.
What if I don’t have beef broth? Can I use chicken or vegetable broth instead?
Chicken broth will work but tastes noticeably lighter—you’ll taste the chicken background instead of beef umami. Vegetable broth is even lighter. If you must substitute, increase either option by using ¾ cup broth plus ¼ cup water instead of ½ cup plus ¼ cup, and add a tablespoon of soy sauce (which contributes umami). This compensates somewhat for the missing beef depth. Ideally, beef broth is worth seeking out. Quality boxed beef broth is readily available and makes a real difference here.
How do I know when my beef is done without overcooking it?
Use the fork test: at forty minutes, pierce the thickest piece with a fork. If the fork slides through with virtually no resistance, it’s done. If you feel firmness, give it five more minutes. Don’t cut into the beef to check doneness—cutting releases juices that stay on your cutting board instead of in your gravy. The fork test is gentler and more reliable. Additionally, properly braised beef won’t become tough even if you cook it a few extra minutes, so don’t stress about precision here.
Can I make this in a slow cooker or Instant Pot instead of on the stovetop?
Absolutely. For slow cooker: brown your beef and vegetables on the stovetop (very important—don’t skip this), then transfer everything to your slow cooker with the broth and water. Cook on low for six to eight hours or high for three to four hours. The browning is essential because slow cookers can’t create the Maillard reaction that builds flavor. For Instant Pot: use the sauté function to brown beef and vegetables, then use the pressure-cooking function at high pressure for thirty minutes with natural release. Check for doneness and adjust if needed. Both methods work, but beef pasta crock pot recipes show how diverse the slow-cooking approach can be.
What’s the difference between braising on the stovetop versus in the oven?
The result is nearly identical; the method is about convenience. Stovetop braising requires occasional monitoring to ensure liquid stays at a gentle simmer (it’s easy to let it boil or reduce too much). Oven braising (at 325°F) provides steady, even heat that’s harder to mess up. For this recipe specifically, stovetop is faster and uses less energy. But if you’re cooking for a crowd or making a double batch, moving to the oven frees up your stovetop for sides and gives you more hands-on space.
My gravy separated or became greasy. What happened?
Separation usually means the temperature spiked too high when you added the cornstarch slurry, or you didn’t whisk it into cold water first. Greasiness means the beef released more fat than expected (this happens with fattier cuts), and you didn’t skim it before thickening. Next time, skim the surface with a spoon or use a fat separator pitcher before adding your cornstarch. If this happens mid-dish, transfer your gravy to a blender, add a tablespoon of ice-cold water, and blend briefly—this often reemulsifies separated gravy. It won’t be pretty, but it’ll work.
More Recipes for Your Table
- Beef Chuck Shoulder Steak Thin Recipe – A different take on the same cut, with thinner pieces and faster cooking for when you’re short on time
- Blade Beef Recipe – Another shoulder cut that works beautifully with braising techniques for variety in your weeknight rotation
- Apple Cider Cocktails – Perfect for warming beverages to serve alongside this beef during fall gatherings
Final Thoughts: Building Memories Around Food
That November dinner with my parents taught me something I carry into every recipe I develop: the best meals don’t come from technique perfection; they come from intention and presence. This beef shoulder steak recipe exists because I wanted to honor how my mom made people feel around the table without sacrificing the weeknight reality of modern life. You don’t need hours or complicated ingredients. You need forty-five minutes, one skillet, and the knowledge that gentle heat transforms humble meat into something worth lingering over.
I think about those dinners often when I’m testing recipes or advising clients. Someone once asked me why I focus so much on efficiency alongside flavor. The answer is simple: efficient cooking means you’re present for the moments that matter. You’re not stressed in the kitchen, so you can be genuinely engaged with the people around your table. Food is the vehicle; presence is the point.
When you make this beef shoulder steak for your family or friends, remember that you’re not just cooking dinner. You’re creating the memory they’ll return to someday—maybe years from now—when they smell braised beef and onions. You’re teaching them that good food doesn’t require stress or pretension. You’re showing them that technique matters but kindness matters more.
I hope this recipe becomes part of your regular rotation, that it carries you through weeknight chaos and improves your dinner parties, that it proves to you that beef shoulder steak is actually one of the most rewarding cuts you can cook. And whenever you make it, I’d love to
