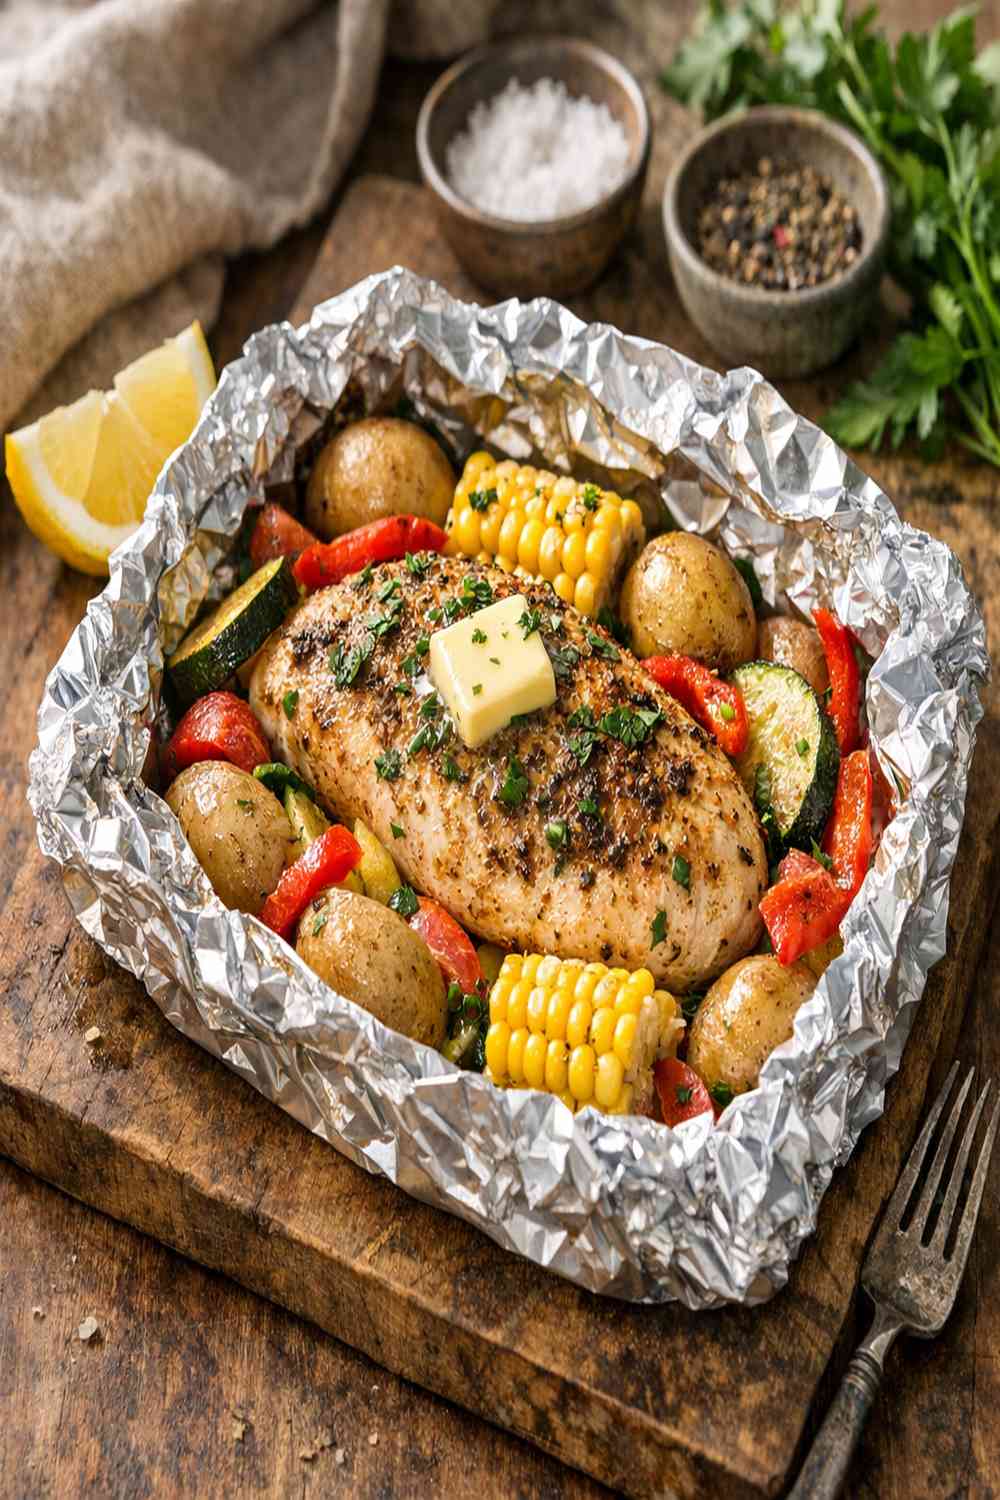
Chicken Foil Packet Recipe
This post contains affiliate links. As an Amazon Associate I earn from qualifying purchases.
I still remember the evening my mom gathered our family around the kitchen table after a particularly chaotic Thursday. She’d just discovered that cooking individual meals in foil packets meant everyone could customize their dinner without the chaos of plating. My younger brother wanted extra garlic. My dad loved the crispy edges. My sister insisted on lemon slices scattered throughout. That single meal taught me something profound: when food is packaged with intention and cooked together, it brings people closer, not further apart. Fast forward to my practice here in Fairfield, and I’ve watched countless families reclaim their dinner tables using this same technique. Today, I’m sharing how you can transform 30 minutes and a handful of wholesome ingredients into a meal that feels like a hug on a plate. These individual foil packets aren’t just practical—they’re an invitation to slow down and connect, even on nights when everything feels rushed. Let me show you why this method has become my go-to solution for nutrition-focused families seeking quick, satisfying proteins that don’t compromise on flavor.
Authentic Chicken Foil Packet Recipe: Why This Cooking Method Matters
When I first learned about en papillote cooking—the French culinary technique of steaming food in parchment or foil—I realized it represented something far more meaningful than just a cooking hack. This method dates back centuries to European kitchens where cooks understood that sealing ingredients together created their own microclimate, concentrating flavors and preserving nutrients that would otherwise escape through steam.
The beauty of foil packet cooking lies in its democratic approach to nutrition. As a registered dietitian, I see patients struggle with meal consistency because cooking methods vary so dramatically—pan-searing can dry out proteins, boiling leaches nutrients into water, but steaming inside a foil seal? It’s the goldilocks solution: proteins stay moist, vegetables retain their color and vitamins, and everything is infused with its own juices and aromatics.
What makes this approach authentically rooted in tradition is that it respects the whole-food philosophy. Nothing is added that doesn’t belong. No heavy creams or processed thickeners. Just clean protein, seasonal vegetables, healthy fat, and the alchemy that happens when you trap steam and flavor together.
The History and Cultural Significance of Chicken Foil Packet Recipe
The en papillote technique emerged from 18th-century French haute cuisine, where chefs sought ways to preserve delicate fish and poultry while concentrating their flavors. The method was revolutionary because it required minimal additional fat and allowed the natural moisture of ingredients to create their own sauce—a principle that aligned beautifully with later nutritional science.
But foil packet cooking as we know it today became a modern staple during the mid-20th century when aluminum foil became affordable and widely available in American households. Suddenly, home cooks could employ the same techniques as professional chefs without needing parchment paper or advanced culinary training. Camping families embraced it for outdoor cooking over fires. Busy parents appreciated how individual packets meant less cleanup and portion control for growing kids. It became democratized—taken from fine dining tables and placed directly into family kitchens.
In different cultures, this principle adapted beautifully. Latin American cooks wrapped ingredients in banana leaves. Asian cuisines used lotus leaves or bamboo. Each culture understood the same truth: sealing food during cooking creates an environment where nutrients are preserved, flavors intensify, and the dish becomes greater than the sum of its parts. Today, when I recommend this method to my clients in Fairfield, I’m honoring that cross-cultural wisdom while offering a practical solution to modern nutritional challenges.
What Makes an Authentic Chicken Foil Packet Recipe
Authenticity in this dish hinges on several non-negotiable principles that separate a mediocre foil packet from one that truly sings. First, you need proper sealing technique—not a casual fold but a methodical crimping that traps steam without allowing any escape. When moisture is contained, proteins cook gently through residual heat rather than direct oven exposure, resulting in tender chicken that maintains its juiciness.
Second, layering strategy matters deeply. The vegetables that take longest to cook (potatoes) go on the bottom where they receive the most heat. Delicate ingredients like lemon go on top, where they’re protected by the foil but still infuse everything with brightness. The chicken rests in the middle, acting as a insulating barrier that prevents overcooking while absorbing flavors from everything around it.
Finally, the fat component is essential—not for indulgence but for nutrient absorption and flavor distribution. The butter and olive oil aren’t just flavorings; they’re vehicles that help fat-soluble vitamins from vegetables become bioavailable to your body. This is why I never suggest reducing these elements, even for lower-calorie versions.
- Individual portioning – This method trains us toward proper portion control naturally. Each person gets exactly one breast and their own vegetable medley, eliminating the temptation to overserve that buffet-style cooking creates.
- Sealed steam environment – The foil creates a pressure cooker effect at home oven temperature, meaning faster cooking times while preserving nutrients that would leach away in boiling water.
- Flavor concentration through moisture retention – Nothing escapes. Every aromatic compound stays trapped, creating a sauce made entirely from the ingredients’ own essences—no reduction required.
- Customization without chaos – Unlike one-pan meals where everyone gets the same treatment, these packets allow individual preferences (extra garlic, hold the onion, more lemon) without additional work.
The Ingredients – Sourcing Quality Components
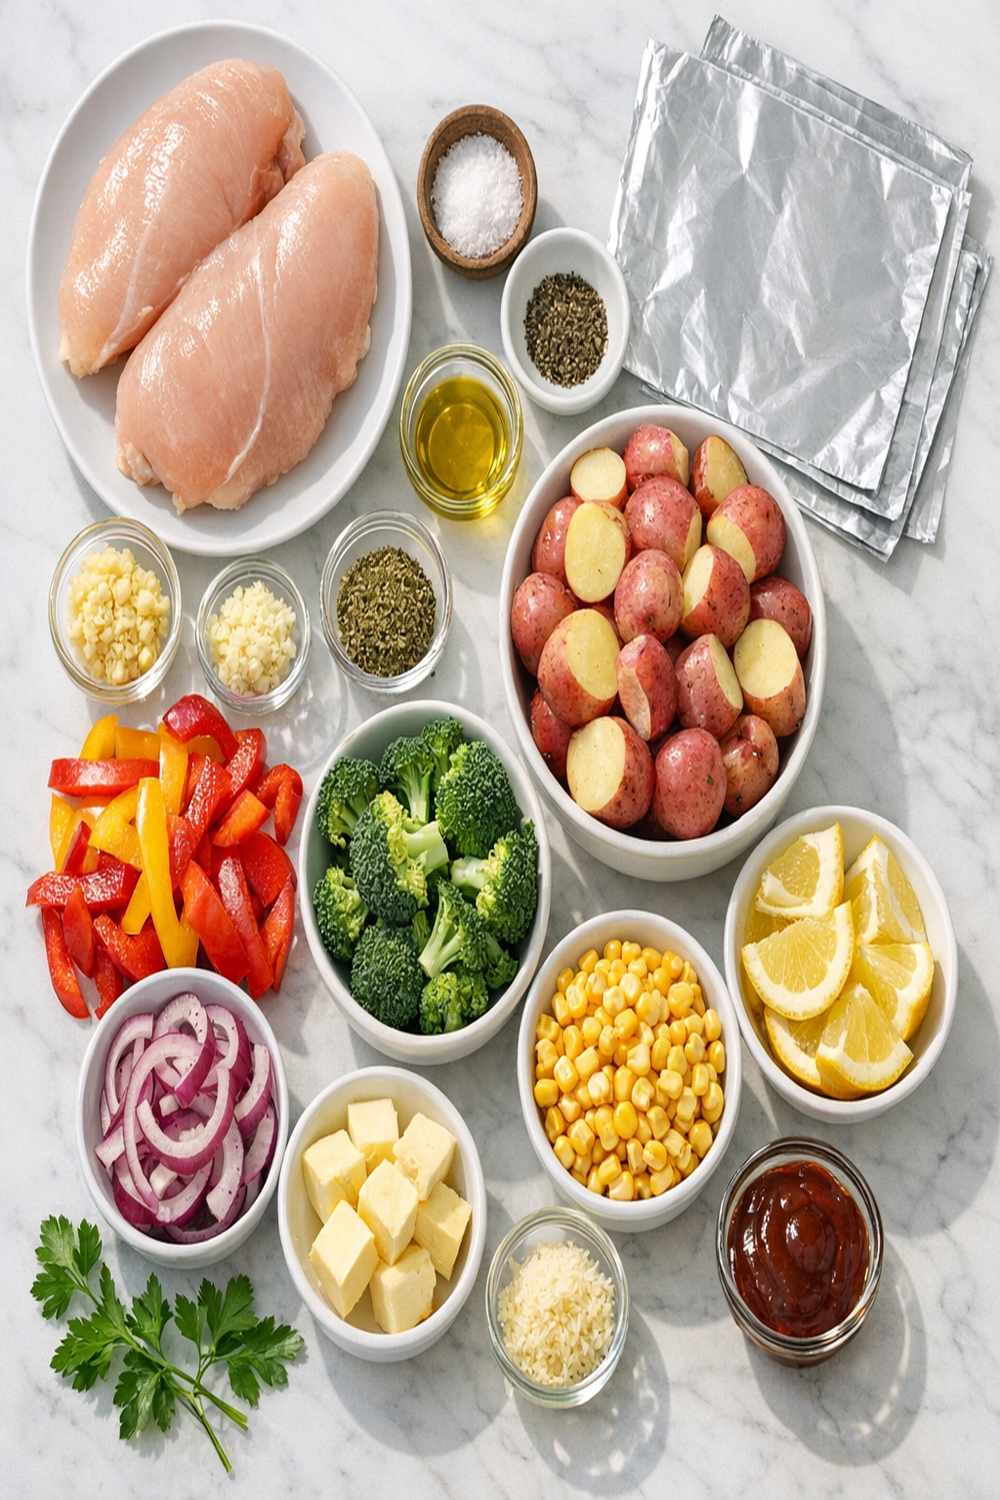
Finding quality ingredients for this recipe is straightforward because every component is a staple you likely already have. However, I’d encourage you to think intentionally about sourcing. Where I see this recipe shine is when each ingredient is the best version of itself—not fancy or expensive, but genuinely good quality and, when possible, sourced thoughtfully.
- ½ teaspoon paprika (divided; sweet paprika adds depth without heat, while smoked paprika would push toward different flavor territory)
- ¼ cup extra-virgin olive oil (this is where quality truly matters; a fruity, well-made olive oil adds complexity that cooking doesn’t diminish)
- 4 boneless, skinless chicken breasts (about 6-8 ounces each; look for birds raised without antibiotics when possible, as they tend to have better texture and flavor)
- 2 teaspoons Italian seasoning blend (divided; I prefer blends without salt added, so I can control sodium, and I look for recently dried herbs rather than dusty containers that have been sitting for years)
- 2 fresh lemons (sliced into thin rounds; Meyer lemons are sweeter and less acidic if you find them, but regular lemons work beautifully)
- 1 tablespoon fresh lemon zest (optional but recommended; the oils in zest add brightness that juice alone cannot deliver)
- 3 cloves garlic (minced finely; fresh garlic is non-negotiable here—it transforms from sharp to mellow and sweet when steamed)
- 1 large yellow onion (thinly sliced; the natural sugars caramelize slightly inside the packet, creating sweetness that balances the lemon)
- 1 pound baby potatoes (sliced into thin ¼-inch rounds; waxy varieties like Yukon Gold or red potatoes hold their shape better than starchy russets)
- 1 teaspoon kosher salt (divided, so approximately ¼ teaspoon per packet; kosher salt granules are larger, making it easier to gauge how much you’re using compared to table salt)
- ½ teaspoon ground black pepper (divided; freshly cracked is infinitely better than pre-ground, which loses volatile oils quickly)
- Fresh herbs for garnish like parsley or dill (about 3-4 tablespoons total; these are added after cooking to preserve their delicate flavor notes)
- 4 tablespoons unsalted butter (divided into 1-tablespoon portions; butter carries fat-soluble vitamins and creates richness without heaviness)
Ingredient notes: If you can’t find quality potatoes, waxy potatoes from farmers markets are usually superior to grocery store options. For chicken, I’d rather you buy one smaller package of quality bird than larger cheaper packages—your results will be noticeably better. Everything else is flexibly sourceable, though I do recommend tasting your olive oil before committing to it; if it tastes rancid or musty, start fresh.
The Traditional Method: How to Make Authentic Chicken Foil Packet Recipe
I approach making these foil packets as if I’m conducting an orchestra—each step builds on the last, and timing matters. The beauty is that once everything is assembled, the oven does the real work. You’re simply setting up the conditions for success, then stepping back to let the sealed environment work its magic.
Step 1: Prepare Your Work Station and Oven
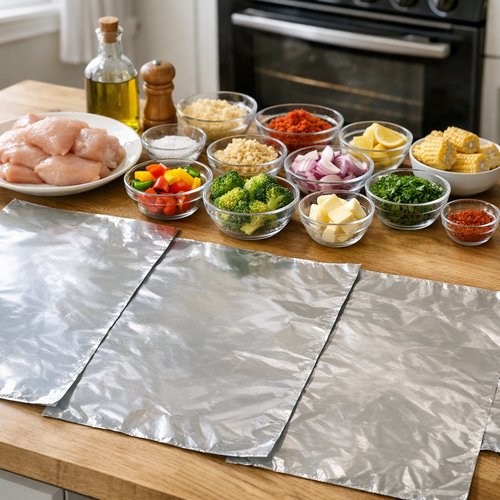
Start by preheating your oven to 375°F. This temperature is the sweet spot—hot enough to generate steam quickly and cook potatoes through in about 35 minutes, but not so scorching that the foil packets char or the chicken overcooks before vegetables reach tenderness. While your oven heats, gather four pieces of heavy-duty aluminum foil, each cut to roughly 12 x 18 inches. Heavy-duty matters here; regular foil can tear during the crimping process.
Arrange your work surface with the foil sheets laid out. This is where organization truly pays dividends. Have all your ingredients prepped and measured before you start assembling, because once you begin, you’ll want to move efficiently and get packets into the oven while everything is fresh.
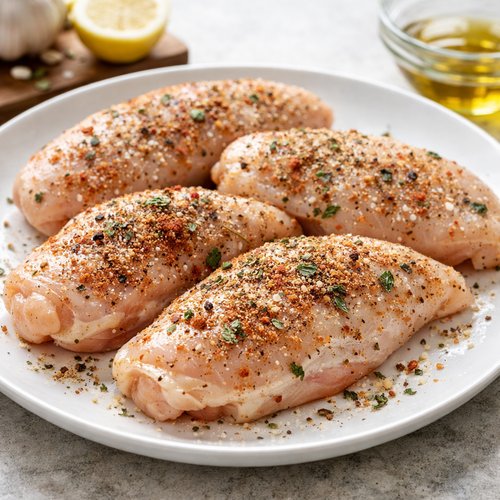
Step 2: Season Your Chicken with Care and Intention
Take your four chicken breasts and pat them completely dry with paper towels. Moisture on the surface interferes with seasoning adhesion, and I want those herbs to cling to your protein. On a small plate, combine ½ teaspoon kosher salt, ¼ teaspoon freshly cracked black pepper, ¼ teaspoon paprika, and 1 teaspoon of the Italian seasoning blend.
Season both sides of each chicken breast evenly, using about one-quarter of your spice mixture per breast. Place seasoned breasts on a separate clean plate. This isn’t just about flavor—it’s about priming the protein to absorb the aromatics and fats it will encounter. The salt begins breaking down muscle proteins, which helps them retain moisture during cooking. This is textbook food science supporting tradition.
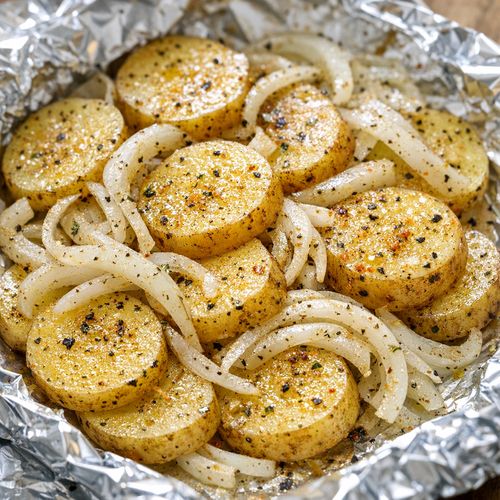
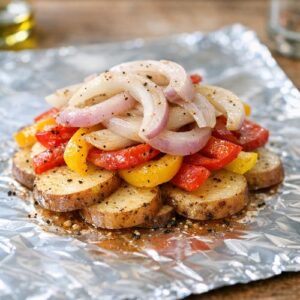
Step 3: Build Your Vegetable Base with Strategic Layering
In a large mixing bowl, combine your thinly sliced potatoes, sliced onion, and minced garlic. This is your foundational layer—the one that will cook longest and benefit most from direct heat exposure. Drizzle the vegetables with ¼ cup of your extra-virgin olive oil, then sprinkle with the remaining 1 teaspoon Italian seasoning, ¾ teaspoon salt, ¼ teaspoon pepper, and ¼ teaspoon paprika.
Toss everything gently but thoroughly, ensuring every potato slice and onion strand gets coated with oil and seasoning. This distribution step is crucial. Unevenly seasoned packets result in some bites tasting bland while others taste overseasoned. Spend the extra 30 seconds making sure your vegetables are uniformly treated.
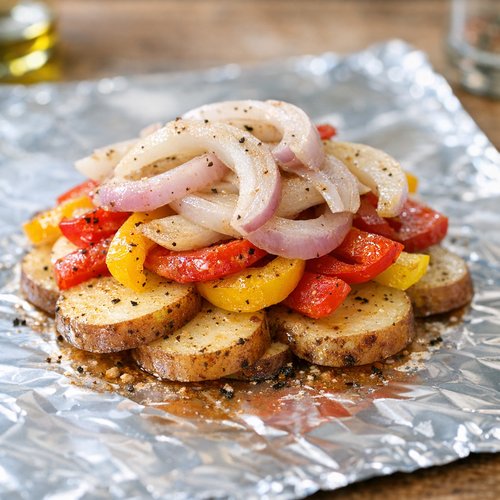
Step 4: Assemble Your First Foil Packet Layer by Layer
Take one piece of foil and lay it flat on your work surface. Spray the center matte side lightly with nonstick cooking spray—this prevents sticking without adding unwanted ingredients. Divide your vegetable mixture into four equal portions and place one portion in the center of each foil sheet, creating a rough rectangle about the size of your chicken breast.
This vegetable layer is your foundation. It’s sitting directly on the foil, which will conduct heat upward. The vegetables on the bottom will caramelize slightly where they touch the hot foil surface, while those in the middle steam gently. The layering creates textural variety—some crispy edges, some tender centers.
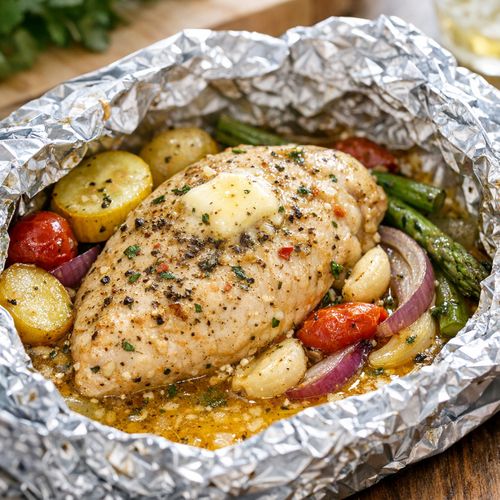
Step 5: Nestle Your Protein Among the Aromatics
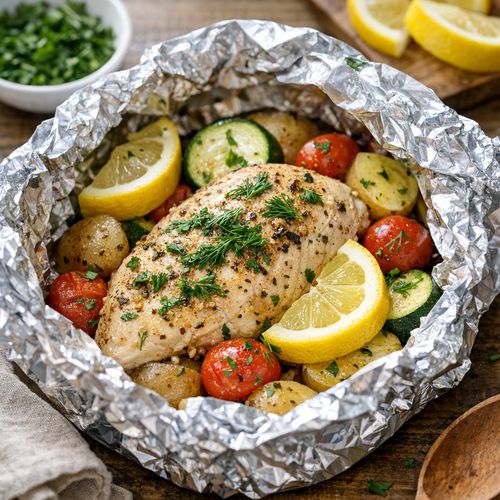
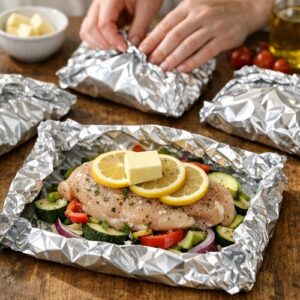
Now place one seasoned chicken breast directly on top of the vegetable mixture. The protein acts as an insulating layer, protecting vegetables below from extreme heat while cooking through its own residual warmth. Arrange 3-4 lemon slices on top of the chicken, and top with 1 tablespoon of unsalted butter cut into small pieces.
This butter-lemon combination is essential. As heat builds inside the sealed packet, the butter melts and mixes with the chicken’s natural juices, creating a sauce that’s entirely derived from the ingredients present. The lemon juice infuses everything with brightness and helps denature proteins gently. This is how you get restaurant-quality results from a home oven.
Step 6: Seal Your Packet with Precision
This is the step that separates successful foil packet cooking from disappointing attempts. Start by folding the left and right sides of your foil toward the center, overlapping them slightly above the chicken. This creates your initial seal. Now, here’s where precision matters: fold the seam down toward the chicken, creasing firmly. You’re not just folding; you’re crimping, creating a seal that’s tight enough to trap steam but deliberate enough that it won’t accidentally unfold during cooking.
Next, fold the top edge of foil down toward the chicken, creasing firmly. Finally, fold the bottom edge up, creating a complete seal. Some people worry this is overcomplicated, but remember: that seal is what creates the entire cooking environment. A loose fold means steam escapes and you’re essentially baking rather than steaming.
Repeat this process with your remaining three packets, using one-quarter of your vegetables, one chicken breast, 3-4 lemon slices, and 1 tablespoon butter per packet. Before you place them in the oven, double-check each seal by gently trying to pry the foil apart with your finger. If it opens easily, re-seal it.

Step 7: Bake Until Vegetables Are Tender and Chicken Is Cooked Through
Place all four sealed packets on a sheet pan (this catches any potential leaks and makes transport easier). Transfer to your preheated 375°F oven and bake for 35 minutes. This timeframe is based on the thickness of standard 6-8 ounce chicken breasts and ¼-inch potato slices. If your breasts are particularly thick or your potatoes are cut thicker, add 5 minutes.
You’ll know they’re done when you carefully open one packet (using oven mitts and being cautious of the steam) and find that the chicken registers 165°F internally using an instant-read thermometer, and the potatoes are fork-tender with no resistance at the center.

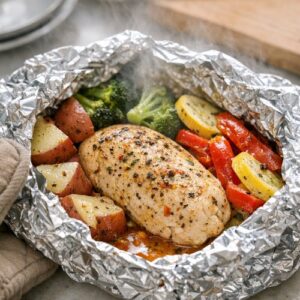
Step 8: Rest and Garnish with Fresh Finishing Touches
Remove the sheet pan from the oven and let packets rest for 3-5 minutes. This isn’t just for safety from steam burns—it allows proteins to continue cooking gently from residual heat while reabsorbing their own juices. If you open a packet immediately, those juices run out onto the plate instead of staying in the chicken where they belong.
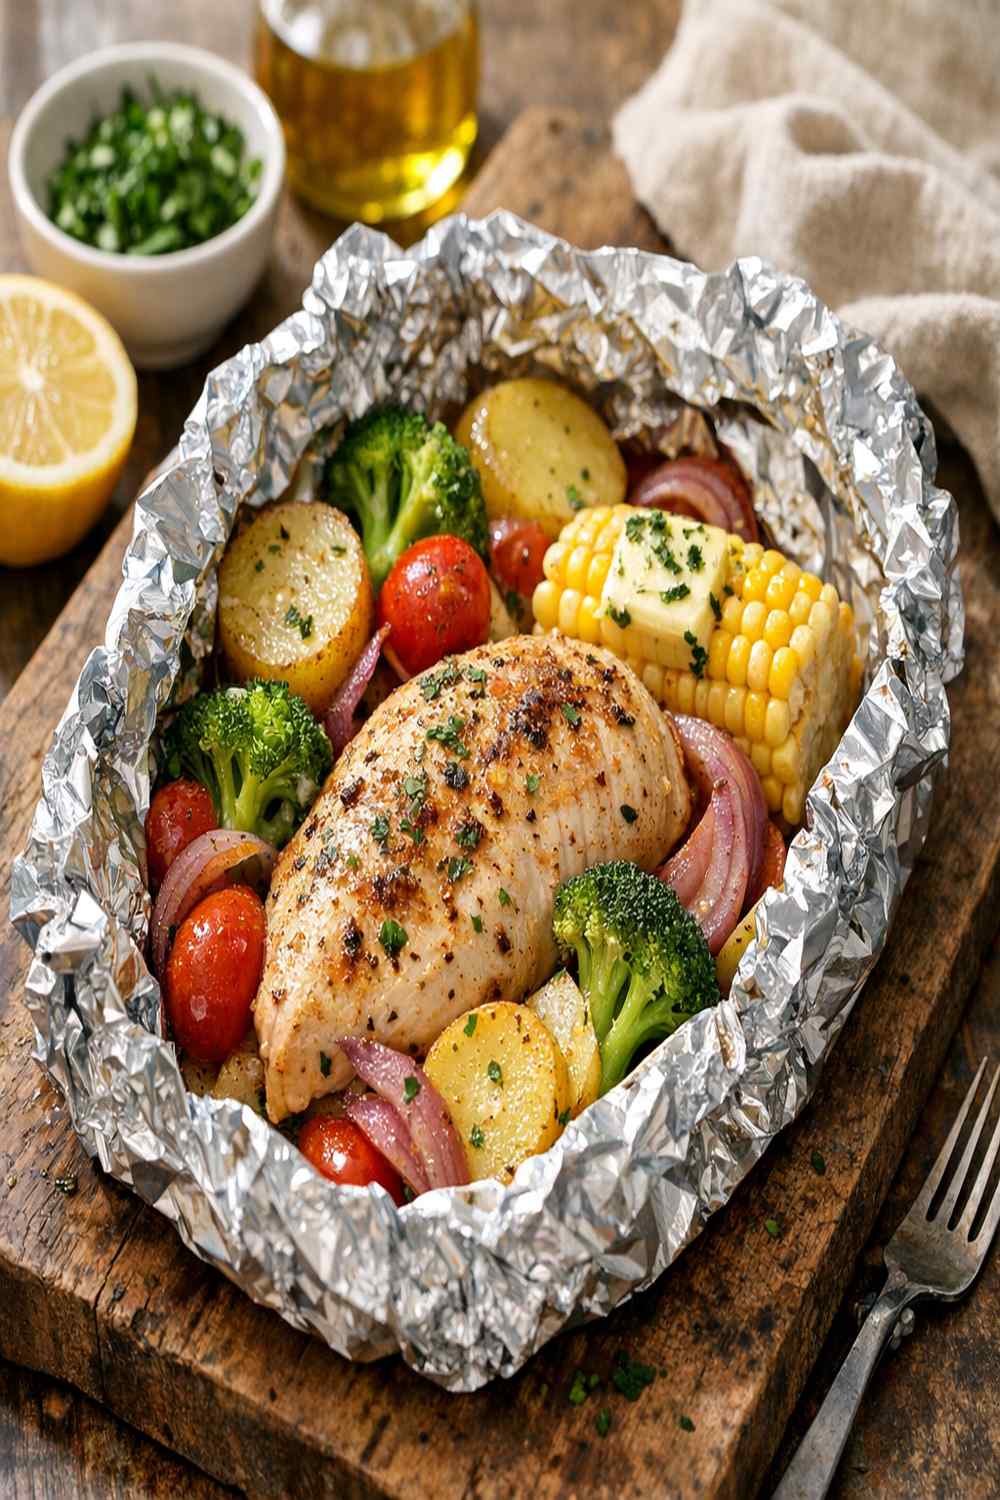
Carefully open each packet (again, watch for steam), and if desired, garnish with fresh herbs—parsley or dill work beautifully—and any additional lemon zest you reserved. These fresh garnishes add brightness and visual appeal that elevates the entire presentation from “dinner” to “something special.”
Regional Variations Around the World
- Mediterranean Approach – Swap potatoes for zucchini and eggplant, add Kalamata olives and feta cheese, use oregano instead of Italian seasoning, and finish with fresh mint. This variation emphasizes vegetables over starch and incorporates briny, sharp elements that Greek cuisine celebrates. The cooking time remains the same because you’re still working with tender vegetables.
- Asian-Inspired Method – Replace potatoes with thin-sliced carrots and snap peas, use garlic and ginger rather than Italian seasonings, add a drizzle of low-sodium soy sauce and sesame oil instead of (or in addition to) butter, and finish with fresh cilantro and sesame seeds. Some Asian cooks traditionally use parchment or banana leaves, but foil works beautifully. The flavor profile becomes lighter and more herbaceous.
- Latin American Variation – Include diced sweet potatoes alongside regular potatoes, add sliced bell peppers, cumin and chili powder instead of Italian seasoning, fresh lime juice instead of lemon, and finish with fresh cilantro and avocado slices. Some cooks add black beans between the potato layer and chicken. This version celebrates the warm spices that Latin American cuisines treasure and results in slightly warmer, more complex flavor notes.
- French Country Style – Add mushrooms and pearl onions to your potato base, use Herbes de Provence seasoning, include white wine or dry vermouth along with the butter, and finish with a pinch of Dijon mustard folded into any pan juices. This version feels more refined and restaurant-like, honoring the en papillote technique’s French origins while remaining entirely achievable at home.
Traditional Serving Customs
Foil packet meals honor a dinner custom that’s becoming increasingly rare: everyone eats at the same time, from their own individual plate, with minimal passed dishes or complicated plating. This communal aspect is actually deeply rooted in tradition, even though foil packets are a modern execution.
I recommend serving these packets directly on plates—the foil becomes part of the presentation, warm and functional. Your guests open their own packets tableside, which creates a moment of anticipation and involvement. That steam rising from an individual sealed packet is theater; it makes the meal feel special without requiring fancy presentation techniques.
Traditionally, foil packets are served simply. The vegetables and proteins are meant to shine, so I avoid heavy sauces or complicated sides. Instead, pair them with something equally straightforward: crusty bread to soak up juices, a simple green salad with lemon vinaigrette, or roasted broccoli with minimal sauce to add textural contrast. The meal becomes about the quality of individual components rather than the complexity of preparation.
In some families, opening the foil packet becomes a ritual—something kids look forward to, something that slows down eating just enough to encourage conversation. That’s the real tradition worth honoring: food that brings people together because it’s special enough to deserve attention but practical enough to fit into real life.
Can I Store Chicken Foil Packet Recipe?
Yes, and this is where the practical magic of foil packets really shines for meal planning. Once cooked and cooled completely, you can store the entire packet sealed in the refrigerator for up to 3-4 days. The foil actually extends shelf life slightly because it provides an additional barrier against oxidation and moisture loss.
To reheat, I recommend removing the foil packet and transferring contents to an oven-safe dish, then reheating at 350°F for about 10-12 minutes until warmed through. You can also microwave in a covered dish for 2-3 minutes, though the microwave won’t re-crisp any vegetable edges. I don’t recommend reheating in the original foil in the microwave, as the foil can damage the microwave.
For freezing, here’s what I’ve found works: cool the entire packet completely, wrap it once more in plastic wrap for additional protection, then label with the date and contents. Frozen packets keep for up to 2 months. To cook from frozen, add 10-15 additional minutes to your baking time, or thaw overnight in the refrigerator first, then follow original cooking instructions.
Raw assembly and freezing is also possible—prepare packets without cooking, freeze them, then bake directly from frozen by adding about 15 additional minutes to cooking time. This makes foil packets exceptional for meal prep: prepare four packets on a Sunday and cook them individually throughout the week.
Expert’s Nutritional Tip: Why This Recipe Works So Well for Health-Conscious Eating
As a registered dietitian, I genuinely love recommending this recipe because it represents what evidence-based nutrition actually looks like. You’ve got about 35-40 grams of high-quality protein per packet (from the chicken), which research consistently shows supports satiety and muscle maintenance. You have complex carbohydrates from potatoes (about 25-30 grams, depending on portion), which provide sustained energy without blood sugar spikes.
The vegetables contribute roughly 5-7 grams of fiber per packet, plus micronutrients like potassium (especially from potatoes), vitamin C (from the lemon and onion), and various phytonutrients from the herbs. The fat from butter and olive oil—about 18-22 grams per packet—isn’t an indulgence; it’s a necessity for nutrient absorption and satiety.
What makes this nutritionally superior to many weeknight dinners is that nothing here is processed, nothing is added for shelf stability, and portion control happens naturally through individual packets. You’re not tempted to take thirds because you can’t—your packet is finite. This kind of built-in portion control is incredibly valuable for people trying to maintain healthy weights without obsessing over calories.
Make-Ahead Guide: Meal Prep Strategy for Busy Weeks
Here’s how I recommend prepping these packets for a full work week: On Sunday evening, prep all your ingredients. Slice potatoes and onions, mince garlic, and slice lemons. Store vegetables separately in airtight containers in your refrigerator. Pat your chicken breasts dry and store them in their own container.
Each evening, assembly takes approximately 10 minutes. Pull out one foil sheet, assemble your packet, and pop it into an oven preheated to 375°F. By the time you’ve changed clothes and settled in, 35 minutes have passed and dinner is ready. This approach eliminates the stress of “what’s for dinner” while maintaining the freshness that comes from cooking complete proteins daily rather than storing them cooked for days.
Alternatively, if you want true set-it-and-forget-it convenience, assemble all four packets Sunday evening and refrigerate them on a sheet pan, covered loosely with plastic wrap. They’ll keep up to 24 hours before cooking. When you’re ready to cook, there’s no thawing needed—just straight from the refrigerator into the preheated oven, adding maybe 2-3 minutes to cooking time since they start cold.
For frozen packets (best made on a Sunday to eat throughout the month), assemble raw packets, label them clearly with cooking instructions, and layer them between parchment paper in a freezer-safe container so they don’t stick together. Cook directly from frozen: simply add 15 minutes to your cooking time and check that the chicken registers 165°F before serving.
Common Mistakes to Avoid
Mistake #1: Leaving foil packets too loose. I see this constantly—people who think a casual fold is enough. Then halfway through cooking, steam escapes and suddenly you’re no longer steaming; you’re baking. Take the 30 seconds to properly crimp your seals. Press firmly. Really commit to that fold.
Mistake #2: Cutting vegetables too thick. If your potato slices are thicker than ¼ inch, they won’t cook through in 35 minutes, and you’ll end up with done chicken and crunchy potatoes. Uniform thinness matters enormously. I use a mandoline for consistency, which takes away the guesswork.
Mistake #3: Overcrowding the packet. I understand the temptation to pile vegetables high and add more of everything. But overcrowded packets cook unevenly because heat can’t penetrate properly. Your vegetable layer should be relatively thin, with chicken sitting on top, not buried underneath two inches of potatoes. The architecture matters.
Mistake #4: Using wet chicken. If your chicken breasts haven’t been patted completely dry before seasoning, the seasonings won’t adhere properly. You also introduce excess moisture into the packet, which can make the final result steamed rather than properly cooked. Pat your protein thoroughly.
Seasonal Variations: Adapting This Recipe Throughout the Year
Spring Version: Replace potatoes with fingerling potatoes, add fresh asparagus spears, include fresh dill instead of Italian seasoning, and use fresh tarragon if you can find it. The result is lighter and more herbaceous, celebrating spring’s brightness. Add fresh peas if they’re in season. Cooking time remains the same since you’re working with similarly tender vegetables.
Summer Approach: Reduce potatoes to half the amount and add zucchini, yellow squash, and bell peppers. Use fresh basil in place of some Italian seasoning, and add halved cherry tomatoes on top of the chicken. The flavor becomes more Mediterranean and vegetable-forward. Cooking time drops to about 30 minutes since summer vegetables cook faster than potatoes.
Fall Execution: Include sweet potato alongside regular potato, add diced butternut squash, use sage instead of (or in addition to) Italian seasoning, and finish with fresh thyme. These warm, earthier flavors celebrate autumn ingredients. You might add 5 minutes to cooking time because butternut squash needs slightly longer than regular potatoes.
Winter Method: Stick closer to the original recipe with regular potatoes, but add shredded root vegetables like parsnips or carrots, use rosemary in addition to Italian seasoning, and include a small amount of aged garlic or roasted garlic. The flavors become deeper and more complex. Winter vegetables cook at similar rates to potatoes, so timing remains consistent.
Nutrition Information
Per foil packet (based on USDA nutrition database calculations for this recipe as written, with standard assumptions about ingredient weights):
- Calories: 485-510
- Protein: 38-42 grams
- Carbohydrates: 28-32 grams
- Dietary Fiber: 5-6 grams
- Total Fat: 20-24 grams (saturated fat: 6-8 grams)
- Sodium: 420-480 milligrams
This nutritional profile aligns beautifully with evidence-based dietary recommendations. The 35-40% of calories from protein supports lean body mass maintenance. The 50-55% of calories from carbohydrates comes entirely from whole-food sources with genuine fiber content, which research shows improves cardiovascular health markers compared to refined carbohydrates. The remaining 35-40% from fat includes monounsaturated fat from olive oil, which numerous large-scale studies (including the Mediterranean diet research) associate with improved cholesterol profiles and reduced inflammation.
For context, this single packet provides roughly 15-18% of daily sodium needs (assuming a 2,300 mg recommendation), which leaves room for other meals and seasonings without exceeding healthy sodium intake. It meets about 15% of daily potassium needs from the potatoes alone, supporting bone health and blood pressure regulation. The vitamin C from lemon and onions aids iron absorption from the chicken, making this a metabolically efficient meal.
What Can I Serve With Chicken Foil Packet Recipe?
The beauty of a complete foil packet meal is that it’s genuinely self-contained—vegetables, protein, and starch all in one place. However, complementary sides can enhance the experience without burdening you with additional cooking.
A simple green salad with lemon vinaigrette makes an elegant addition. The acidity complements the buttery richness of the packets while the greens provide additional fiber and micronutrients. Toss mixed greens (arugula, spinach, romaine) with olive oil, fresh lemon juice, Dijon mustard, and minced shallots. This adds brightness without heaviness.
Crusty bread is always appropriate, serving the practical purpose of soaking up the incredible pan juices inside each packet. Look for artisanal sourdough or a simple baguette from a local bakery. Whole grain options add additional fiber and nutrients. Warm bread straight from the oven or toaster pairs beautifully with the buttery, herbed chicken.
For an additional vegetable side, consider grain-based preparations like a simple quinoa salad with fresh herbs, or roasted Brussels sprouts with minimal seasoning since your main course is already well-seasoned. Steamed broccoli with lemon zest offers familiar comfort without competing with your main.
- Simple Green Salad – Traditional accompaniment that cuts richness without adding heaviness; the acidity enhances rather than overwhelms
- Crusty Bread – Practical and comforting; makes use of all those incredible pan juices that would otherwise be left on the plate
- Roasted or Steamed Vegetables – Choose something with different texture from the steamed vegetables in your packet; roasted Brussels sprouts or broccoli add textural contrast
- Grain-Based Sides – If you prefer more substantial meals, quinoa salad or rice pilaf complements without stealing focus
Ingredients
Method
- Start by preheating your oven to 375°F. This temperature is the sweet spot—hot enough to generate steam quickly and cook potatoes through in about 35 minutes, but not so scorching that the foil packets char or the chicken overcooks before vegetables reach tenderness. While your oven heats, gather four pieces of heavy-duty aluminum foil, each cut to roughly 12 x 18 inches. Heavy-duty matters here; regular foil can tear during the crimping process. Arrange your work surface with the foil sheets laid out. This is where organization truly pays dividends. Have all your ingredients prepped and measured before you start assembling, because once you begin, you'll want to move efficiently and get packets into the oven while everything is fresh.

- Take your four chicken breasts and pat them completely dry with paper towels. Moisture on the surface interferes with seasoning adhesion, and I want those herbs to cling to your protein. On a small plate, combine ½ teaspoon kosher salt, ¼ teaspoon freshly cracked black pepper, ¼ teaspoon paprika, and 1 teaspoon of the Italian seasoning blend. Season both sides of each chicken breast evenly, using about one-quarter of your spice mixture per breast. Place seasoned breasts on a separate clean plate. This isn't just about flavor—it's about priming the protein to absorb the aromatics and fats it will encounter. The salt begins breaking down muscle proteins, which helps them retain moisture during cooking. This is textbook food science supporting tradition.

- In a large mixing bowl, combine your thinly sliced potatoes, sliced onion, and minced garlic. This is your foundational layer—the one that will cook longest and benefit most from direct heat exposure. Drizzle the vegetables with ¼ cup of your extra-virgin olive oil, then sprinkle with the remaining 1 teaspoon Italian seasoning, ¾ teaspoon salt, ¼ teaspoon pepper, and ¼ teaspoon paprika. Toss everything gently but thoroughly, ensuring every potato slice and onion strand gets coated with oil and seasoning. This distribution step is crucial. Unevenly seasoned packets result in some bites tasting bland while others taste overseasoned. Spend the extra 30 seconds making sure your vegetables are uniformly treated.

- Take one piece of foil and lay it flat on your work surface. Spray the center matte side lightly with nonstick cooking spray—this prevents sticking without adding unwanted ingredients. Divide your vegetable mixture into four equal portions and place one portion in the center of each foil sheet, creating a rough rectangle about the size of your chicken breast. This vegetable layer is your foundation. It's sitting directly on the foil, which will conduct heat upward. The vegetables on the bottom will caramelize slightly where they touch the hot foil surface, while those in the middle steam gently. The layering creates textural variety—some crispy edges, some tender centers.
- Now place one seasoned chicken breast directly on top of the vegetable mixture. The protein acts as an insulating layer, protecting vegetables below from extreme heat while cooking through its own residual warmth. Arrange 3-4 lemon slices on top of the chicken, and top with 1 tablespoon of unsalted butter cut into small pieces. This butter-lemon combination is essential. As heat builds inside the sealed packet, the butter melts and mixes with the chicken's natural juices, creating a sauce that's entirely derived from the ingredients present. The lemon juice infuses everything with brightness and helps denature proteins gently. This is how you get restaurant-quality results from a home oven.

- This is the step that separates successful foil packet cooking from disappointing attempts. Start by folding the left and right sides of your foil toward the center, overlapping them slightly above the chicken. This creates your initial seal. Now, here's where precision matters: fold the seam down toward the chicken, creasing firmly. You're not just folding; you're crimping, creating a seal that's tight enough to trap steam but deliberate enough that it won't accidentally unfold during cooking. Next, fold the top edge of foil down toward the chicken, creasing firmly. Finally, fold the bottom edge up, creating a complete seal. Some people worry this is overcomplicated, but remember: that seal is what creates the entire cooking environment. A loose fold means steam escapes and you're essentially baking rather than steaming. Repeat this process with your remaining three packets, using one-quarter of your vegetables, one chicken breast, 3-4 lemon slices, and 1 tablespoon butter per packet. Before you place them in the oven, double-check each seal by gently trying to pry the foil apart with your finger. If it opens easily, re-seal it.
- Place all four sealed packets on a sheet pan (this catches any potential leaks and makes transport easier). Transfer to your preheated 375°F oven and bake for 35 minutes. This timeframe is based on the thickness of standard 6-8 ounce chicken breasts and ¼-inch potato slices. If your breasts are particularly thick or your potatoes are cut thicker, add 5 minutes. You'll know they're done when you carefully open one packet (using oven mitts and being cautious of the steam) and find that the chicken registers 165°F internally using an instant-read thermometer, and the potatoes are fork-tender with no resistance at the center.
- Remove the sheet pan from the oven and let packets rest for 3-5 minutes. This isn't just for safety from steam burns—it allows proteins to continue cooking gently from residual heat while reabsorbing their own juices. If you open a packet immediately, those juices run out onto the plate instead of staying in the chicken where they belong. Carefully open each packet (again, watch for steam), and if desired, garnish with fresh herbs—parsley or dill work beautifully—and any additional lemon zest you reserved. These fresh garnishes add brightness and visual appeal that elevates the entire presentation from "dinner" to "something special."

FAQs
Can I cook these foil packets on a grill instead of in the oven?
Absolutely, and many people prefer the slightly smoky flavor that grill cooking imparts. Preheat your grill to medium heat (about 375-400°F, which is slightly hotter than oven temperature since some heat escapes). Place sealed foil packets directly on the grill grates and cook for 30-35 minutes, rotating packets halfway through to ensure even cooking.
Can I use bone-in, skin-on chicken thighs instead of boneless, skinless breasts?
Absolutely, and many would argue this improves the dish. Thighs have more fat content, which keeps them juicier during cooking, and they’re forgiving if you exceed 35 minutes slightly. You’ll need to increase cooking time to 40-45 minutes since thighs are thicker. Remove the skin before eating if you’re watching saturated fat intake, or leave it on for extra flavor and satisfaction. The cooking method is identical—foil packet magic works beautifully with thighs.
What if I don’t have Italian seasoning at home?
You can substitute with a combination of dried oregano (1 teaspoon), dried basil (½ teaspoon), and dried thyme (½ teaspoon) to equal 2 teaspoons. Or simply use fresh herbs—double the amount since fresh herbs are milder than dried. Fresh rosemary, thyme, and basil all work beautifully. Fresh garlic also becomes more pronounced, so reduce from 2 cloves to 1½ cloves if using all fresh herbs, or you might overpower the chicken.
Can I assemble these packets ahead for a camping trip or outdoor cooking?
Yes, this is one of my favorite camping meals. Assemble packets completely (through Step 5) the night before. Transport them in a large container or cooler. At your campsite, seal them with foil and cook over medium-hot coals or on a grill grate at about 375°F. The cooking time might extend to 40-45 minutes depending on your heat source’s consistency, but the method works perfectly. Just ensure your foil is heavy-duty and handles the rougher heat of campfire cooking.
Is there a dairy-free version since I’m lactose intolerant?
Definitely. Replace the 4 tablespoons of unsalted butter with equal amounts of high-quality olive oil or ghee (which is butter with milk solids removed, making it lactose-free). Your sauce will be slightly lighter in richness—not bad, just different. Some clients use avocado oil for a slightly different flavor profile. The dish remains absolutely delicious; you’re simply adjusting the fat source. The cooking time and temperature don’t change.
Can I double this recipe to serve eight people?
Absolutely. Simply double every ingredient and prepare eight foil packets instead of four. Arrange them on two sheet pans, rotating the pans halfway through baking to ensure even cooking. Total baking time remains 35 minutes since each packet is individual. This makes it perfect for hosting without spending hours in the kitchen—I’ve used this exact approach for dinner parties multiple times.
Why does my chicken sometimes come out slightly tough even when it reaches 165°F?
More Recipes You Will Love
- This Easy Chicken Dinner – Worth adding to your recipe collection.
This usually happens when chicken breasts are very thick—over an inch—and the foil packet isn’t creating proper steam circulation. Pound your chicken breasts to a uniform ¾-inch thickness before seasoning. If you can’t pound them, simply increase cooking time by 5 minutes. Alternatively, this is where thighs truly excel—they’re more forgiving and difficult to overcook because their fat content prevents drying out even if you exceed the time slightly.
