Chicken Ranch Wrap Recipe
This post contains affiliate links. As an Amazon Associate I earn from qualifying purchases.
Getting kids to eat a satisfying lunch or dinner feels impossible—until you try this approach. I learned this lesson during chaotic weeknights when my family needed something fast, nutritious, and actually delicious. That’s when chicken ranch wraps became our secret weapon. These aren’t your average lunch box fillers; they’re crispy, golden pockets of flavor that even the pickiest eaters at my table devour without complaint. If you’re looking for recipes that bridge the gap between what kids want to eat and what parents know they need, I’ve got you covered. Check out my Breakfast Wraps With Eggs Recipe for another wrap-based winner your family will request again and again.
Chicken Ranch Wrap Recipe the Whole Family Will Actually Eat (Picky Eaters Included)
I’ll never forget Tuesday night last spring when my youngest declared she was “never eating chicken again.” My heart sank. Then I made these wraps. She watched the cheese melt slightly as I pan-seared them, caught the aroma of toasted tortillas, and asked for seconds before I’d even finished plating. Her older brother added hot sauce to his; their dad stuck with the classic version. That’s when it clicked for me—this recipe succeeds because it’s infinitely customizable while still tasting cohesive and restaurant-quality. Everyone at the table gets to eat something they genuinely love, and I get to serve a meal I know meets their nutritional needs.
As a registered dietitian, I see families struggle with the same tension: creating meals that satisfy multiple palates without cooking three different dinners. These wraps solve that problem. The crispy exterior appeals to kids who love texture, the creamy ranch satisfies those seeking familiar flavors, and the grilled presentation feels special enough that picky eaters perceive it as a “real” meal rather than something Mom threw together.
Why Kids Love This Version
This recipe works with kids’ neurobiology and psychology, not against it. Children are naturally drawn to foods they can see, touch, and partially control. Wraps check every box on that list.
- Crispy, Golden Exterior – Texture is everything to developing palates. The pan-seared tortilla shell creates a satisfying crunch that masks the softer fillings inside, giving kids the textural contrast they crave without any trickery.
- Familiar Flavors Presented Differently – Ranch dressing appears in nearly every kid’s approved foods list. By building a wrap around it rather than serving it as a dip, you’re presenting something “new” that tastes safely predictable.
- Visible Ingredients – Unlike casseroles or mixed dishes, kids can see exactly what’s inside their wrap. This transparency builds trust with suspicious eaters who’ve learned to inspect their food before committing.
- Hand-Held Ease – Wraps are portable confidence builders. Kids can hold, rotate, and nibble at their own pace, which gives them autonomy over the eating experience.
How to Get Kids Involved in Making This
One of my favorite aspects of this recipe is how naturally it invites kitchen help. Every age can contribute meaningfully, making the final product taste even better because they had a hand in creating it.
- Ages 3-5: The Seasoning Sprinkler – Let toddlers shake pre-measured spices onto the cooked chicken (with your hands guiding theirs). They feel like “real chefs,” and you maintain portion control. This is also a sensory-friendly task that builds comfort around different flavors.
- Ages 6-9: The Assembly Line Manager – School-age kids can measure and place each component into tortillas: 2 tablespoons cheese here, 1 tablespoon ranch there. Give them a small spoon for the ranch to prevent overfilling. This teaches portion awareness and following sequences—skills that transfer directly to math and reading.
- Ages 10+: The Pan Operator – With direct supervision and clear safety guidelines, older kids can help monitor the griddle. Always supervise heat-based tasks closely, but walking them through temperature management and golden-brown assessment builds real cooking confidence. They’re learning actual technical skills they’ll use for decades.
The Ingredients – Hidden Nutrition, Visible Deliciousness
I’ve stripped this recipe down to essentials that deliver maximum nutrition without complexity. The chicken provides lean protein crucial for growing bodies, the cheese contributes calcium for bone development, and the ranch base—when made from quality ingredients—adds beneficial fats that help children absorb fat-soluble vitamins like A, D, and K. Each component serves a nutritional purpose beyond pure flavor.
- 2 cups boneless, skinless chicken breast (grilled and finely chopped, about 14 ounces raw weight)
- 1 tablespoon fresh cilantro (minced, optional but adds phytonutrients and brightens flavors)
- 4 whole wheat 8-inch flour tortillas (fiber content supports digestive health and sustained energy)
- ½ cup whole milk mozzarella cheese (shredded, full-fat dairy supports nutrient absorption)
- ¼ teaspoon black pepper (freshly ground creates more nuanced flavor than pre-ground)
- ¼ cup full-fat Greek yogurt-based ranch dressing (creamy without excess calories, higher protein than traditional versions)
- 1 tablespoon extra-virgin olive oil (for pan-searing, provides heart-healthy monounsaturated fats)
- 1 teaspoon garlic powder (adds flavor depth without sodium overload)
- ½ teaspoon smoked paprika (provides subtle smoke and antioxidants from the peppers)
- ¼ teaspoon salt (kosher salt crystals dissolve more evenly than table salt)
Makes 4 wraps (serves 2-3 as a main course, or 4 as a lighter meal with sides)
Expert’s Nutritional Tip
Here’s what I notice most families miss: the quality of your ranch dressing matters significantly for nutritional profile. Traditional bottled versions often contain high-fructose corn syrup and stabilizers that aren’t necessary when you use Greek yogurt as your base. Greek yogurt-based ranch contains nearly double the protein of standard versions while keeping calories comparable. For a child’s developing brain and growing muscles, that protein density makes a real difference. If you’re using store-bought ranch, read the label carefully—look for versions with fewer than 5 grams of added sugar per serving.
How to Make Chicken Ranch Wrap Recipe for the Whole Family
This isn’t just cooking; it’s creating an experience your family will request repeatedly. The beauty of this recipe is that prep and cooking happen in one unified flow, meaning dinner reaches the table in under 30 minutes from the moment you enter the kitchen.
Step 1: Prepare Your Chicken Base
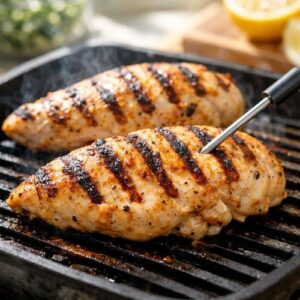
If you’re starting from scratch, grill two boneless, skinless chicken breasts (about 7 ounces each) until the internal temperature reaches 165°F on a meat thermometer—typically 6-7 minutes per side over medium-high heat. Always verify doneness with a thermometer rather than guessing; undercooked chicken poses food safety risks. If you have leftover grilled chicken from dinner the night before, this recipe becomes even faster. Chop your cooked chicken into small, uniform pieces (roughly ¼-inch pieces work best for wrap filling). Smaller pieces distribute more evenly through the tortilla and prevent large chunks from puncturing the wrapper during cooking.

Once chopped, place your chicken in a medium bowl and add garlic powder, smoked paprika, black pepper, and salt. Toss thoroughly until every piece is lightly coated with seasonings. If you have a young child helping at this stage, let them shake the spices and toss with a large spoon—they’re doing real cooking work here.
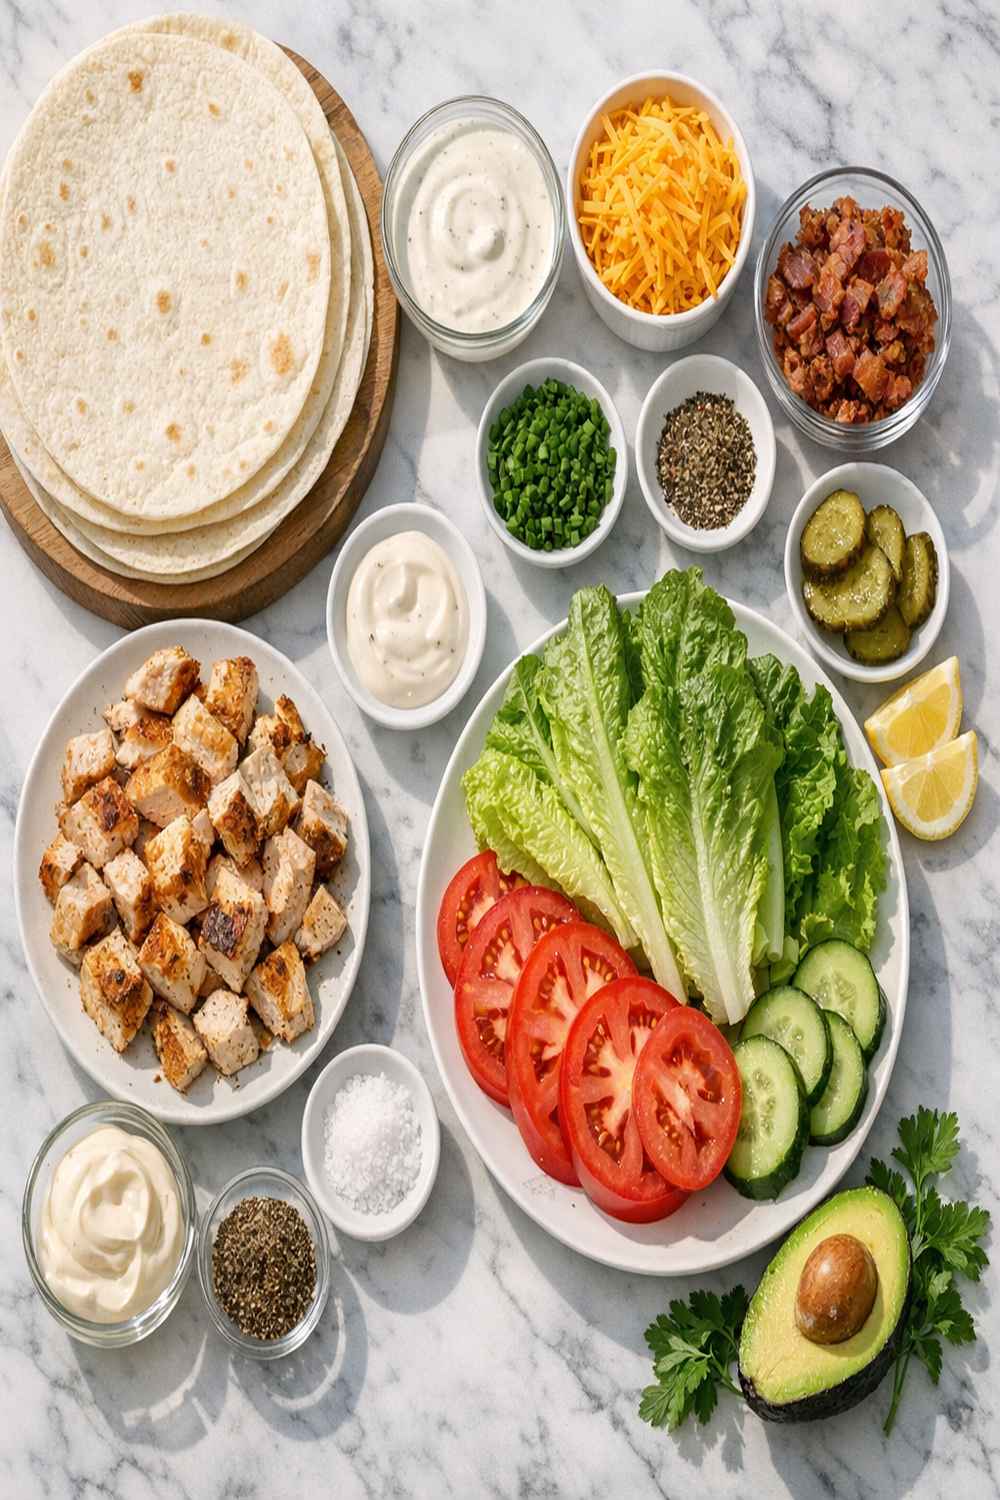
Step 2: Gather Your Filling Components
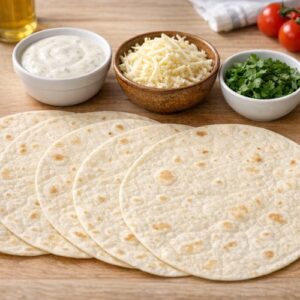
Set up a small assembly station with your ranch dressing, shredded mozzarella, and cilantro (if using) in separate small bowls. Lay all four tortillas flat on a clean cutting board or large plate. If your tortillas seem dry or brittle, lightly steam them wrapped in a damp paper towel in the microwave for 15 seconds—this makes them pliable and prevents cracking during wrapping.

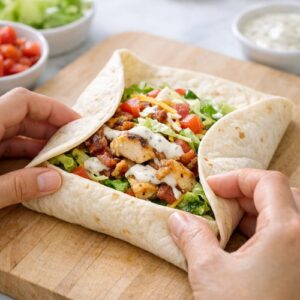
This is the perfect moment for kids ages 6-9 to participate. They can measure out portions using the small spoon or measuring spoon, placing exactly 1 tablespoon of ranch dressing on each tortilla, followed by 2 tablespoons of shredded cheese and about ½ cup of seasoned chicken. Let them position the ingredients in roughly the center-lower third of each tortilla, leaving space at the sides for wrapping.
Step 3: The Wrap Assembly
Take the first tortilla with its ingredients and fold the left and right edges inward about 2 inches, then firmly fold the bottom edge up and over the filling. Roll tightly away from you, using your hands to press and secure as you go. The key is tension—wrapping loosely means your filling will tumble out during cooking. This is actually much easier than it sounds, and watching someone successfully execute that first wrap is genuinely satisfying.

Repeat with remaining tortillas. Place each wrapped tortilla seam-side down as you finish—this seals the package and prevents the ranch from leaking out during cooking. If you’re cooking with kids, this assembly step is genuinely fun. There’s something satisfying about rolling and tucking that appeals to young hands.
Step 4: Heat Your Cooking Surface
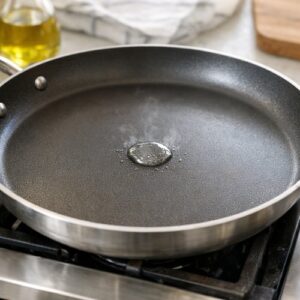
Place a large skillet or griddle over medium heat. Let it warm for 2-3 minutes until a drop of water sizzles on contact but doesn’t immediately evaporate (that’s medium heat, not too hot). Add the extra-virgin olive oil and tilt the pan to coat evenly. If you’re cooking with children, they should step back during this heating phase. Heat-related burns are entirely preventable when you maintain clear boundaries about who operates the stove.

The right temperature matters here. Too-low heat results in pale, soggy wraps. Too-high heat burns the exterior before warming the interior. Medium heat gives you that perfect golden-brown crispy shell while keeping the filling warm without overheating.
Step 5: Cook Your Wraps to Golden Perfection
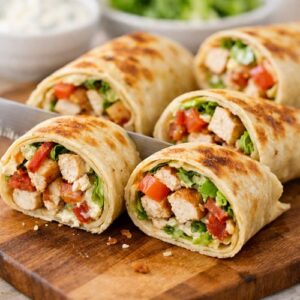
Carefully place your first wrapped tortilla seam-side down into the hot oil. You should hear a gentle sizzle—not an aggressive roar. Let it cook undisturbed for 1-2 minutes until the bottom is golden brown and slightly crispy. Using tongs or a wide spatula, flip the wrap and cook the other side for another 1-2 minutes until matching color appears there too. The exterior should look like it’s been lightly toasted with crispy edges.

Don’t crowd your pan. Cook 2 wraps at a time if using a standard 10-inch skillet. Overcrowding drops the temperature and causes steaming instead of searing. Remove each finished wrap to a clean cutting board. Repeat with remaining wraps. This entire cooking phase takes about 8 minutes total. The smell at this stage is absolutely irresistible—your family will start gathering in the kitchen without you calling them.
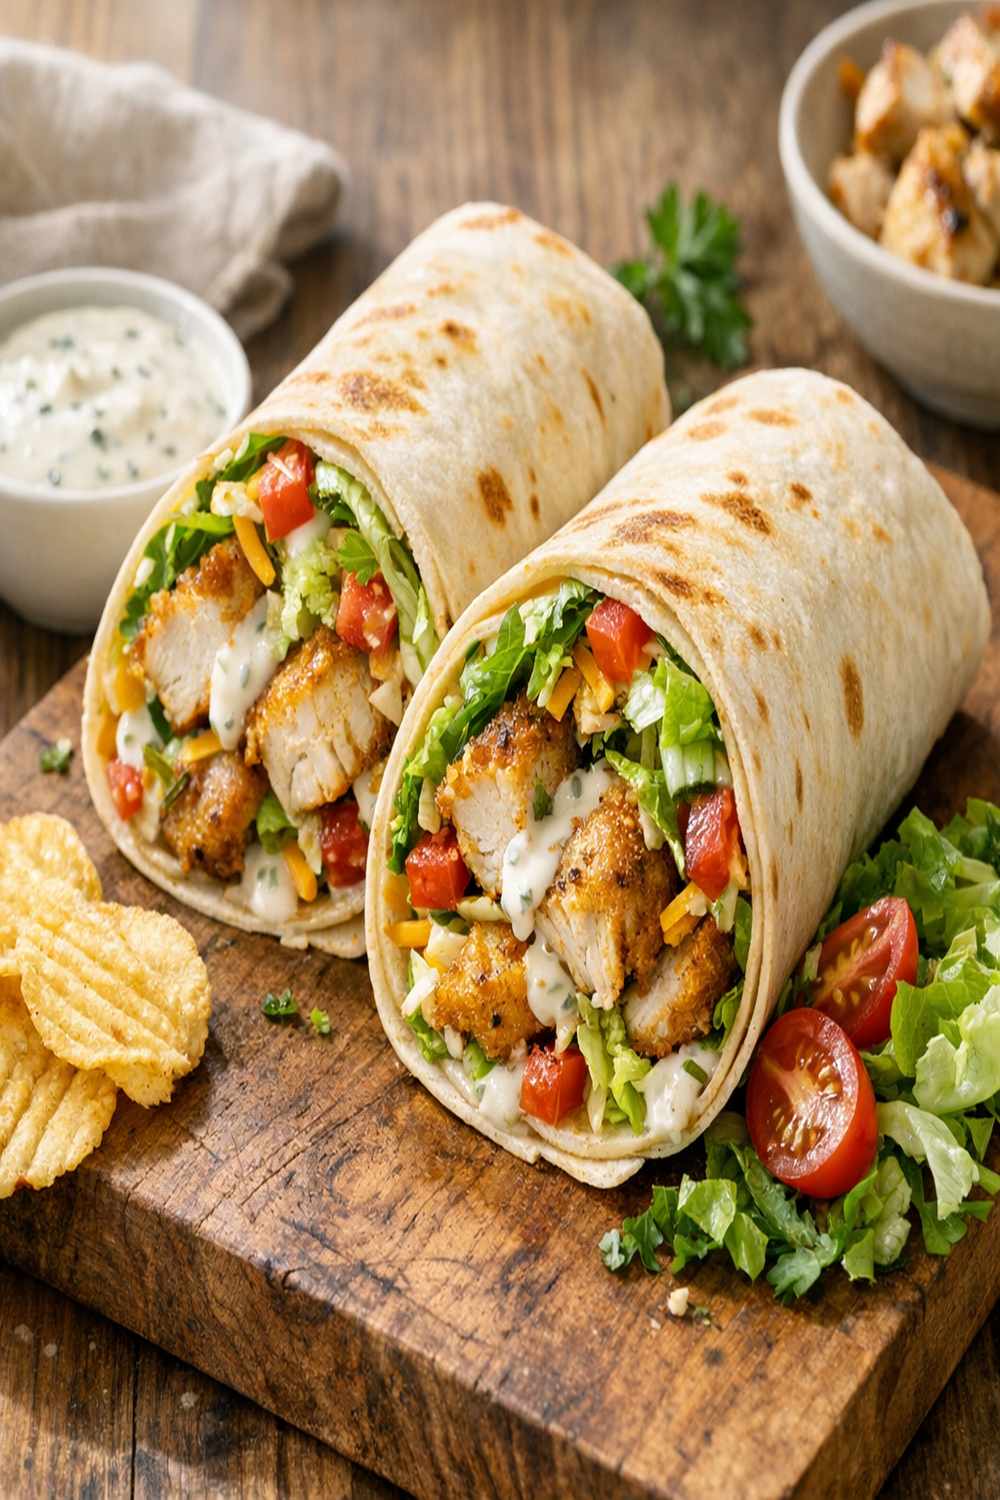
Step 6: Slice and Serve Immediately
Once all wraps are cooked, let them cool for just 1-2 minutes (enough time to handle safely but not so long they start cooling), then use a sharp serrated knife to slice each wrap diagonally in half. The diagonal cut not only looks appealing but also creates a larger surface area that showcases the beautiful filling inside—presentation matters when you’re trying to win over skeptical eaters. Serve immediately while the exterior is still crispy and the interior is warm.

Customization Station: Let Everyone Build Their Own
Here’s the secret weapon for picky eaters: control. When kids feel empowered to customize their meal, they’re infinitely more likely to actually enjoy eating it. I recommend setting up a simple prep station and letting each family member build exactly what they want. It takes the same amount of time as making everything yourself, but the psychological impact is profound.
- Protein Options – Offer grilled chicken as the standard, but also have seasoned ground turkey or even cooked shrimp available. Some kids who resist chicken embrace it when they feel they’ve chosen it alongside alternatives.
- Cheese Varieties – Mozzarella is mild and kid-friendly, but keep a small portion of sharp cheddar or Monterey Jack available for family members who prefer more assertive flavors. Variety prevents “food boredom” that makes picky eaters reject previously enjoyed meals.
- The Ranch Factor – Offer plain ranch alongside a small bowl of ranch mixed with hot sauce for older kids or adults. Some family members might prefer just a light smear; others want generous coverage. Let them decide the intensity.
- Vegetable Inclusions – Offer thinly sliced bell peppers, shredded carrots, or minced cilantro on the side. Kids are more likely to accept vegetables they’ve chosen to add than those hidden inside. You might be surprised what they’ll include once they’re in control.
I keep a “customization checklist” posted in my kitchen so kids can mark what they want in their wrap. It’s turned mealtimes into collaborative experiences rather than power struggles. You’d be amazed how many previously rejected foods become acceptable when a child feels they had a hand in the decision.
Scaling for Different Family Sizes
The beauty of wraps is that they scale elegantly. You’re not doubling a complex sauce or trying to fit more batter in your pan—you’re simply making more individual units. Here’s exactly how to adjust for your household:
For a Family of 2: Cut the recipe in half. Use 1 cup cooked, chopped chicken breast (about 7 ounces raw), 2 tablespoons ranch dressing total, ¼ cup mozzarella cheese, 2 flour tortillas, and ½ tablespoon olive oil. This makes exactly 2 wraps with minimal waste. Perfect for date-night dinners or when you’re cooking for yourself and a partner.
For a Family of 4 (as written): The recipe yields 4 wraps using 2 cups cooked chicken. If you have a family where everyone eats 1.5 wraps, make 1.5 times the recipe: 3 cups chicken, 6 tortillas, and keep the other ingredients proportional.
For a Family of 6: Double the entire recipe. Make 4 cups cooked chicken breast (about 28 ounces raw), ½ cup ranch dressing, 1 cup shredded mozzarella, 8 flour tortillas, and 2 tablespoons olive oil. You’ll need to cook in batches—your skillet can still only handle 2 wraps at a time, but everything else simply multiplies. Set a timer for each batch to stay organized.
For a Crowd of 8+: Consider cooking on a larger griddle or preparing wraps in two parallel skillets. Alternatively, assemble all your wraps first, then work through cooking them in batches while keeping finished wraps warm on a baking sheet in a 200°F oven (no longer than 10 minutes, or they’ll dry out). This approach keeps everything ready to serve simultaneously.
Pro tip: If you’re cooking for a crowd, recruit helpers to work the grill while others continue assembly. I’ve learned that coordinating multiple stations prevents bottlenecking and keeps energy high. Plus, cooking becomes less of a solo burden and more of a family effort.
Can I Store Chicken Ranch Wrap Recipe?
These wraps are definitely make-ahead friendly, though timing matters for texture. Let me break down your storage options:
Cooked Wraps (Refrigerator): Store finished wraps in an airtight container on a paper towel-lined shelf for up to 3 days. The exterior will soften slightly rather than maintain its initial crispness—this is normal. Reheat in a 300°F oven for 5-8 minutes to restore some crispness. Microwaving makes them rubbery, so please avoid that method.
Assembled but Uncooked Wraps: You can assemble wraps up to 8 hours ahead and refrigerate them seam-side down on a plate covered with plastic wrap. Cook them fresh when you’re ready to serve. This is genuinely convenient for busy families. On a Tuesday morning, spend 10 minutes assembling, then 8 minutes cooking when you arrive home. The quality is indistinguishable from cooking immediately after assembly.
For Lunchboxes: Pack cooked wraps wrapped in foil or parchment paper inside an insulated lunch container with an ice pack. They’ll stay fresh for up to 4 hours. Include a small container of additional ranch on the side if your child likes extra. The seam-side down placement in the lunchbox prevents unwrapping accidents.
Freezing: Honestly, I don’t recommend freezing finished cooked wraps. The texture suffers significantly upon thawing. However, you can freeze the seasoned, uncooked chicken separately for up to 3 months, then thaw and use it for fresh wraps later. This is helpful for meal prep strategies.
Make-Ahead Guide for Meal Prep Masters
As a busy dietitian, I’ve developed a foolproof make-ahead system that takes the stress out of weeknight meals. Here’s my detailed approach:
Sunday Prep (30 minutes total): Grill 4 boneless, skinless chicken breasts (about 28 ounces total), seasoning each lightly with salt and pepper during cooking. Cool completely, then chop into ¼-inch pieces. Store in an airtight glass container on the refrigerator shelf—this stays fresh for up to 4 days. Make a batch of Greek yogurt-based ranch dressing if you prefer homemade (blend ½ cup Greek yogurt, ¼ cup buttermilk, 1 tablespoon fresh dill, 1 teaspoon garlic powder, 1 teaspoon onion powder, salt and pepper). This keeps for 5 days in a sealed jar.
Tuesday Evening Assembly (10 minutes): Pull your prepped chicken, dressing, cheese, and tortillas from storage. Working in your customization station setup, assemble all wraps seam-side down on a plate. Cover with plastic wrap and refrigerate up to 8 hours.
Wednesday Dinner (8 minutes cooking): Cook your pre-assembled wraps directly from the refrigerator—they don’t need to come to room temperature first. They’ll actually cook more evenly straight from cold. Finish with a quick slice and serve.
This system means you’re only truly cooking once per week, then making quick assembly and cooking decisions on convenient evenings. The entire week’s lunches or dinners for your family can be prepped in about 40 minutes total across two sessions.
Common Mistakes to Avoid
After making these wraps hundreds of times, I’ve noticed patterns in what trips people up. Here’s what to avoid:
Mistake 1: Overfilling Your Wraps – More filling doesn’t equal better wraps. Overstuffed wraps leak during cooking, and the filling never heats through properly. Stick to the measurements: ½ cup chicken, 1 tablespoon ranch, 2 tablespoons cheese per wrap. If you want extra filling, make more wraps rather than overstuffing fewer ones. Restraint here actually improves your final product.
Mistake 2: Cooking at the Wrong Temperature – This is the biggest texture destroyer. Medium heat is genuinely your sweet spot. Too low and you get pale, doughy wraps with cold filling. Too high and you burn the exterior before the interior warms. Use the water-droplet test: a drop should sizzle gently but not immediately evaporate. If you’re unsure, invest in an oven-safe thermometer—medium heat on your stove should register around 350-375°F on the skillet surface.
Mistake 3: Wrapping Too Loosely – A loosely wrapped tortilla will unravel in the skillet, spilling filling everywhere. Your seams should feel tight and secure, with gentle but firm pressure as you roll. Think of it like rolling a burrito at a restaurant—that tension is intentional and necessary.
Mistake 4: Not Letting Chicken Cool Completely Before Assembly – Hot chicken will make your tortillas soggy and cause your cheese to melt prematurely, then resolidify unevenly. Cool your cooked chicken completely (about 10 minutes at room temperature) before assembling wraps. This is one of those small details that separates good wraps from genuinely excellent ones.
Nutrition Information
Based on USDA nutritional data, each wrap contains approximately 380 calories, 32 grams protein, 18 grams fat, 28 grams carbohydrates, and 3 grams dietary fiber. Here’s what this means for growing kids:
The protein content—roughly equivalent to 1.25 servings of lean meat—supports muscle development and creates sustained satiety, meaning kids stay full through afternoon activities without the energy crash that comes from carbohydrate-heavy meals. The calcium from mozzarella (roughly 140mg per wrap) contributes meaningfully toward the daily recommended intake for children, who require 700-1300mg depending on age. The dietary fiber, while modest, comes from the whole wheat tortilla and contributes to healthy digestion.
The fat content deserves special mention: all 18 grams come from sources that support brain development. The olive oil provides monounsaturated fats associated with cardiovascular health. The cheese provides fat-soluble vitamins A and D, which children’s bodies need for vision, immune function, and calcium absorption. This isn’t empty calories—it’s strategic nutrition delivery.
For a complete child-focused nutritional picture, this single wrap provides roughly 60% of the protein needs for a 6-year-old at a single meal, 15-20% of daily calories from healthy sources, and meaningful micronutrient contributions. Pair it with a fruit side and some vegetables, and you’ve created a genuinely balanced meal.
What to Serve Alongside for a Complete Family Meal
Wraps are wonderfully versatile as the centerpiece of a meal. Here are sides that complement without overwhelming:
- Fruit with Purpose – Sliced cantaloupe, berries, or mandarin orange segments provide vitamin C that enhances iron absorption from the chicken, plus natural sweetness kids love. Aim for a ½-cup to 1-cup serving per person.
- Roasted Vegetables – Toss broccoli florets or carrot sticks with a minimal amount of olive oil and roast at 400°F for 12-15 minutes. The slight char makes them appealing even to vegetable-reluctant kids. Check out my Broccoli And Cream Recipe for a creamy side option that pairs beautifully.
- Grain-Based Sides – Fluffy white rice, cilantro-lime rice, or a simple couscous create textural contrast and bulk out the meal. These are particularly helpful if you have growing teenagers who need additional calories.
- Simple Salad – Lettuce dressed with a light vinaigrette or just a drizzle of olive oil and lemon. Kids often feel more grown-up eating “salad” alongside their wrap. Try my my favorite salad for a warm option during cooler months.
I typically plan wraps plus two sides: one fruit or vegetable, one grain-based or creamy element. This creates a complete nutritional profile and visual variety on the plate that appeals to both children and adults. The color contrast also makes the meal feel more intentional and restaurant-quality.
Seasonal Variations to Keep Things Interesting
One brilliant aspect of this recipe is its adaptability throughout the year. Seasonal variations prevent food boredom while highlighting what’s fresh:
Spring Version: Add fresh asparagus tips or spring peas mixed into the filling. Include fresh mint instead of cilantro. The herbaceous lightness feels appropriate as weather warms. Serve alongside fresh strawberries.
Summer Version: Incorporate grilled zucchini ribbons or fresh corn kernels into your filling. Consider adding crispy bacon pieces for kids who love smoky flavors. Serve with cold fruit salad. The summery vegetables are at peak flavor and lowest cost in these months.
Fall Version: Add roasted butternut squash (from last season’s freezer supply) or dried cranberries to the filling for slight sweetness. Use smoked paprika more generously—it suits the season’s comfort-food vibe. Serve alongside apple slices.
Winter Version: Keep the recipe straightforward but serve alongside roasted root vegetables or creamed greens. The simplicity becomes luxurious during heavier seasons. Consider adding crispy sage leaves as garnish for elegant seasoning.
These variations keep the core recipe intact while celebrating seasonal ingredients, supporting local agriculture, and preventing your family from tiring of the same exact wrap week after week.
Chicken Ranch Wrap Recipe
Ingredients
Method
- If you're starting from scratch, grill two boneless, skinless chicken breasts (about 7 ounces each) until the internal temperature reaches 165°F on a meat thermometer—typically 6-7 minutes per side over medium-high heat. Always verify doneness with a thermometer rather than guessing; undercooked chicken poses food safety risks. If you have leftover grilled chicken from dinner the night before, this recipe becomes even faster. Chop your cooked chicken into small, uniform pieces (roughly ¼-inch pieces work best for wrap filling). Smaller pieces distribute more evenly through the tortilla and prevent large chunks from puncturing the wrapper during cooking. Once chopped, place your chicken in a medium bowl and add garlic powder, smoked paprika, black pepper, and salt. Toss thoroughly until every piece is lightly coated with seasonings. If you have a young child helping at this stage, let them shake the spices and toss with a large spoon—they're doing real cooking work here.
- Set up a small assembly station with your ranch dressing, shredded mozzarella, and cilantro (if using) in separate small bowls. Lay all four tortillas flat on a clean cutting board or large plate. If your tortillas seem dry or brittle, lightly steam them wrapped in a damp paper towel in the microwave for 15 seconds—this makes them pliable and prevents cracking during wrapping. This is the perfect moment for kids ages 6-9 to participate. They can measure out portions using the small spoon or measuring spoon, placing exactly 1 tablespoon of ranch dressing on each tortilla, followed by 2 tablespoons of shredded cheese and about ½ cup of seasoned chicken. Let them position the ingredients in roughly the center-lower third of each tortilla, leaving space at the sides for wrapping.
- Take the first tortilla with its ingredients and fold the left and right edges inward about 2 inches, then firmly fold the bottom edge up and over the filling. Roll tightly away from you, using your hands to press and secure as you go. The key is tension—wrapping loosely means your filling will tumble out during cooking. This is actually much easier than it sounds, and watching someone successfully execute that first wrap is genuinely satisfying. Repeat with remaining tortillas. Place each wrapped tortilla seam-side down as you finish—this seals the package and prevents the ranch from leaking out during cooking. If you're cooking with kids, this assembly step is genuinely fun. There's something satisfying about rolling and tucking that appeals to young hands.
- Place a large skillet or griddle over medium heat. Let it warm for 2-3 minutes until a drop of water sizzles on contact but doesn't immediately evaporate (that's medium heat, not too hot). Add the extra-virgin olive oil and tilt the pan to coat evenly. If you're cooking with children, they should step back during this heating phase. Heat-related burns are entirely preventable when you maintain clear boundaries about who operates the stove. The right temperature matters here. Too-low heat results in pale, soggy wraps. Too-high heat burns the exterior before warming the interior. Medium heat gives you that perfect golden-brown crispy shell while keeping the filling warm without overheating.
- Carefully place your first wrapped tortilla seam-side down into the hot oil. You should hear a gentle sizzle—not an aggressive roar. Let it cook undisturbed for 1-2 minutes until the bottom is golden brown and slightly crispy. Using tongs or a wide spatula, flip the wrap and cook the other side for another 1-2 minutes until matching color appears there too. The exterior should look like it's been lightly toasted with crispy edges. Don't crowd your pan. Cook 2 wraps at a time if using a standard 10-inch skillet. Overcrowding drops the temperature and causes steaming instead of searing. Remove each finished wrap to a clean cutting board. Repeat with remaining wraps. This entire cooking phase takes about 8 minutes total. The smell at this stage is absolutely irresistible—your family will start gathering in the kitchen without you calling them.

- Once all wraps are cooked, let them cool for just 1-2 minutes (enough time to handle safely but not so long they start cooling), then use a sharp serrated knife to slice each wrap diagonally in half. The diagonal cut not only looks appealing but also creates a larger surface area that showcases the beautiful filling inside—presentation matters when you're trying to win over skeptical eaters. Serve immediately while the exterior is still crispy and the interior is warm.
FAQs
Can I Use Different Proteins Besides Chicken?
Absolutely. Ground turkey (seasoned identically to chicken) works beautifully—it’s slightly leaner with a subtle flavor difference that some families prefer. Cooked ground beef also works, though it’s richer. For seafood lovers, seasoned shrimp creates a luxurious variation (use the same spices). My advice: introduce one protein variation at a time rather than offering multiple options simultaneously. This prevents decision paralysis and helps kids adjust to new flavors.
What If My Family Dislikes Ranch Dressing?
Ranch dominates because it’s familiar and kid-approved, but it’s not mandatory. Greek yogurt-based sour cream mixed with garlic and chives works gorgeously. Hummus provides different nutrition (more fiber, plant-based protein). Even a light spread of cream cheese works if your family prefers minimal sauce. The key is using something with fat content to prevent dry wraps and help nutrient absorption. Avoid salsa-only options, which can make tortillas soggy.
Are These Wraps Suitable for Packing in School Lunches?
Yes, with strategic packing. Wrap the cooked wrap in foil or parchment paper, then place it seam-side down in an insulated lunch container with an ice pack. It’ll stay fresh for up to 4 hours. Pack any additional ranch dressing separately in a small container so the wrap doesn’t become soggy during transit. I’ve found that kids eat these more reliably than sandwiches because the novelty factor keeps novelty factor keeps them engaged. Teachers have actually commented that wraps travel better than traditional lunches.
Can I Make These Wraps Healthier or Lower in Calories?
The recipe is already nutritionally balanced, but modifications are possible. Use reduced-fat mozzarella (saves 20 calories per wrap with minimal flavor impact). Substitute Greek yogurt for ranch dressing entirely (saves 40 calories and adds 3 grams protein per wrap). Use low-carb or cauliflower-based tortillas if that’s important for your family’s dietary approach. My honest assessment: the current recipe is already genuinely healthy. If calorie reduction is your goal, adjust serving sizes or add vegetable volume rather than compromising flavor, which makes kids less likely to eat it.
How Do I Know When My Chicken Is Fully Cooked?
Always use a meat thermometer for food safety. Chicken reaches safe internal temperature at 165°F (73.9°C), measured at the thickest part of the breast. Visual cues like color aren’t reliable—chicken can look cooked while remaining unsafe. Digital instant-read thermometers cost under $15 and are genuinely the best kitchen investment I’ve made for food safety. Undercooked chicken poses serious foodborne illness risks, particularly for young children and immunocompromised family members.
More Family-Friendly Recipes to Add to Your Rotation
- Black Bean And Rice Burrito Recipe – Another customizable wrap option that offers plant-based protein for vegetarian meals
- Breakfast Wraps With Eggs Recipe – Transform your mornings with a similar wrap format kids find exciting
- Smoked Sausage Potato Skillet – A sheet-pan dinner that requires minimal hands-on time while creating genuine comfort-food vibes
- Beer Can Chicken Recipe – The source for your grilled chicken, plus a showstopper presentation for family gatherings
The Joy of Cooking Together
I started my dietitian career believing nutrition was purely about macronutrients and micronutrients, calories and carbohydrates. Fifteen years later, I understand that food’s most powerful nutrition is relational. When your child chops cilantro beside you, when your teenager successfully sears their first wrap, when your picky eater requests seconds while telling you about their day—that’s when real nourishment happens.
These wraps aren’t special because they’re fancy. They’re special because they invite everyone to the table—literally and figuratively. Your 5-year-old can participate meaningfully. Your 15-year-old can take ownership. Your partner can customize exactly how they want it. Your family gathers around the same delicious thing, but each person’s version reflects who they are.
The memories we build around food last longer than the meal itself. I still remember my daughter’s face the day she watched me make her first wrap, the concentration as her older brother added his favorite toppings, my husband’s genuine surprise that homemade wraps could taste better than restaurant versions. That’s the cooking journey I want you to join.
Join me on this cooking journey!
