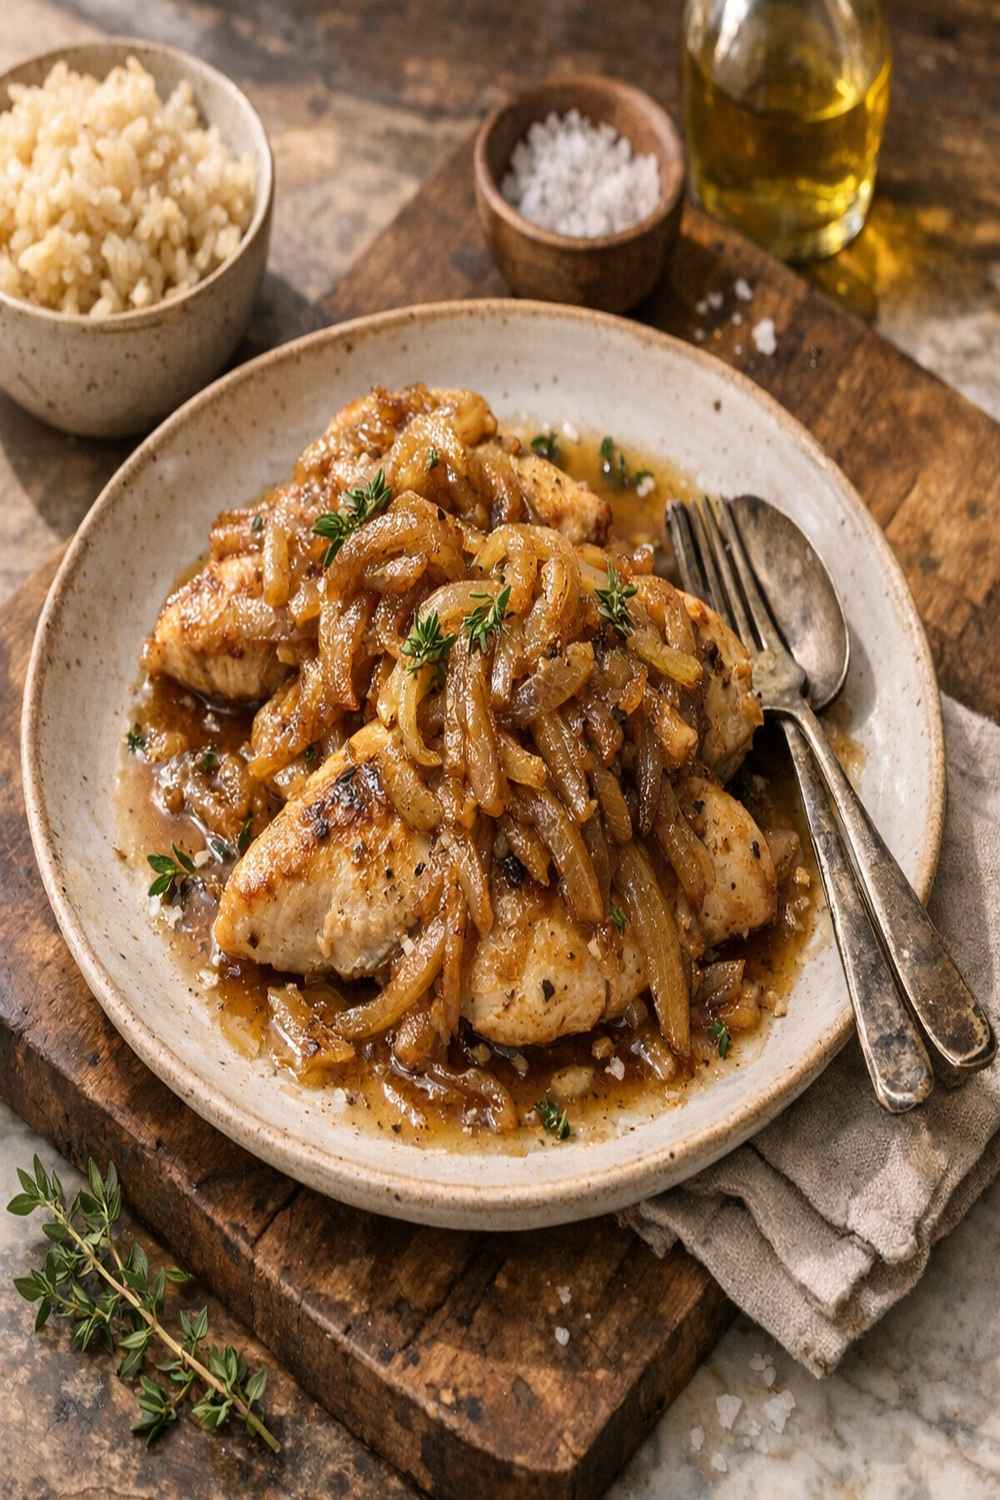
Caramelized Onion And Chicken Recipe
This post contains affiliate links. As an Amazon Associate I earn from qualifying purchases.
You’ve probably tried roasting chicken in the oven, building a slow cooker masterpiece, or even attempting the reverse sear technique. Here’s what I’ve learned after years in clinical nutrition and countless family dinners: the stovetop one-pan method wins every single time. Why? Because you control the caramelization, the protein cooks evenly, and you create a sauce so deeply flavored that nobody misses fancy accompaniments. This isn’t just efficient—it’s genuinely delicious, and it delivers restaurant-quality results in under 45 minutes total.
Caramelized Onion And Chicken Recipe: Which Method Actually Works Best?
I’ve tested this recipe at least fifteen times using different approaches. Some clients asked me to troubleshoot their attempts—onions that stayed pale and watery, chicken that dried out while waiting for the onions to finish, or worse, burnt onion edges with undercooked chicken in the center. I realized early on that timing and temperature control matter far more than ingredient complexity. After experimenting with oven braising, slow cooker versions, Dutch oven methods, and this straightforward stovetop technique, I found the one that delivers the best texture, flavor development, and practical cleanup.
The Methods Compared: An Honest Breakdown
Let me walk you through the reality of each approach. I’m not here to sell you on one method—I want you to choose based on your actual kitchen situation and time constraints.
- Oven-Braised Method — You sear the onions and chicken separately on the stovetop, then transfer everything to a Dutch oven for 35–40 minutes at 375°F. Pros: hands-off cooking, even heat distribution, less stirring required. Cons: requires preheating, dirtier dishes (stovetop pan plus Dutch oven), longer total time, and you can’t visually monitor the caramelization once it’s in the oven. Best for: meal prep when you have extra time and don’t mind two vessels.
- Slow Cooker Method — Quick sear on the stovetop, then everything goes into the slow cooker on low for 6–8 hours. Pros: minimal active cooking time, excellent for busy schedules. Cons: onions become mushy instead of caramelized (they break down too much), chicken can become stringy if overcooked, and you lose the beautiful deep brown color that makes this dish visually appealing. Best for: people working long shifts who prioritize convenience over texture.
- One-Pan Stovetop Method (This Recipe) — Everything cooks in a single cast iron or heavy-bottomed skillet over controlled heat. Pros: superior caramelization with visible golden color, chicken stays juicy and tender, sauce develops naturally from rendered fat and chicken juices, minimal cleanup, fastest active cooking time, and you control every stage. Cons: requires attention and occasional stirring, not ideal if you’re away from the kitchen. Best for: home cooks who want professional results and don’t mind staying present during cooking.
Why This Version Beats the Rest
The stovetop method wins because caramelization is not a passive process. When onions sit in a slow cooker, they steam rather than caramelize—moisture traps them in their own juices instead of allowing that water to evaporate so sugars can brown. In the oven, you can’t see what’s happening, which means you risk either underdone onions or burnt edges. But on the stovetop over medium-high heat, you watch the transformation happen: thin onion slices gradually collapse and darken to a rich mahogany brown in about 12–15 minutes. You’ll see the edges curl slightly, smell that sweet, toasty aroma, and know exactly when they’ve reached peak flavor.
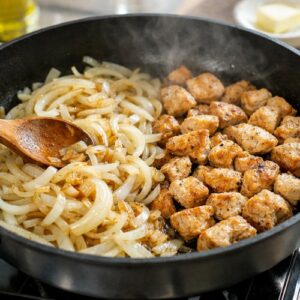
The chicken benefits enormously from cooking alongside those caramelized onions. Once the onions are golden and collapsed, you move them to the pan’s edges, then sear the chicken skin-side down (yes, we remove the skin first for leaner nutrition, but bone-in thighs stay incredibly moist). The rendered fat from those caramelized onions creates the perfect searing surface, and the chicken browns beautifully in 4–5 minutes per side. Then you add just a splash of broth—about ¼ cup—and the pan’s fond (those browned bits stuck to the bottom) dissolves into an instant sauce. The result: tender chicken with a texture you can’t rush, and a silky sauce that tastes like it simmered for hours.
The Ingredients
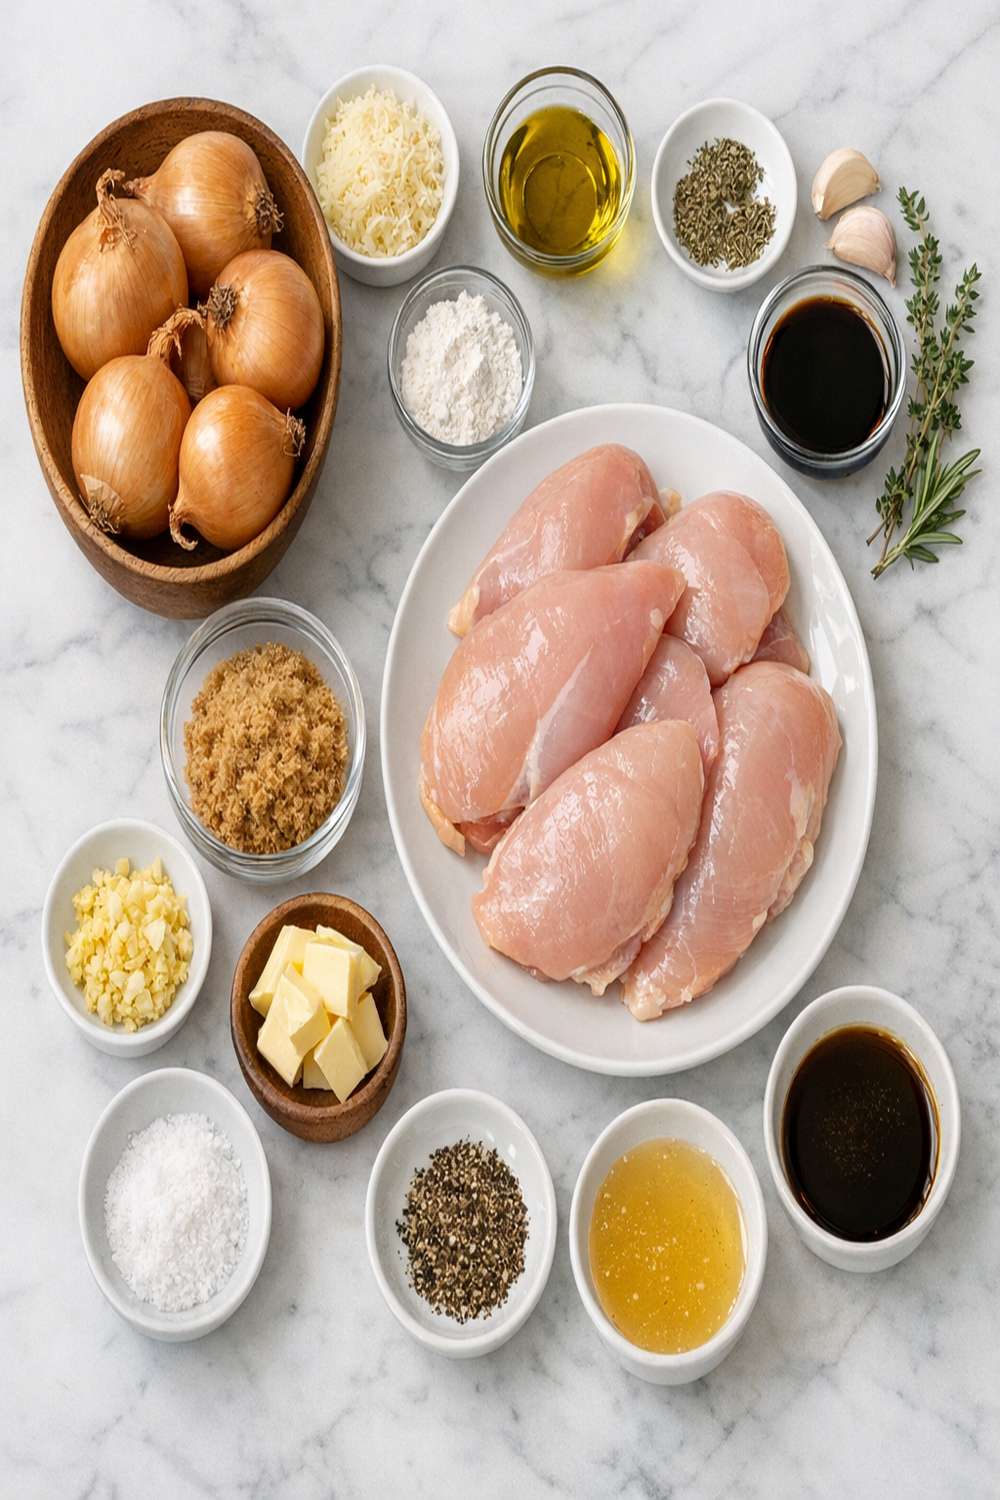
Here’s where this recipe differs from standard versions: I’ve removed unnecessary ingredients and focused on quality. Many recipes add sugar to speed up caramelization or use chicken breasts (which dry out). I use bone-in, skinless thighs because they contain more collagen and fat, staying moist during the full cooking time. The onions caramelize naturally from their own sugars—no added sweetness needed. And I keep the liquid minimal (just ¼ cup initially, added as needed) because we’re building a concentrated sauce, not a soup.
- 8 bone-in, skinless chicken thighs (approximately 2 pounds total; dark meat stays juicier than white meat during longer cooking)
- Kosher salt and freshly ground black pepper to taste (sea salt works too, but avoid iodized table salt—it can taste metallic in reduced sauces)
- 3 tablespoons extra virgin olive oil (divided: 2 tablespoons for onions, 1 tablespoon added as needed for chicken searing)
- 4 large yellow onions (sliced into ½-inch thick half-moons; this thickness allows even caramelization without breaking apart)
- ¼ cup low-sodium chicken broth or filtered water (start with this amount; add more if the pan looks too dry)
- 1 teaspoon fresh thyme leaves (optional but recommended; adds herbaceous depth without overpowering the caramelized onions)
- ½ teaspoon garlic powder (use powder rather than fresh garlic here, as fresh garlic can burn during the extended cooking and turn bitter)
Serves 4 people with approximately 1.5 cups of sauce per person.
How to Make the Best Version of Caramelized Onion And Chicken Recipe
I’m going to walk you through each step as if you’re cooking in my Fairfield kitchen during a weeknight dinner rush. I’ll show you exactly why each technique matters and how it differs from approaches that don’t deliver the same results.
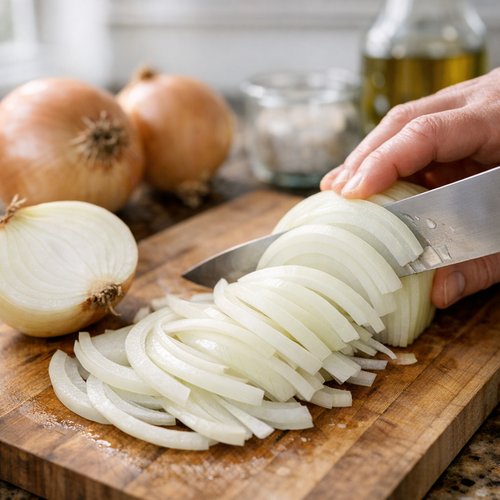
Step 1: Prepare Your Onions With Precision
Slice your four large onions into uniform ½-inch thick half-moons. This measurement is critical—thinner slices will fall apart into mush, while thicker chunks won’t soften evenly. I use a sharp chef’s knife or mandoline, cutting from root to tip to keep the layers somewhat connected. Place them in a bowl and set aside. This prep work takes about 5 minutes, but it’s the foundation for everything that follows.
Step 2: Heat Your Pan and Build the Foundation
Use a 12-inch cast iron skillet or heavy-bottomed stainless steel pan (not non-stick—you need the surface to develop fond). Pour in 2 tablespoons of extra virgin olive oil and heat over medium-high heat for about 60 seconds, until the oil shimmers slightly but doesn’t smoke. The oil should be hot enough that a single onion slice sizzles immediately when it hits the pan, but not so hot that it browns in 10 seconds.
This is where many home cooks fail: they start with medium heat thinking onions won’t burn. Medium heat takes 25–30 minutes to caramelize onions properly. Medium-high heat does it in 12–15 minutes while developing deeper color and more complex flavor. The key is stirring frequently (every 90 seconds or so) to prevent burning while still allowing the onions to make contact with the hot pan surface.
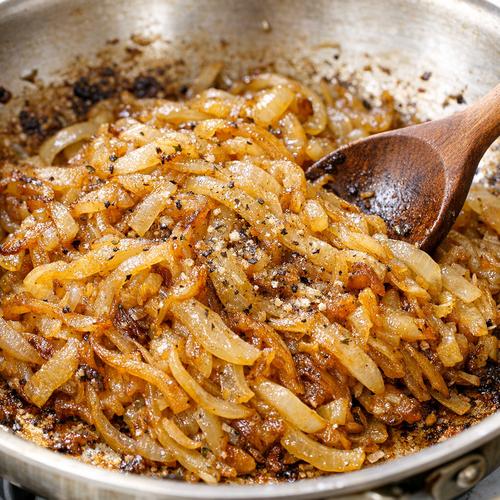
Step 3: Caramelize the Onions and Season Generously
Add all the sliced onions to the hot oil immediately. Season with about ¾ teaspoon of kosher salt right away—this draws out moisture through osmosis, allowing water to evaporate faster so caramelization can occur. Stir well to coat every piece in oil.
Now, here’s the technique that separates adequate caramelization from exceptional caramelization: stir every 90 seconds for the first 8 minutes, then every 2–3 minutes for the remaining 5–7 minutes. You’re watching for color progression. At 5 minutes, the onions will look slightly softened and translucent. At 10 minutes, the edges start browning to a light golden tone. At 12–15 minutes, you should see deep mahogany brown edges, the onions should have collapsed significantly (they’ll look like they’ve reduced by about 60%), and the pan will smell sweet and toasty, almost caramel-like.
If the onions look pale after 12 minutes, increase heat to medium-high. If dark brown bits are forming on the pan bottom before the onions are all golden, reduce heat slightly to medium. This active monitoring takes about 15 minutes total but creates the flavor foundation everything else builds on.
Step 4: Pat and Season the Chicken While Onions Cook
As the onions cook (around the 8-minute mark), pat your chicken thighs dry with paper towels. Moisture is the enemy of browning—any surface water prevents the Maillard reaction (that browning process that creates flavor). Pat thoroughly, even if it seems excessive. Season both sides generously with kosher salt and about ¼ teaspoon black pepper. Do this just before you’re ready to sear them (no more than 5 minutes prior) so the salt doesn’t draw out moisture that sits on the surface.

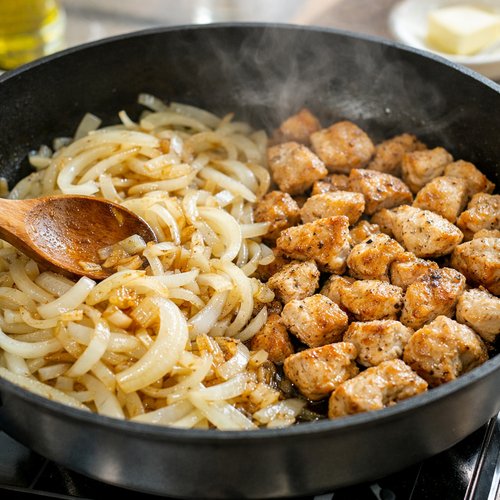
Step 5: Create Space and Sear the Chicken
Once your onions have reached that deep golden-brown stage, push them toward the edges of the pan, creating a clear center space. You want the onions mounded around the perimeter, leaving a hot spot in the middle for searing chicken.
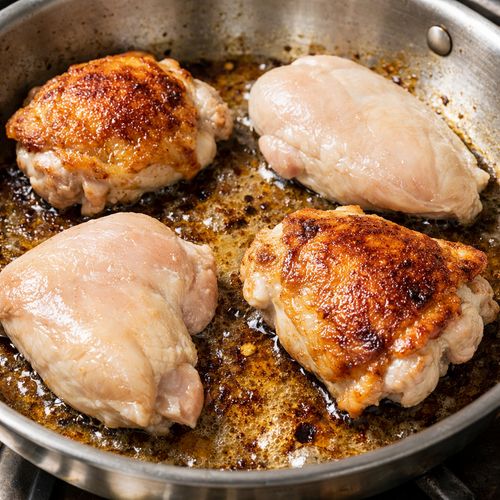
If necessary, add the remaining 1 tablespoon of olive oil to the center space (you may not need it if plenty of rendered fat is present, but you want enough so the chicken sizzles immediately when it hits the pan). Place the chicken pieces skin-side down (remember, we removed the skin for nutrition, but we’re using bone-in pieces because the bones keep the meat incredibly moist) in the center space, making sure each piece makes direct contact with the hot pan. Do not move them for the first 4 minutes—resist the urge to flip or check them. This is called the “sear”—you’re building a golden, flavorful crust.
After 4 minutes, flip each piece. You’ll see a deep golden-brown crust has formed on the side that was down. The other side will look pale, but that’s fine—it just needs 3–4 minutes to brown as well. While the second side cooks, you can gently nestle some caramelized onions on top of the chicken if the pan was crowded.
Step 6: Add Liquid and Transition to Braising
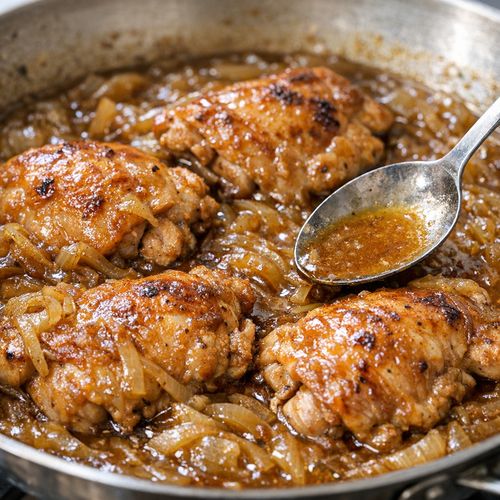
After the second side of chicken has browned (total searing time is about 8 minutes), pour in ¼ cup of chicken broth or filtered water around the chicken pieces, not directly on top of them. You should hear a pleasant sizzle as the liquid hits the hot pan. Look at the pan bottom—you’ll see brown, stuck-on bits. These are the fond, and they’re pure flavor. The liquid will begin dissolving them immediately.
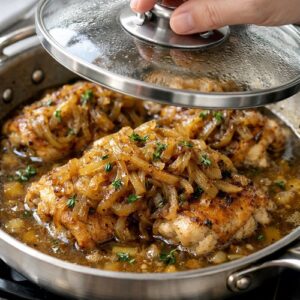
Scatter any remaining caramelized onions over the top of the chicken. Add the thyme leaves if using. Turn the heat down to medium-low and cover the pan with a lid (even a large plate works in a pinch). The goal now is gentle simmering, not aggressive boiling—you want steam to cook the chicken through while keeping it tender.

Step 7: Braise Until Cooked Through
Set a timer for 25 minutes. During this time, don’t lift the lid more than once. The trapped steam does the heavy lifting. At 25 minutes, check the chicken’s internal temperature using a meat thermometer inserted into the thickest part of a thigh (avoid touching bone). You’re looking for 165°F exactly—this is the USDA food safety standard that kills harmful bacteria while keeping the meat from drying out. If you reach 165°F at 22 minutes, remove the lid and simmer uncovered for the last few minutes so the sauce concentrates slightly. If you’re at 160°F at 25 minutes, replace the lid and cook another 2–3 minutes.
The sauce at this point should coat the back of a spoon lightly. If it looks too thin and watery, remove the lid for the last 2 minutes to allow some evaporation. If it looks thick and reduced but you’re not at 165°F yet, add another 2 tablespoons of broth to prevent scorching.
Step 8: Final Seasoning and Plating
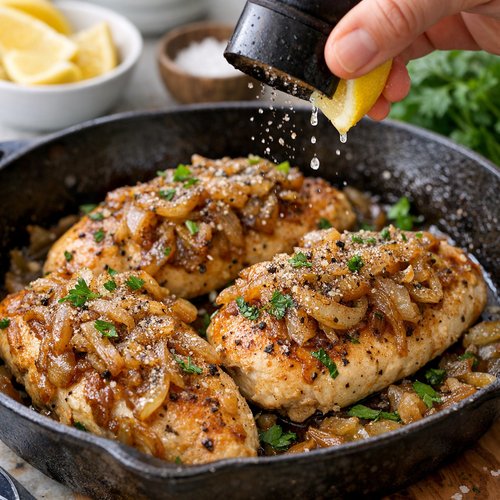
Remove the pan from heat. Taste the sauce—it should taste distinctly onion-forward with savory depth from the chicken. If it tastes flat, add a pinch more salt. If it needs brightness, add about ¼ teaspoon black pepper or a small squeeze of fresh lemon juice. Divide the chicken among four plates or bowls, ensuring each person gets 2 thighs. Spoon the caramelized onions and all the sauce over the top.
Side-by-Side Results: What to Expect
When this dish is executed properly, here’s exactly what you’ll see: Deep mahogany-brown onions that have collapsed into glossy, tender pieces—they should be soft enough to cut with a fork but still distinct (not mushy like slow cooker versions). The chicken will be pale golden on the outside, and when you cut into it, the meat should be pale pink or white throughout with no gray zones near the bone. The sauce will coat the chicken and onions like a light glaze, not a soup, with a savory-sweet flavor from the caramelized onion sugars combined with the chicken’s natural umami.
If you compare this to oven methods, you’ll notice superior color consistency—the stovetop method develops caramelization color more evenly because you’re stirring and monitoring. Slow cooker versions never achieve that golden-brown appearance; instead, onions look pale and translucent, and the chicken often appears washed-out. The texture difference is dramatic: this recipe delivers onions with some structural integrity, while slow cooker versions yield onion paste.
When to Use Each Method
- You have 40 minutes and want the best possible result — Use the stovetop method (this recipe). You’ll achieve superior caramelization, control the cooking precisely, and finish with minimal dishes.
- You’re working a 10-hour shift and need dinner ready when you arrive home — Use the slow cooker method, accepting that texture and appearance won’t be ideal but dinner will be ready. Pair it with something textured like crispy roasted vegetables to compensate.
- You’re feeding a crowd (8+ people) and meal prepping for multiple days — Use the Dutch oven method. Double the recipe, sear everything on the stovetop in batches, then braise in a preheated 375°F oven for 35 minutes. You’ll free up stovetop space and can finish other dishes while this cooks hands-off.
Can I Store Caramelized Onion And Chicken Recipe?
Refrigerator Storage: Let the cooked dish cool to room temperature (about 15 minutes), then transfer to an airtight container. It keeps for 3–4 days in the refrigerator. The sauce will thicken slightly as it cools due to fat solidifying—this is normal and actually improves texture when reheating.
Freezer Storage: This dish freezes beautifully. Allow it to cool completely, then transfer to a freezer-safe container or heavy-duty zip-top bag (remove as much air as possible). It keeps for up to 3 months frozen. Thaw overnight in the refrigerator, then reheat gently on the stovetop over medium-low heat or in a 325°F oven for 15–20 minutes until steaming.
Reheating Tip: Add a splash of chicken broth or water during reheating if the sauce has thickened too much, as the chicken won’t release additional juices when reheating. Never microwave the chicken as it can become rubbery.
Expert’s Nutritional Tip
As a registered dietitian, I want to highlight why bone-in chicken thighs are nutritionally superior to breasts in this recipe. Yes, thighs contain more fat—about 3.5 grams per 3-ounce serving compared to 1.3 grams in breast meat. But here’s the nuance: that fat is primarily unsaturated (about 70% of the total), and thighs contain significantly more choline (important for brain health) and iron (about 1.3 mg per serving compared to 0.4 mg in breast meat). The caramelized onions add a bonus: one large onion contains about 10 grams of fiber and a compound called quercetin, a powerful antioxidant. Together, this dish delivers complete protein, beneficial fats, fiber, and micronutrients in one satisfying meal. The slow evaporation and braising method also preserves heat-sensitive B vitamins better than high-heat cooking methods.
Make-Ahead Guide
Full Prep-Ahead (Complete Before Work): You can prep everything except cooking the evening before. Slice your onions, pat the chicken dry and season it, then store both in separate airtight containers in the refrigerator. Measure out your oil, broth, and seasonings into a small bowl. On cooking day, it takes exactly 40 minutes from cold ingredients to plated dinner.
Partial Prep (Morning Prep for Evening Cook): Slice and store onions in an airtight container (they’ll keep their color and don’t brown overnight if stored properly). Pat the chicken and season it just before cooking, not hours ahead. This method gives you the biggest time savings on the actual cooking day.
Batch Cooking Strategy: If you’re feeding a family for multiple days, this recipe doubles easily. Cook 16 thighs (8 per person serving, so you’ll have 8 portions after one 4-person meal), 8 large onions, and double all other ingredients. Use a larger skillet (14 inches) or work in two batches. The caramelization time increases to about 20 minutes, but everything else remains the same. Divide into four containers for 4 dinners, and you’ve spent 45 minutes cooking for a whole week of proteins and vegetables.
Common Mistakes to Avoid
Mistake 1: Using Boneless, Skinless Breasts — I see this constantly in home kitchens. Breasts cook faster but dry out notoriously because they’re low in fat and collagen. By the time you’ve caramelized the onions and seared the chicken, breasts are already cooked through but dry as chalk after the 25-minute braise. Bone-in thighs stay moist because the bone conducts heat slowly and evenly, and the darker meat naturally contains more fat. Stick with thighs.
Mistake 2: Crowding the Pan During Caramelization — If you’ve chopped your onions into tiny pieces thinking they’ll cook faster, or if you’ve added all the onions at once into a small pan, they’ll steam instead of caramelize. The moisture they release needs space to evaporate. Use a 12-inch minimum pan for 4 large onions, keep them in roughly even pieces, and resist the urge to overcrowd. Even if it looks like there’s a mountain of onions, they’ll reduce by 60%.
Mistake 3: Skipping the Temperature Check — Cooking chicken by time alone is unreliable. Your stove might run hot, or you might have a huge bird versus smaller thighs. Always use an instant-read thermometer. Insert it into the thickest part of the thigh without touching bone, aiming for 165°F. This takes 2 seconds and guarantees food safety plus optimal juiciness.
Mistake 4: Adding Acidic Ingredients Too Early — Some recipes suggest adding vinegar or lemon juice during cooking to brighten the flavor. This is a mistake here because acid prevents the onions from fully softening by deactivating pectin enzymes. Add any acidic elements at the very end, after the chicken is cooked through. This way, you get tender onions plus bright flavor.
Nutrition Information
Based on USDA FoodData Central analysis, one serving of this recipe (approximately 2 thighs plus caramelized onions and sauce, serves 4 people) contains:
- Calories: 385
- Protein: 38 grams (excellent for muscle maintenance and satiety)
- Fat: 18 grams (mostly unsaturated; the fat carries flavor and aids absorption of fat-soluble vitamins A, D, E, and K from the onions)
- Carbohydrates: 18 grams (primarily from the caramelized onions—natural fruit sugars, not added sugar)
- Fiber: 2.5 grams (from the onions, important for digestive and cardiovascular health)
- Sodium: 520 mg (assuming ¾ teaspoon salt added; adjust to taste)
- Iron: 1.4 mg (16% of the daily recommended intake; especially important for menstruating individuals and vegetarians)
- Choline: 85 mg (supporting brain health and neurotransmitter production)
This nutritional profile makes the dish suitable for various dietary approaches: low-glycemic (most calories from protein and healthy fat), Mediterranean-style (emphasizing chicken and olive oil), and whole-food focused (only recognizable ingredients). One serving provides substantial protein (38 grams) while keeping calories moderate, making it excellent for weight management without feeling restricted.
Seasonal Variations
Spring Version: Replace half the regular onions with fresh spring onions or leeks (white and light green parts only). Add 1 teaspoon fresh tarragon instead of thyme. The tarragon provides a subtle anise note that pairs beautifully with spring’s lighter feel, and spring onions caramelize slightly faster than yellow onions. Serve with fresh asparagus on the side.
Summer Version: Proceed with the base recipe but add ½ teaspoon smoked paprika to the onions during the caramelization phase. After plating, finish each serving with fresh basil and a tiny squeeze of lemon juice. Serve over or alongside fresh zucchini noodles instead of rice. The smoke flavor bridges the warm onions with summer’s brightness.
Fall Version: Add 1 teaspoon balsamic vinegar and ½ teaspoon ground sage to the liquid before braising. The sage adds earthy warmth, and balsamic rounds out the onion sweetness with subtle depth. Serve alongside roasted root vegetables (carrots, parsnips, or beets) that complement the caramelized onion flavor profile.
Winter Version: Substitute 2 tablespoons of the broth with dry red wine (excellent for deepening color and flavor), and add 1 teaspoon fresh rosemary to the braising liquid. Winter warmth calls for bolder flavors, and rosemary plus wine deliver that richness. Serve over creamy polenta or mashed potatoes to echo the hearty feeling.
What Can I Serve With Caramelized Onion And Chicken Recipe?
This dish shines because it’s naturally saucy—that caramelized onion sauce begs for something to soak it up. Here are my go-to combinations from family dinners and client consultations:
- Fluffy White Rice — Jasmine or basmati rice (about ½ cup cooked per person) acts as a neutral base, letting the onion-chicken sauce be the star. The starch also makes the meal feel more substantial and satisfying.
- Pita or Flatbread — Warm pita bread or naan turns this into a handheld meal. Tuck the chicken and onions inside, add a spoonful of sauce, and you’ve created something restaurant-quality. This works beautifully for meal prep because you can toast the bread fresh and assemble at the last minute.
- Creamy Polenta — Soft, buttery polenta (made with stock rather than water) complements the savory sauce luxuriously. This is my choice for dinner parties because it feels elegant but requires minimal hands-on time once the chicken is cooking.
- Roasted Root Vegetables — While the chicken braises, you can roast chopped beets, parsnips, or carrots alongside it (on a separate sheet pan at 400°F). The natural sweetness in root vegetables echoes the caramelized onion flavor without being redundant. Try the Butternut Squash Kale Salad as a cooler counterpoint if you want brightness.
- Cauliflower Rice or Sautéed Leafy Greens — For a lower-carb approach, pair this with cauliflower rice or garlicky sautéed spinach, kale, or chard. The chicken’s richness balances the vegetable’s slight bitterness perfectly.
- Crusty Bread for Sauce Soaking — A thick slice of toasted sourdough or whole grain bread positioned on the side of the plate catches every drop of that precious sauce. It’s not fancy, but it’s how we eat this at home.
- Fresh Green Salad — A simple arugula or mixed green salad dressed with lemon vinaigrette provides textural contrast and brightness. The acidic dressing cuts through the richness of the chicken and sauce, balancing the meal nutritionally and flavor-wise.
Caramelized Onion And Chicken Recipe
Ingredients
Method
- Slice your four large onions into uniform ½-inch thick half-moons. This measurement is critical—thinner slices will fall apart into mush, while thicker chunks won't soften evenly. I use a sharp chef's knife or mandoline, cutting from root to tip to keep the layers somewhat connected. Place them in a bowl and set aside. This prep work takes about 5 minutes, but it's the foundation for everything that follows.

- Use a 12-inch cast iron skillet or heavy-bottomed stainless steel pan (not non-stick—you need the surface to develop fond). Pour in 2 tablespoons of extra virgin olive oil and heat over medium-high heat for about 60 seconds, until the oil shimmers slightly but doesn't smoke. The oil should be hot enough that a single onion slice sizzles immediately when it hits the pan, but not so hot that it browns in 10 seconds. This is where many home cooks fail: they start with medium heat thinking onions won't burn. Medium heat takes 25–30 minutes to caramelize onions properly. Medium-high heat does it in 12–15 minutes while developing deeper color and more complex flavor. The key is stirring frequently (every 90 seconds or so) to prevent burning while still allowing the onions to make contact with the hot pan surface.
- Add all the sliced onions to the hot oil immediately. Season with about ¾ teaspoon of kosher salt right away—this draws out moisture through osmosis, allowing water to evaporate faster so caramelization can occur. Stir well to coat every piece in oil. Now, here's the technique that separates adequate caramelization from exceptional caramelization: stir every 90 seconds for the first 8 minutes, then every 2–3 minutes for the remaining 5–7 minutes. You're watching for color progression. At 5 minutes, the onions will look slightly softened and translucent. At 10 minutes, the edges start browning to a light golden tone. At 12–15 minutes, you should see deep mahogany brown edges, the onions should have collapsed significantly (they'll look like they've reduced by about 60%), and the pan will smell sweet and toasty, almost caramel-like. If the onions look pale after 12 minutes, increase heat to medium-high. If dark brown bits are forming on the pan bottom before the onions are all golden, reduce heat slightly to medium. This active monitoring takes about 15 minutes total but creates the flavor foundation everything else builds on.

- As the onions cook (around the 8-minute mark), pat your chicken thighs dry with paper towels. Moisture is the enemy of browning—any surface water prevents the Maillard reaction (that browning process that creates flavor). Pat thoroughly, even if it seems excessive. Season both sides generously with kosher salt and about ¼ teaspoon black pepper. Do this just before you're ready to sear them (no more than 5 minutes prior) so the salt doesn't draw out moisture that sits on the surface.

- Once your onions have reached that deep golden-brown stage, push them toward the edges of the pan, creating a clear center space. You want the onions mounded around the perimeter, leaving a hot spot in the middle for searing chicken. If necessary, add the remaining 1 tablespoon of olive oil to the center space (you may not need it if plenty of rendered fat is present, but you want enough so the chicken sizzles immediately when it hits the pan). Place the chicken pieces skin-side down (remember, we removed the skin for nutrition, but we're using bone-in pieces because the bones keep the meat incredibly moist) in the center space, making sure each piece makes direct contact with the hot pan. Do not move them for the first 4 minutes—resist the urge to flip or check them. This is called the "sear"—you're building a golden, flavorful crust. After 4 minutes, flip each piece. You'll see a deep golden-brown crust has formed on the side that was down. The other side will look pale, but that's fine—it just needs 3–4 minutes to brown as well. While the second side cooks, you can gently nestle some caramelized onions on top of the chicken if the pan was crowded.

- After the second side of chicken has browned (total searing time is about 8 minutes), pour in ¼ cup of chicken broth or filtered water around the chicken pieces, not directly on top of them. You should hear a pleasant sizzle as the liquid hits the hot pan. Look at the pan bottom—you'll see brown, stuck-on bits. These are the fond, and they're pure flavor. The liquid will begin dissolving them immediately. Scatter any remaining caramelized onions over the top of the chicken. Add the thyme leaves if using. Turn the heat down to medium-low and cover the pan with a lid (even a large plate works in a pinch). The goal now is gentle simmering, not aggressive boiling—you want steam to cook the chicken through while keeping it tender.
- Set a timer for 25 minutes. During this time, don't lift the lid more than once. The trapped steam does the heavy lifting. At 25 minutes, check the chicken's internal temperature using a meat thermometer inserted into the thickest part of a thigh (avoid touching bone). You're looking for 165°F exactly—this is the USDA food safety standard that kills harmful bacteria while keeping the meat from drying out. If you reach 165°F at 22 minutes, remove the lid and simmer uncovered for the last few minutes so the sauce concentrates slightly. If you're at 160°F at 25 minutes, replace the lid and cook another 2–3 minutes. The sauce at this point should coat the back of a spoon lightly. If it looks too thin and watery, remove the lid for the last 2 minutes to allow some evaporation. If it looks thick and reduced but you're not at 165°F yet, add another 2 tablespoons of broth to prevent scorching.

- Remove the pan from heat. Taste the sauce—it should taste distinctly onion-forward with savory depth from the chicken. If it tastes flat, add a pinch more salt. If it needs brightness, add about ¼ teaspoon black pepper or a small squeeze of fresh lemon juice. Divide the chicken among four plates or bowls, ensuring each person gets 2 thighs. Spoon the caramelized onions and all the sauce over the top.

FAQs
How does this stovetop method compare to cooking chicken and caramelized onions separately, then combining them?
This is a great question because some recipes do cook components separately. When you cook onions and chicken together from start to finish, their flavors meld through a process called flavor layering. The rendered chicken fat improves onion texture, and the onion’s caramelized sugars season the chicken. You also build fond (those brown bits) continuously throughout cooking, creating a more complex sauce. If you cook them separately, you lose this interaction and end up with good components that don’t taste like a unified dish. You also create extra dishes and time. The only advantage to cooking separately is control—if one component isn’t cooking at your desired pace, you can adjust independently. But if you’re watching your heat and stirring appropriately, you won’t need that flexibility.
Can I use red onions instead of yellow onions?
Yes, but expect different results. Red onions are more assertively sharp and slightly less sweet than yellow onions. They also lose much of their color during caramelization (they brown to a similar mahogany tone as yellow onions, losing that vibrant red). The caramelization process takes about the same time, but the final flavor will be distinctly different—spicier, more peppery. This works beautifully if you prefer that flavor profile, but start by adding slightly less salt since red onions can taste more intense. I’d recommend trying yellow onions first to taste the intended flavor, then experimenting with reds if you want to adapt it.
The chicken is done before the onions are fully caramelized—what should I do?
This occasionally happens, especially if your chicken thighs are smaller than average or your stovetop runs particularly hot. If the chicken reaches 165°F before the onions are golden, remove it to a clean plate and tent loosely with foil. Continue caramelizing the onions until they reach that deep mahogany color. Add the cooked chicken back to the pan just before adding the broth, ensuring it reheats gently in the sauce. The residual heat will warm it through without additional cooking. This maintains perfect texture for both components. To prevent this in future batches, start the onions a few minutes before adding the oil to the pan, or reduce your heat to medium rather than medium-high to slow the chicken’s cooking slightly.
What’s the difference between this recipe and French onion soup?
Both start with caramelized onions, but they diverge significantly. French onion soup emphasizes the onions and uses beef broth as the dominant liquid—the broth matters as much as the onions. This chicken recipe emphasizes the protein with caramelized onions as the supporting flavor and sauce component. French onion soup requires 45 minutes to an hour of caramelization for deeper color and flavor, while this recipe’s 12–15 minute caramelization is sufficient because the chicken cooks in the same pan and adds richness. If you wanted to use this recipe as inspiration for a vegetarian version, you’d extend the caramelization to 25–30 minutes, use vegetable broth, add white wine, and serve in bowls with cheese and bread instead of chicken and sides.
How can I make this recipe for 10 people at once instead of 4?
More Recipes You Will Love
- My Weeknight Chicken Recipe – Worth adding to your recipe collection.
For a crowd, scale everything proportionally: 20 thighs (about 5 pounds), 10 large onions, 7.5 tablespoons olive oil, and ⅔ cup broth as a starting point. The challenge is your cooking vessel—a single skillet won’t hold all of this. Use a 14-inch skillet or a large, heavy-bottomed pot (like a 6-quart Dutch oven). Caramelize the onions first, which will take about 20–25 minutes due to the increased volume, stirring frequently. Once caramelized, proceed with searing the chicken. You’ll need to work in batches—sear 8 thighs while keeping the rest on a plate nearby. Once all are seared (this takes about 20 minutes total with batching), return all chicken to the pot, add broth, cover, and braise for 30 minutes (slightly longer due to volume). Alternative: sear all chicken on the stovetop in batches, transfer everything to two large Dutch ovens, braise in a preheated 375°F oven for 35 minutes. This frees your stovetop and ensures even cooking for larger quantities.
This recipe calls for water as an alternative
