Before we dive into the scrumptious adventure of making Oreo peanut butter pie, let’s chat about what you might want to pair with this delight. Trust me, the right pairing can elevate your dessert experience.
1. Coffee or Espresso: The rich, creamy nature of the pie complements a well-brewed coffee. Bitter notes of espresso can balance the sweetness of Oreo and peanut butter. It’s a match made in heaven.
2. Ice Cream: Vanilla or chocolate ice cream provides a cold, creamy contrast. Imagine digging into a slice of pie while a scoop of vanilla melts beside it. Pure bliss!
3. Fresh Berries: For a burst of freshness, toss in some strawberries or raspberries. Their tartness offsets the sweetness of the pie. Plus, they look stunning on the plate!

Why This Recipe Works?
1. The Perfect Combination of Flavors:
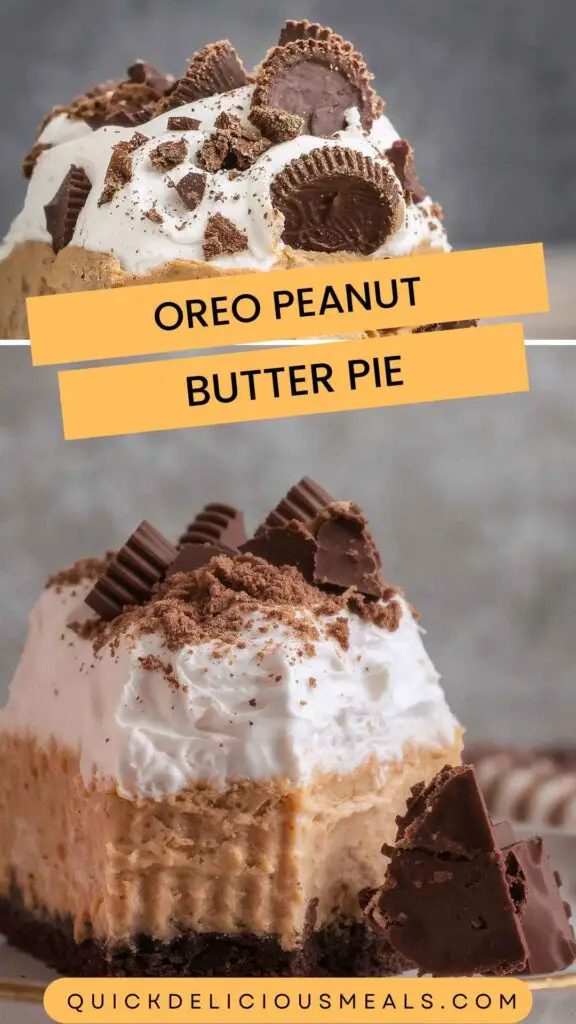
This pie brings together the beloved flavor duo of peanut butter and Oreo cookies. The sweetness of the Oreos, combined with the richness of peanut butter, creates an irresistible harmony. If you’re a fan of contrasts in taste, this pie nails it every time.
2. Simple Ingredients:
The recipe calls for basic pantry items. You won’t need to search every corner of the grocery store. The simplicity of the ingredient list ensures that you can whip it up whenever the craving strikes.
3. No-Bake Bliss:
Who has time for baking when the weather is warm? This pie is a no-bake marvel! You can prepare it in a flash and let the refrigerator do the magic. No sweating over a hot oven means more time to enjoy summer adventures!
4. Make Ahead and Freeze Friendly:
You can easily prep this dessert in advance. Freeze it, and pull it out when guests arrive. It’s stress-free and gives you a chance to enjoy your gatherings without worry.
How Does It Taste?
Imagine a fork plunging into the layers of this pie. The first bite is a delightful blend of crunch from the Oreo crust and a creamy, dreamy peanut butter filling. Next comes the velvety whipped cream topping that wraps around the flavors like a warm hug. Each flavor pops in your mouth while maintaining a smooth texture that makes it hard to resist.
There’s a subtle sweetness from the cream and honey, contrasted by the salty goodness of peanut butter. It’s indulgent yet light enough to make you want a second slice. Trust me, you won’t stop at just one piece!
What Sets This Recipe Apart From Other Oreo Peanut Butter Pie Variations?
Many other recipes may include heavy chocolate or additional toppings that can overwhelm the star flavors. This recipe shines because it focuses squarely on the flavors of peanut butter and Oreo while adding light notes from the whipped cream and minimal extras.
While some might overload with added sugars or unnecessary ingredients, this version is deliberate and thoughtful. It creates a balanced dessert that highlights the best of what Oreos and peanut butter can do together.
The Ingredients
For the Peanut Butter Filling:
- 1 ½ cups chilled heavy cream
- 8 ounces cream cheese, softened
- 1 cup creamy peanut butter
- 1 cup powdered sugar
- ½ teaspoon pure vanilla extract
- 1 tablespoon honey or maple syrup
For the Oreo Crust:
- 20 Oreo cookies, finely crushed
- 6 tablespoons unsalted butter, melted
For the Topping:
- 1 ½ cups cold heavy cream
- Pinch of sea salt
- Crushed Oreo cookies (optional)
- Chopped peanut butter cups (optional)

Instructions
Step 1: Prepare the Oreo Crust
Start by crushing the Oreos. I find the easiest way is to throw them into a zip-lock bag and smash away with a rolling pin. It’s therapeutic! Once crushed, mix the cookie crumbs with the melted butter until combined.
Press this mixture firmly into the bottom of a pie dish to form a crust. Make sure to get it as even as possible so you don’t end up with a lopsided pie. Chill the crust in the refrigerator while you prepare the filling.
Step 2: Make the Peanut Butter Filling
In a large mixing bowl, beat the cream cheese until smooth. Add in the creamy peanut butter and mix it well until you have a silky texture. Gradually add the powdered sugar and vanilla extract, mixing on low speed, then increase to medium.
In another bowl, whip the chilled heavy cream until soft peaks form. Gently fold this whipped cream into the peanut butter mixture. This will lighten the filling and give it that airy texture we all crave.
Step 3: Assemble the Pie
Once your crust is ready, pour the peanut butter filling into it. Spread it evenly using a spatula. Once it looks perfect, pop it back in the fridge to set for at least 4 hours or overnight if you’re feeling patient.
Step 4: Top with Whipped Cream
Before serving, whip the remaining heavy cream with a pinch of sea salt until fluffy. Spread or pipe this cream on top of your pie. If you want a little extra flair, sprinkle on crushed Oreos and chopped peanut butter cups.
Notes
- Use High-Quality Peanut Butter: For the best flavor, choose a natural style peanut butter. It enhances the peanut butter experience.
- Chill Your Equipment: For fluffier whipped cream, chill your mixing bowl and beaters before whipping. It makes a noticeable difference!
- Experiment with Toppings: Get creative! Use crushed nuts, chocolate shavings, or drizzle with chocolate syrup for extra richness.
- Room Temperature Ingredients: Ensure your cream cheese is at room temperature before you start. It allows for smoother blending.
- Don’t Skimp on Chilling Time: Allow enough time for the pie to set. If you cut it too early, it might not hold its shape.
Nutrition Information
Serving Size: 1 slice (1/10 of pie)
- Calories: 350
- Total Fat: 25g
- Saturated Fat: 15g
- Carbohydrates: 30g
- Dietary Fiber: 2g
- Sugars: 15g
- Protein: 5g
Keep in mind that variations in ingredients and portion sizes will affect the nutrition profile.
How Do You Store This Oreo Peanut Butter Pie?
You can store leftover slices in the refrigerator. Cover the pie with plastic wrap to maintain its freshness. It should keep well for about 3 to 5 days in the fridge. You can also freeze the pie for longer storage. Slice it in advance, wrap with foil or plastic, and pop it into a freezer bag. When you’re ready to indulge, thaw it in the fridge overnight.
Sides for Oreo Peanut Butter Pie
1. Fresh Fruit Salad:
A refreshing fruit salad provides a light contrast to the creamy pie. Use a mix of berries, melons, and citrus for a pop of color and flavor.
2. Chocolate Dipped Strawberries:
These are always a hit! Their slight bitterness works well with the pie’s sweetness. Plus, who can resist a chocolate strawberry?
3. Vanilla Yogurt Parfait:
Layer Greek yogurt with granola and fresh fruit as an alternative dessert option. It’s lighter and contrasts beautifully with the richness of your pie.
What Alternatives Can You Use for the Ingredients if They Are Not Present in Your Kitchen?
1. Nut Butters:
If peanut butter is a no-go, try almond or cashew butter. They provide a delicious twist while keeping the same creamy texture.
2. Dairy-Free Cream Cheese:
For a dairy-free option, swap regular cream cheese with a dairy-free variety. It blends well and keeps the texture creamy.
3. Agave Nectar:
If honey or maple syrup is unavailable, agave nectar can serve as a sweetener. Just use a little less, as it’s more concentrated.
4. Cookie Crust Variations:
If Oreos aren’t in your pantry, use graham crackers or digestives for the crust. You’ll need to adjust the quantities but still end up with a tasty base.

Conclusion
Creating an Oreo peanut butter pie is not just about baking; it’s about sharing an experience. I hope you feel empowered to try this recipe and enjoy the delicious rewards of your efforts. Each slice is a reminder of how simple ingredients can come together to create something unforgettable. So gather your loved ones, serve up a slice (or two), and relish in the joy this pie brings to the table. Happy baking!
You’ll also like the following recipes!
Oreo Peanut Butter Pie – Quick Delicious Meals
If you’re in the mood for a dessert that will wow both your family and friends, you’ve hit the jackpot with this Oreo peanut butter pie. I remember the first time I tasted a slice at a gathering. The moment that creamy, crunchy delight hit my tongue, I was hooked. This pie is not just a treat; it’s an experience that combines nostalgia with deliciousness.
Peanut butter lovers unite! Picture this: you take a bite, and the layers of creamy peanut butter filling, Oreo crust, and fluffy whipped cream create a heavenly moment. This pie is so easy to make, and it’s a sure-fire hit for any occasion—be it a summer BBQ or a cozy gathering with friends.
Ingredients
For the Peanut Butter Filling
For the Oreo Crust
For the Topping
Instructions
Step 1: Prepare the Oreo Crust
-
Start by crushing the Oreos. I find the easiest way is to throw them into a zip-lock bag and smash away with a rolling pin. It’s therapeutic! Once crushed, mix the cookie crumbs with the melted butter until combined.
Press this mixture firmly into the bottom of a pie dish to form a crust. Make sure to get it as even as possible so you don't end up with a lopsided pie. Chill the crust in the refrigerator while you prepare the filling.
Step 2: Make the Peanut Butter Filling
-
In a large mixing bowl, beat the cream cheese until smooth. Add in the creamy peanut butter and mix it well until you have a silky texture. Gradually add the powdered sugar and vanilla extract, mixing on low speed, then increase to medium.
In another bowl, whip the chilled heavy cream until soft peaks form. Gently fold this whipped cream into the peanut butter mixture. This will lighten the filling and give it that airy texture we all crave.
Step 3: Assemble the Pie
-
Once your crust is ready, pour the peanut butter filling into it. Spread it evenly using a spatula. Once it looks perfect, pop it back in the fridge to set for at least 4 hours or overnight if you’re feeling patient.
Step 4: Top with Whipped Cream
-
Before serving, whip the remaining heavy cream with a pinch of sea salt until fluffy. Spread or pipe this cream on top of your pie. If you want a little extra flair, sprinkle on crushed Oreos and chopped peanut butter cups.
Nutrition Facts
Servings 8
- Amount Per Serving
- Calories 350kcal
- % Daily Value *
- Total Fat 25g39%
- Saturated Fat 15g75%
- Total Carbohydrate 30g10%
- Dietary Fiber 2g8%
- Sugars 15g
- Protein 5g10%
* Percent Daily Values are based on a 2,000 calorie diet. Your daily value may be higher or lower depending on your calorie needs.
Note
- Use High-Quality Peanut Butter: For the best flavor, choose a natural style peanut butter. It enhances the peanut butter experience.
- Chill Your Equipment: For fluffier whipped cream, chill your mixing bowl and beaters before whipping. It makes a noticeable difference!
- Experiment with Toppings: Get creative! Use crushed nuts, chocolate shavings, or drizzle with chocolate syrup for extra richness.
- Room Temperature Ingredients: Ensure your cream cheese is at room temperature before you start. It allows for smoother blending.
- Don’t Skimp on Chilling Time: Allow enough time for the pie to set. If you cut it too early, it might not hold its shape.


