Before diving deep into the deliciousness that is hot cocoa cake, let’s consider perfect pairings. Think about a cozy evening with friends. A warm cup of your favorite spiced chai tea for balance with the sweetness of the cake. How about a rich, velvety vanilla ice cream? That contrast adds a delightful coolness to each bite. Or picture a scoop of whipped cream topped with a sprinkle of cocoa powder.
Those textures come together perfectly. If you want to enhance your experience, grab a small cup of espresso. The bitterness cuts through the cake’s sweetness and elevates the flavor. Each of these options complements the cake wonderfully, making every slice an adventure for the senses.

What is Hot Cocoa Cake?
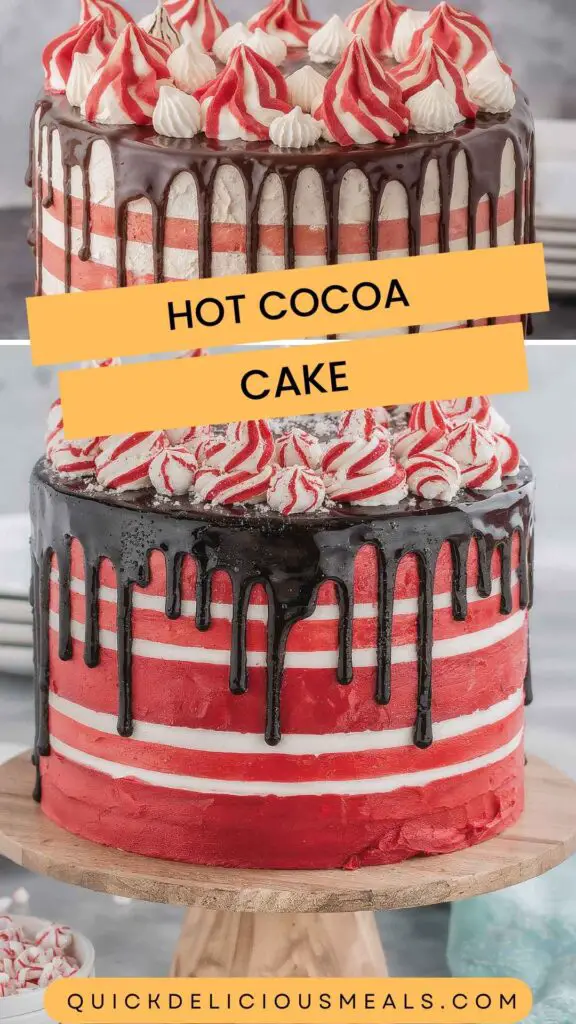
Hot cocoa cake is a rich chocolate cake inspired by everyone’s favorite winter beverage: hot cocoa. It combines the chocolatey goodness of cocoa powder with the warming notes of spices typically found in a good cup of cocoa.
Each bite is a soft and fluffy experience that tantalizes your taste buds. The cake boasts a delightful depth of flavor, often enhanced with a soft layer of peppermint buttercream and optionally, a chocolate ganache drip.
What Does It Taste Like?
The taste of hot cocoa cake is a delightful journey. It’s intensely chocolatey, almost like taking a deep sip from a cup of hot cocoa. But there’s more! The addition of spices like cinnamon can evoke memories of chilly winters.
The cake’s texture is moist and fluffy, and the sweet peppermint buttercream adds a quintessential holiday touch. When drizzled with chocolate ganache, it takes indulgence up a notch.
Why This Recipe Works?
1. Packed with Flavor
The combination of cocoa powder and rich hot cocoa mix creates a rich, chocolatey flavor. Instant espresso powder enhances this depth, making every bite a true chocolate lover’s dream.
2. Perfect Texture
Using room temperature ingredients like eggs and milk leads to a light and airy cake. The addition of hot water makes the batter silky and ensures that the cake bakes up soft and fluffy.
3. Easy to Follow
The steps are straightforward. If you can mix ingredients and follow instructions, you’re ready to impress. It’s a great recipe even for a beginner baker.
4. Versatile Toppings
You can dress this cake up or down. Whether you want a simple dusting of powdered sugar or a full-on chocolate ganache drizzle, the cake stands strong no matter the garnishments.
Ingredients for Hot Cocoa Cake
Before we bake, let’s gather the essential ingredients. Here’s what you need:
- 1½ cups (300g) fine white granulated sugar: Provides sweetness and helps with texture.
- 2 cups (265g) unbleached all-purpose flour: The base for the cake.
- 2 tsp baking soda: Creates that delightful lift.
- 1 tsp baking powder: Ensures it rises perfectly.
- ½ tsp fine sea salt: Balances out the sweetness.
- ⅔ cup (60g) natural unsweetened cocoa powder: The rich chocolate flavor.
- 3 Tbsp hot cocoa mix (preferably with mini chocolate bits): Adds depth and fun bits of chocolate.
- 1 tsp instant espresso powder: Boosts chocolate flavor.
- ¼ tsp ground cinnamon: A warmth that complements chocolate.
- 1½ tsp vanilla extract: Enhances overall taste.
- ½ cup (120ml) neutral vegetable oil: Adds moisture.
- 2 large eggs, at room temperature: Binds the ingredients together.
- 1 cup (240ml) whole milk, at room temperature: Contributes to the moistness.
- 1 cup (240ml) hot filtered water: Helps to bloom the cocoa and create a fudgy texture.
For the Peppermint Buttercream:
- 7 cups (840g) sifted powdered sugar: Forms the creamy base.
- 2 cups (226g) unsalted sweet cream butter: Adds richness.
- ¾ tsp pure peppermint extract: Seasonal flavor punch.
- 1 tsp pure vanilla extract: Sweetens the buttercream.
- ¼ tsp fine salt, or to taste: Balances sweet flavors.
- 3 Tbsp whole milk, at room temperature: Thins the buttercream.
- Red food coloring gel (optional): For decorative flair.
And for an optional Chocolate Ganache Drip:
- ½ cup (95g) semi-sweet chocolate chips: For that indulgent drip.
- ½ cup (120ml) heavy cream: To melt and create a rich sauce.
Add some fluff with mini marshmallows, crushed peppermint candy canes, or a layer of fluffy marshmallow crème on top.

Step-by-Step Instructions
Step 1: Preheat the Oven
Start by preheating your oven to 350°F (175°C). This ensures that your cake rises evenly and bakes to perfection.
Step 2: Prepare Your Baking Pans
Grease and flour two 9-inch round cake pans. You can also use parchment paper at the bottom for easy removal later. No one likes a stuck cake!
Step 3: Mix Dry Ingredients
In a large bowl, whisk together the flour, sugar, cocoa powder, baking soda, baking powder, salt, and cinnamon. This creates a dry mixture that sparks joy in every chocolate lover’s heart.
Step 4: Combine Wet Ingredients
In another bowl, blend the eggs, oil, milk, hot cocoa mix, vanilla extract, and hot water. Use a whisk or a mixer on low. The mixture should be well combined and a bit frothy.
Step 5: Combine Wet and Dry Mixtures
Slowly pour the wet mixture into the dry ingredients. Stir gently until just combined. You don’t want to over-mix—keeping some air in the batter will yield a fluffier cake.
Step 6: Bake
Evenly distribute the batter into your prepared pans and send them into your preheated oven. Bake for 30–35 minutes, or until a toothpick inserted in the center comes out clean. The aroma will start to fill your kitchen, making it hard to resist!
Step 7: Cool Down
Once baked, let the cakes cool in the pans for about 10 minutes. Then transfer them to a wire rack to cool completely. This step is crucial. A hot cake can melt your frosting, and we wouldn’t want that.
Step 8: Prepare the Buttercream
While the cakes cool, let’s whip up that peppermint buttercream. Beat the softened butter in a mixing bowl until creamy. Gradually add the powdered sugar and blend until smooth. Then add the milk, peppermint extract, and vanilla extract. Beat on medium until fluffy and spreadable.
Step 9: Frost the Cake
Once the cakes are cool, place one layer on a serving plate. Spread a generous layer of the peppermint buttercream on top. Place the second layer on top and frost the entire cake.
Step 10: Optional Ganache Drip
To make the ganache, heat the heavy cream until just simmering and pour it over the chocolate chips. Let it sit for a minute before stirring, creating a luscious ganache. Drizzle it over the frosted cake. Let it set a bit before decorating with marshmallows and crushed candy canes.
Notes
- Room Temperature Ingredients Are Key: Ensure eggs and milk are at room temperature for the best mixture.
- Don’t Skip the Espresso: It deepens the flavor. Trust me; even if you don’t like coffee, you won’t taste it.
- Adjust Sugar in Frosting: If it’s too sweet, add a pinch of salt to balance things out.
- Embrace Creativity: Don’t be afraid to add your own magic. Want to go wild with toppings? Go for it!
- Double the Recipe for Layered Fun: This recipe can easily be doubled for a taller cake.
Nutrition Information
For a standard slice of hot cocoa cake (without frosting):
- Calories: 350
- Protein: 4g
- Carbohydrates: 52g
- Fat: 14g
- Sugar: 30g
This may vary based on portion sizes and toppings used.
How To Store The Leftovers?
You want to savor every bite, right? Store your leftover cake in an airtight container in the fridge. It stays fresh for up to a week. For longer storage, wrap slices well in plastic wrap and freeze for up to three months. Just let it thaw in the fridge overnight before indulging again.
Sides for Hot Cocoa Cake
Now, let’s talk sides that pair well with hot cocoa cake. Here are four ideas to consider:
1. Vanilla Ice Cream
The creaminess of vanilla ice cream contrasts beautifully with the chocolatey richness of the cake. A scoop on the side creates a delightful experience.
2. Whipped Coconut Cream
For a dairy-free option, whipped coconut cream adds a tropical twist. It’s light and fluffy, perfect to balance the heaviness of the cake.
3. Fresh Berries
A handful of fresh raspberries or strawberries adds brightness and acidity, cutting through the sweetness. They’re a lovely touch for presentation too.
4. Hot Chocolate
Why not go all out? Serve a warm mug of chocolate next to the cake. It embodies the spirit of hot cocoa in every bite and sip.
Alternative Choices for Ingredients
Sometimes, you may find the pantry lacking. Here are alternatives to consider:
1. Flour
Swap all-purpose flour with gluten-free flour blend if you need a gluten-free option. It works surprisingly well!
2. Cocoa Powder
Dutch-process cocoa can be used for a smoother flavor. Just keep in mind it has a different acidity.
3. Vegetable Oil
Replace it with melted coconut oil or applesauce for a healthier fat alternative. The latter also offers added moisture.
4. Eggs
For egg-free baking, use flax eggs (1 tablespoon ground flaxseed mixed with 3 tablespoons water per egg) or silken tofu.

Conclusion
In the world of desserts, hot cocoa cake stands out as a comforting classic. Its rich, chocolaty layers coupled with peppermint-flavored buttercream make it an unforgettable treat. With straightforward steps and room for creativity, it’s a recipe that welcomes bakers of all levels.
Whether you’re arranging a festive gathering or just easing into your own dessert cravings, hot cocoa cake checks all the right boxes. So gather up those ingredients and start baking! It’s the kind of cake that warms the heart and invites moments of joy. Enjoy each slice, and don’t forget to pair it with your favorite sides. Happy baking!
You’ll also like the following recipes!
Hot Cocoa Cake – Quick Delicious Meals
Have you ever had a dessert that hugged you as you took the first bite? That’s the feeling you get with hot cocoa cake. Imagine a slice of moist chocolate cake infused with the rich essence of hot cocoa. It speaks to wintery evenings and cozy gatherings. It’s all the best childhood memories packed into a flavorful dessert. This cake whisks you back to snowy afternoons huddled under blankets with a steaming cup of cocoa in hand.
Delving into the world of hot cocoa cake opens up exciting realms of flavor and comfort. I’ll share the essentials: what this cake is, how it tastes, and why this recipe is a must-try. Along the way, I’ll uncover the magic behind its ingredients and provide step-by-step instructions. Let’s whip up some deliciousness and make it your new favorite dessert!
Ingredients
For the Peppermint Buttercream:
1/2 cup semi-sweet chocolate chips (95 g): For that indulgent drip.
Instructions
Step 1: Preheat the Oven
-
Start by preheating your oven to 350°F (175°C). This ensures that your cake rises evenly and bakes to perfection.
Step 2: Prepare Your Baking Pans
-
Grease and flour two 9-inch round cake pans. You can also use parchment paper at the bottom for easy removal later. No one likes a stuck cake!
Step 3: Mix Dry Ingredients
-
In a large bowl, whisk together the flour, sugar, cocoa powder, baking soda, baking powder, salt, and cinnamon. This creates a dry mixture that sparks joy in every chocolate lover’s heart.
Step 4: Combine Wet Ingredients
-
In another bowl, blend the eggs, oil, milk, hot cocoa mix, vanilla extract, and hot water. Use a whisk or a mixer on low. The mixture should be well combined and a bit frothy.
Step 5: Combine Wet and Dry Mixtures
-
Slowly pour the wet mixture into the dry ingredients. Stir gently until just combined. You don’t want to over-mix—keeping some air in the batter will yield a fluffier cake.
Step 6: Bake
-
Evenly distribute the batter into your prepared pans and send them into your preheated oven. Bake for 30–35 minutes, or until a toothpick inserted in the center comes out clean. The aroma will start to fill your kitchen, making it hard to resist!
Step 7: Cool Down
-
Once baked, let the cakes cool in the pans for about 10 minutes. Then transfer them to a wire rack to cool completely. This step is crucial. A hot cake can melt your frosting, and we wouldn’t want that.
Step 8: Prepare the Buttercream
-
While the cakes cool, let’s whip up that peppermint buttercream. Beat the softened butter in a mixing bowl until creamy. Gradually add the powdered sugar and blend until smooth. Then add the milk, peppermint extract, and vanilla extract. Beat on medium until fluffy and spreadable.
Step 9: Frost the Cake
-
Once the cakes are cool, place one layer on a serving plate. Spread a generous layer of the peppermint buttercream on top. Place the second layer on top and frost the entire cake.
Step 10: Optional Ganache Drip
-
To make the ganache, heat the heavy cream until just simmering and pour it over the chocolate chips. Let it sit for a minute before stirring, creating a luscious ganache. Drizzle it over the frosted cake. Let it set a bit before decorating with marshmallows and crushed candy canes.
Nutrition Facts
Servings 15
- Amount Per Serving
- Calories 350kcal
- % Daily Value *
- Total Fat 14g22%
- Total Carbohydrate 52g18%
- Sugars 30g
- Protein 4g8%
* Percent Daily Values are based on a 2,000 calorie diet. Your daily value may be higher or lower depending on your calorie needs.
Note
- Room Temperature Ingredients Are Key: Ensure eggs and milk are at room temperature for the best mixture.
- Don’t Skip the Espresso: It deepens the flavor. Trust me; even if you don't like coffee, you won't taste it.
- Adjust Sugar in Frosting: If it's too sweet, add a pinch of salt to balance things out.
- Embrace Creativity: Don’t be afraid to add your own magic. Want to go wild with toppings? Go for it!
- Double the Recipe for Layered Fun: This recipe can easily be doubled for a taller cake.


