2 Ingredient Chaffle Recipe
This post contains affiliate links. As an Amazon Associate I earn from qualifying purchases.
When I first discovered chaffles at a family dinner in my Fairfield kitchen, I knew I’d stumbled onto something special. My sister brought one to the table, golden and crispy, and within minutes everyone was asking for seconds. What struck me most wasn’t just how delicious they were—it was how remarkably simple the ingredient list truly was.
Just two pantry staples, and suddenly we had a protein-packed breakfast that satisfied everyone from my keto-focused cousin to my youngest who simply wanted something fun and warm.
This recipe pairs beautifully as a sandwich base for hearty lunch options like our Blade Beef Recipe, or stand alone as a savory breakfast that actually keeps you full. Join me as I show you how I’ve made this a rotating staple in my meal prep routine.
How Two Humble Ingredients Changed My Morning Routine
I remember the exact moment my perspective on breakfast shifted. It was a Tuesday morning—the kind where I’d overslept, my family was already asking “what’s for breakfast,” and I was staring at an empty inspiration tank. My registered dietitian training had taught me the importance of starting the day with adequate protein and healthy fats, but I was tired of the same eggs-and-toast routine.
That’s when I pulled out my waffle iron, grabbed two eggs and a handful of mozzarella, and took a calculated risk. Seven minutes later, three golden, crispy waffles emerged—each one packed with more protein than traditional grain-based waffles, zero refined sugars, and a taste that didn’t feel like I was “dieting” at all. My family gathered around, and I watched my eight-year-old dip hers in sugar-free syrup while my partner topped his with avocado and smoked salmon.
That single breakfast moment became the foundation for countless weekday mornings, meal prep sessions, and late-night snack discoveries that followed.

What is 2 Ingredient Chaffle Recipe?
A chaffle is essentially a cheese-based waffle—the culinary marriage of “cheese” and “waffle”—that emerged from the low-carbohydrate and ketogenic cooking communities around 2017. What began as a niche internet discovery has quietly become a nutritionist’s favorite secret weapon because it solves so many modern dietary challenges simultaneously.
At its core, a chaffle uses just eggs and cheese, heated in a standard waffle iron until the cheese creates a crispy, lacy exterior while the eggs bind everything together. The magic happens at around 350°F—that precise temperature where the cheese begins to brown and develop those caramelized edges while the egg proteins set into a tender, custardy interior.
What makes this recipe special is its complete versatility. It respects multiple dietary approaches—keto, paleo, gluten-free, higher-protein diets—without requiring any specialized ingredients or complicated techniques. And honestly, from my dietitian perspective, I appreciate that it delivers real nutrition: approximately 6 grams of protein and minimal carbohydrates per chaffle, making it genuinely satiating rather than a empty-calorie novelty.
Why You’ll Love This 2 Ingredient Chaffle Recipe
- Minimal Equipment Required – If you already own a waffle iron (and honestly, who doesn’t have one tucked away), you have everything necessary for success
- Budget-Conscious – Eggs and cheese are pantry staples that rarely go on sale and cost dramatically less than specialty breakfast products or convenient restaurant options
- Protein-Packed Nutrition – Each chaffle delivers substantial protein and healthy fats that keep you satisfied well into your morning or afternoon, without the energy crash that follows refined carbohydrates
- Adaptable to Any Meal – Serve these sweet with berries and whipped cream, savory as a sandwich foundation, or simply topped with butter and herbs depending on what your day actually needs
- Genuinely Quick – From refrigerator to plate in about 10 minutes, no complicated prep work or lengthy cooking times that test your patience on busy mornings
- Texture That Actually Satisfies – Unlike some “healthy” breakfast alternatives that feel like punishment, these deliver genuine crispy-exterior, slightly-creamy-interior satisfaction that makes you feel like you’re eating something indulgent
The Ingredients
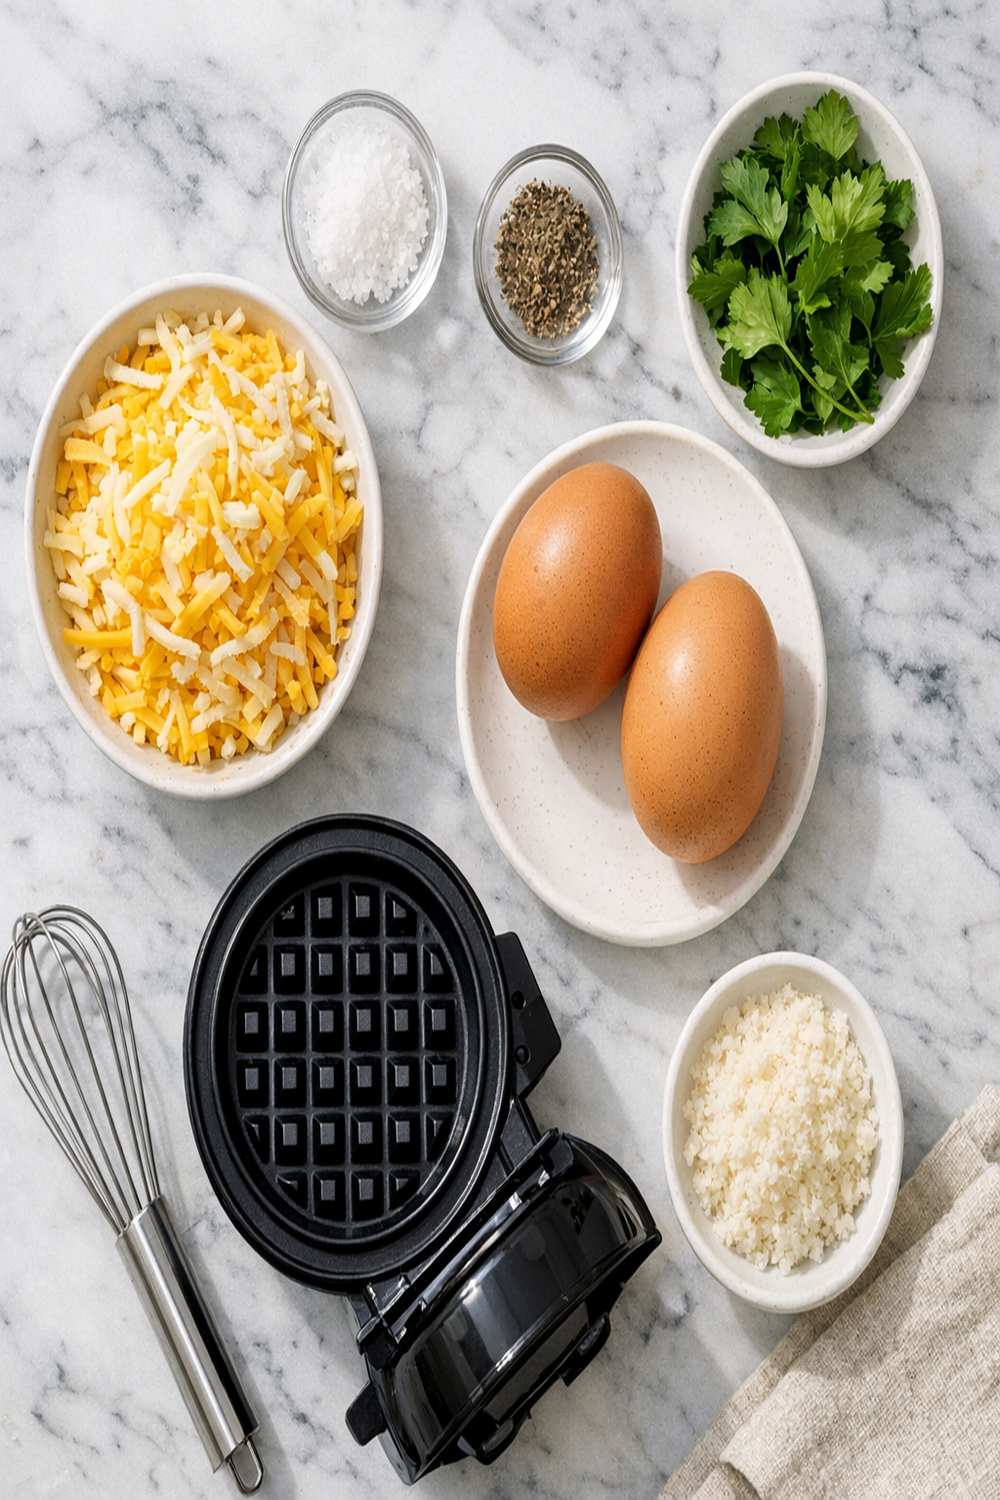
I’ve kept this intentionally minimal because that’s the entire beautiful point. These two ingredients are workhorses—they do the heavy lifting in terms of nutrition, flavor, and texture. Let me break down exactly what you need and why each one matters to the final result:
- 2 large eggs (room temperature, as they incorporate more evenly and cook with better texture)
- 1 cup mozzarella cheese (finely shredded, not pre-shredded from a bag—the anti-caking agents interfere with proper melting and texture)
- ¼ teaspoon sea salt (enhances cheese flavor and balances the overall taste profile)
- ½ teaspoon garlic powder (optional but transforms these from neutral breakfast to savory dinner-ready)
Makes approximately 4 chaffles per batch.
A critical note on cheese selection: Pre-shredded cheeses contain cellulose and anti-caking agents that create a grainy texture and prevent smooth melting. I always block-cut my mozzarella and shred it by hand using the largest holes on a box grater—this five-minute investment completely transforms your results.
How to Make 2 Ingredient Chaffle Recipe?
I’ve refined this process through dozens of iterations, and I’m sharing my exact technique so you can avoid the early mistakes I made. These steps are straightforward, but paying attention to temperatures and timing creates the difference between a mediocre chaffle and one that becomes a family favorite:
Step 1: Prepare Your Waffle Iron
Turn your waffle iron to medium-high heat and allow it to preheat for a full 3-4 minutes. This step matters more than people realize—a truly heated surface creates that crucial crispy exterior. If you start too early with insufficient heat, you’ll end up with rubbery, dense results instead of the lacy, golden texture we’re aiming for. Many waffle irons have indicator lights; wait until that light turns off and back on once, indicating true temperature stability.

Step 2: Combine Your Ingredients
In a medium mixing bowl, crack both eggs and whisk them thoroughly for about 20-30 seconds until the whites and yolks are completely combined and slightly frothy. This incorporates a touch of air, which contributes to lighter texture. Add your finely shredded mozzarella, garlic powder, and sea salt, then fold everything together gently but thoroughly using a spatula, ensuring the cheese is evenly distributed and no dry patches of cheese remain.

The batter should have a slightly wet, chunky appearance—similar to cottage cheese mixed with beaten egg. This is correct. Don’t overmix, which can develop the gluten in the small amount of flour naturally present in cheese and create a tough final product.
Step 3: Spray and Pour
Using either cooking spray or a light brush of melted butter, coat the interior plates of your preheated waffle iron. Pour approximately one-quarter of your batter (roughly 2-3 tablespoons) into the center of the waffle iron. Don’t overfill—the batter will spread, and excess will leak out the sides and create cleanup headaches while preventing proper cooking.

Close the lid gently but firmly, pressing down for just a moment to ensure contact between batter and heating plates.
Step 4: Cook Until Golden
Now comes the patience part. Most waffle irons need 2.5 to 3 minutes for each chaffle, though this varies slightly by machine. I know my iron well enough now that I can hear when the sizzling changes tone, indicating the interior has set. If your waffle iron has an indicator light, wait until it signals completion. If not, peek carefully at the edges after 2 minutes—you’re looking for deep golden-brown coloring, almost caramel-toned. The cheese should smell toasted and nutty.

Resist the urge to open the waffle iron too early. Premature opening releases steam and prevents the structure from setting properly, resulting in a chaffle that falls apart when you remove it.
Step 5: Remove and Cool Slightly
Using a fork or small tongs (not your fingers—they’re genuinely hot), carefully remove each finished chaffle and place it on a wire rack or clean plate. This slight cooling for 30-45 seconds allows the structure to set while maintaining some of that beautiful warmth. Attempting to immediately serve a piping-hot chaffle often results in it falling apart because the interior is still too soft.

Repeat the spray-pour-cook process with the remaining three portions of batter until you’ve used the entire mixture.
Step 6: Serve Immediately or Store
These taste best served warm, within minutes of cooking. If you’re making them for immediate consumption, top them as desired and enjoy their peak texture. If you’re batch-cooking for the week ahead, cool them completely on a wire rack before transferring to storage—this prevents condensation that creates sogginess.
Tips and Tricks
- Room Temperature Eggs Cook More Evenly – Take your eggs out of the refrigerator 10 minutes before cooking. Cold eggs don’t incorporate smoothly with the cheese and can result in a slightly curdled texture in the finished chaffle
- Invest in a Quality Waffle Iron – Inexpensive or overly non-stick waffle irons sometimes don’t reach adequate temperature. My Breville has never disappointed me across hundreds of chaffles, and that investment paid itself back within a few months of avoided restaurant breakfasts
- Double the Batch on Sundays – When you’re already making these, simply double your ingredient quantities. You’ll have four extra chaffles for Monday-Wednesday breakfasts, and the time investment barely increases
- Experiment with Cheese Blends – While mozzarella is my go-to, I’ve had excellent results with a 50-50 blend of mozzarella and sharp cheddar for additional flavor depth. Gruyere creates an almost nutty sophistication. Parmesan alone tends to be too salty, but a quarter-cup mixed with three-quarters mozzarella creates restaurant-quality flavor
- Add an Egg Yolk for Creamier Interior – If you prefer a slightly less crispy, more custard-like interior, replace one whole egg with an additional yolk. This increases richness but slightly decreases structural integrity, so handle with extra care
- Create a Seasoning Station – Keep a small bowl with garlic powder, Italian seasoning, black pepper, and smoked paprika nearby. Adding different seasonings to each batch means you can serve variety without multiplying your effort
Expert’s Nutritional Tip
From my perspective as a registered dietitian, what excites me most about chaffles is their protein-to-carbohydrate ratio. Each chaffle delivers approximately 6 grams of protein and just 1 gram of carbohydrates (mostly from the lactose in cheese, which many people tolerate well). This combination triggers more stable blood sugar responses compared to traditional breakfast options, meaning you’ll experience fewer energy crashes and more consistent hunger signals throughout your morning.
The fat content—roughly 8 grams per chaffle—comes primarily from the egg yolk and cheese. This isn’t something to fear; these are the fats that slow gastric emptying and keep you genuinely satisfied. In fact, studies show that breakfast with adequate protein and fat (which this absolutely provides) reduces overall calorie consumption later in the day by up to 17% compared to grain-heavy breakfasts.
Make-Ahead Guide
I batch-make chaffles every Sunday evening, and this strategy has transformed my weekday mornings from chaotic to calm. Here’s exactly how I do it:
Preparation: Triple your ingredient recipe, but prepare the batter in three separate batches rather than one large batch. If your batter sits longer than 10 minutes, the eggs begin oxidizing and the texture suffers slightly. Fresh batter = better texture every time.
Cooking: Set aside 20-25 minutes and cook your entire batch, placing finished chaffles on a wire rack to cool completely. This cooling period is non-negotiable if you want to avoid moisture buildup during storage.
Storage: Once cooled, layer chaffles between parchment paper in an airtight container. They’ll keep refrigerated for 4-5 days or frozen for up to 2 months. I personally prefer to freeze mine, using them within 4 weeks for optimal texture.
Reheating: For refrigerated chaffles, simply pop them back into your waffle iron for 60-90 seconds per side to restore crispness. For frozen chaffles, add about 30 extra seconds to the heating time. Alternatively, a toaster oven at 375°F for 3-4 minutes revives them beautifully while maintaining that crispy exterior. Never microwave—this creates a rubbery texture that defeats the entire purpose.
Pro Meal Prep Tip: Create a “chaffle board” in your refrigerator with toppings ready to go: smoked salmon, avocado slices, cream cheese, fresh berries, sugar-free syrup, nut butters. When someone wants breakfast, it’s literally an assembly task, not a cooking task. This convenience factor has single-handedly increased our healthy breakfast adherence by making it genuinely easier than driving through a drive-through.
Common Mistakes to Avoid
- Using Pre-Shredded Cheese – This is genuinely my biggest pet peeve because it’s so easily fixable. The anti-caking agents in pre-shredded cheese prevent smooth melting and create a grainy, separated texture that’s honestly disappointing. Spend the extra five minutes shredding block cheese fresh. Your results will dramatically improve
- Cold Eggs from the Fridge – I’ve made this mistake dozens of times when I’m rushing, and the results are consistently worse. Cold eggs don’t incorporate smoothly with warm cheese, sometimes resulting in a slightly scrambled appearance and less unified texture. Remove eggs from refrigeration 10 minutes before cooking, and you’ll notice immediate improvement
- Overfilling the Waffle Iron – Beginner’s logic suggests “more batter = bigger chaffle,” but actually overfilled waffle irons create thin, spread-out results that lack the tender interior and crispy exterior combination we’re pursuing. Stick to one-quarter of your batter per chaffle—consistency matters more than size
- Opening the Waffle Iron Too Early – I did this constantly when I first started, and every single time, the chaffle fell apart or had a wet, underdone center. The waffle iron seals steam inside, and releasing that steam too early interrupts the cooking process. If your machine has an indicator light, wait for it to signal completion. If not, wait at least 2.5 minutes before even peeking
Seasonal Variations
Spring & Summer: Add fresh herbs to your batter—finely chopped chives, basil, or dill create a garden-fresh flavor profile that pairs beautifully with light toppings like crème fraîche and smoked salmon. I also occasionally add a tablespoon of finely minced sun-dried tomatoes for visual interest and subtle sweetness.
Fall & Winter: Introduce smoked paprika, cayenne pepper, or even a tiny pinch of pumpkin pie spice to the batter itself. A chaffle seasoned with fall spices and topped with melted gruyere and bacon becomes weekend brunch-worthy. In December, I’ve been known to add everything bagel seasoning because it’s festive and genuinely delicious.
Year-Round Hack: Keep your pantry stocked with everything bagel seasoning, za’atar spice blend, and Italian herb blends. Each one transforms a basic chaffle into something that feels intentional and restaurant-quality without any actual additional effort.
Can I Store 2 Ingredient Chaffle Recipe?
Absolutely, and this is honestly one of the biggest reasons I make these regularly. The storage options are genuinely flexible, which means you can make them on your schedule, not on the demands of daily cooking.
Refrigerator Storage: Cooled chaffles last 4-5 days in an airtight container, separated by parchment paper. I reheating mine in a toaster oven or briefly in the waffle iron to restore crispness.
Freezer Storage: This is my preferred method. Flash-freeze completed chaffles on a baking sheet for 1-2 hours, then transfer to a freezer-safe container or zip-top bag for up to 2 months of storage. When you want one, simply reheat directly from frozen—add about 30 seconds to the waffle iron time or 4-5 minutes in a toaster oven at 375°F.
Important Note: Never store chaffles in a regular plastic container immediately after cooking while they’re still warm. The condensation that develops makes them soggy and defeats your entire crispy-exterior effort. Always cool completely on a wire rack before storing.
Nutrition Information
Based on USDA nutritional data for the primary ingredients, each chaffle (made with one-half egg and one-quarter cup mozzarella cheese) contains approximately:
- 160 calories (caloric content varies slightly based on cheese type and cooking method)
- 6 grams of protein – This is the nutritional superpower; it’s genuinely substantial for such a small portion
- 13 grams of fat – All from whole food sources (egg yolk and cheese) that support satiety and nutrient absorption
- 1 gram of carbohydrates – Making this genuinely low-carb without any special sweeteners or additives
- Sodium approximately 250mg – Primarily from the cheese; keep this in mind if you’re monitoring sodium intake for hypertension management
These numbers make chaffles particularly valuable in higher-protein, lower-carbohydrate dietary approaches. They’re also naturally gluten-free (assuming your cheese and seasonings contain no additives), making them suitable for celiac disease or non-celiac gluten sensitivity.
What Can I Serve With 2 Ingredient Chaffle Recipe?
This is where chaffles truly shine for me—they’re genuinely adaptable across meals and flavor profiles. The base recipe is savory-neutral enough to pair with both sweet and savory toppings, which means one batch of chaffles can become multiple different meals throughout the week.
For lunch and dinner options, these work beautifully as sandwich bread. Stack one with your favorite deli meat, aged cheese, and roasted vegetables. They’re sturdy enough to hold weight without falling apart, yet tender enough to bite through easily. Our Beef Chuck Thin Sliced Recipe creates absolutely delicious chaffle sandwiches when you layer the tender beef with arugula and horseradish cream. I’ve also topped chaffles with the savory components from our Black Bean And Rice Burrito Recipe for a fun Tex-Mex breakfast twist.
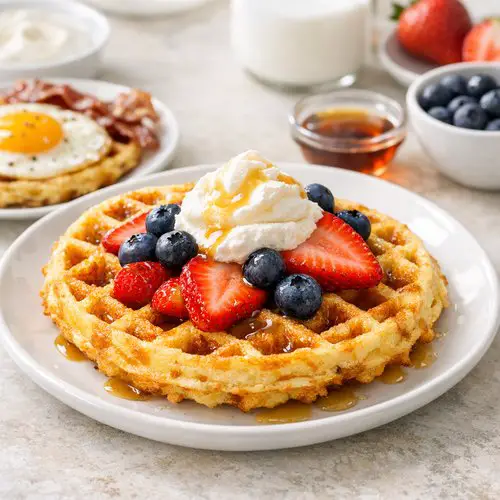
- Sweet Breakfast Style – Top with butter, fresh berries, and a drizzle of sugar-free syrup or pure maple syrup for a breakfast that tastes indulgent while delivering genuine nutrition
- Savory Brunch Foundation – Layer with smoked salmon, cream cheese, thinly sliced red onion, and fresh dill for an elevated brunch that actually impresses guests while requiring minimal effort
- Sandwich Base for Dinner – Use as bread for grilled chicken, sautéed vegetables, and pesto for a completely grain-free dinner sandwich that’s genuinely satisfying
- Breakfast Casserole Component – Crumble chaffles and layer them in a breakfast casserole with eggs, cream, and vegetables for a make-ahead brunch situation
- Crispy Vehicle for Toppings – Simply butter and serve with a soft egg, avocado, microgreens, and everything bagel seasoning for a simple, elegant breakfast
- Late-Night Snack Platform – Top with melted aged cheese and fresh basil for a sophisticated snack that doesn’t spike blood sugar like traditional late-night options
Substitutes
- Cheddar Cheese for Mozzarella – Sharp white cheddar creates a more pronounced flavor and slightly firmer texture. You’ll need slightly less (about three-quarters cup) because cheddar has higher fat content and will create more grease. The ratio works beautifully, and the flavor is arguably more interesting than straight mozzarella
- Gruyere Cheese for Mozzarella – This creates an almost restaurant-quality sophisticated flavor with a slightly nuttier profile. Use the same quantity as mozzarella, though Gruyere tends to brown faster, so watch carefully and reduce cooking time slightly
- Cream Cheese (One-Quarter Cup) Combined with Mozzarella – This creates a creamier interior with a more custardy center while maintaining crispness on the exterior. It’s indulgent and absolutely delicious, though technically adds a few more carbohydrates
- Cottage Cheese (½ Cup) Mixed with Mozzarella (½ Cup) – This is an unconventional substitution, but it creates interesting texture and adds additional protein. Drain the cottage cheese thoroughly first to prevent excess moisture, which creates sogginess
- Egg-Free Alternative Using Aquafaba – If you have a vegan household member, try replacing the eggs with 3 tablespoons of aquafaba (liquid from canned chickpeas) plus an additional tablespoon of cream cheese. The results are less traditional in texture but still quite good
2 Ingredient Chaffle Recipe
Ingredients
Method
- Turn your waffle iron to medium-high heat and allow it to preheat for a full 3-4 minutes. This step matters more than people realize—a truly heated surface creates that crucial crispy exterior. If you start too early with insufficient heat, you’ll end up with rubbery, dense results instead of the lacy, golden texture we’re aiming for. Many waffle irons have indicator lights; wait until that light turns off and back on once, indicating true temperature stability.

- In a medium mixing bowl, crack both eggs and whisk them thoroughly for about 20-30 seconds until the whites and yolks are completely combined and slightly frothy. This incorporates a touch of air, which contributes to lighter texture. Add your finely shredded mozzarella, garlic powder, and sea salt, then fold everything together gently but thoroughly using a spatula, ensuring the cheese is evenly distributed and no dry patches of cheese remain. The batter should have a slightly wet, chunky appearance—similar to cottage cheese mixed with beaten egg. This is correct. Don’t overmix, which can develop the gluten in the small amount of flour naturally present in cheese and create a tough final product.

- Using either cooking spray or a light brush of melted butter, coat the interior plates of your preheated waffle iron. Pour approximately one-quarter of your batter (roughly 2-3 tablespoons) into the center of the waffle iron. Don’t overfill—the batter will spread, and excess will leak out the sides and create cleanup headaches while preventing proper cooking. Close the lid gently but firmly, pressing down for just a moment to ensure contact between batter and heating plates.

- Now comes the patience part. Most waffle irons need 2.5 to 3 minutes for each chaffle, though this varies slightly by machine. I know my iron well enough now that I can hear when the sizzling changes tone, indicating the interior has set. If your waffle iron has an indicator light, wait until it signals completion. If not, peek carefully at the edges after 2 minutes—you’re looking for deep golden-brown coloring, almost caramel-toned. The cheese should smell toasted and nutty. Resist the urge to open the waffle iron too early. Premature opening releases steam and prevents the structure from setting properly, resulting in a chaffle that falls apart when you remove it.

- Using a fork or small tongs (not your fingers—they’re genuinely hot), carefully remove each finished chaffle and place it on a wire rack or clean plate. This slight cooling for 30-45 seconds allows the structure to set while maintaining some of that beautiful warmth. Attempting to immediately serve a piping-hot chaffle often results in it falling apart because the interior is still too soft. Repeat the spray-pour-cook process with the remaining three portions of batter until you’ve used the entire mixture.

- These taste best served warm, within minutes of cooking. If you’re making them for immediate consumption, top them as desired and enjoy their peak texture. If you’re batch-cooking for the week ahead, cool them completely on a wire rack before transferring to storage—this prevents condensation that creates sogginess.

Notes
FAQs
Can I make chaffle batter in advance and store it before cooking?
Technically yes, but I don’t recommend it. Batter stored in the refrigerator for more than 2-3 hours develops an oxidized, slightly sulfurous smell, and the texture of the finished chaffle suffers slightly. The eggs and cheese create a fundamentally different product when they’ve had extended time to interact. For the absolute best results, prepare batter fresh just before cooking. If you absolutely must make it ahead, prepare it no more than 2 hours in advance and store it in the coldest part of your refrigerator.
Why does my chaffle sometimes stick to the waffle iron?
This is almost always an issue with insufficient nonstick cooking spray or butter. Even nonstick waffle irons benefit from a light coating each time you cook. Additionally, ensure your waffle iron is genuinely preheated—many people start cooking before the iron reaches full temperature, which compromises the nonstick surface. Finally, resist opening the iron too early; chaffles that haven’t fully cooked have a higher sticking tendency. If sticking continues to be an issue, consider investing in a higher-quality waffle iron, which genuinely matters with this recipe.
Is this recipe suitable for people following a ketogenic diet?
Yes, absolutely. With just 1 gram of carbohydrates per chaffle and 6 grams of protein plus healthy fats, this recipe fits beautifully within ketogenic macronutrient targets. The protein-to-carb ratio is genuinely excellent for blood sugar management, making it suitable for anyone monitoring carbohydrate intake, whether for ketogenic, low-carb, or diabetes management purposes. This is actually one of the reasons chaffles became so popular within keto communities originally.
Can I add vegetables or herbs directly into the batter?
Yes, with one crucial caveat: any additions must be finely minced and relatively dry. Chopped fresh herbs like chives, basil, or parsley (about 1 tablespoon) work beautifully. Finely minced roasted red peppers (about 2 tablespoons, pressed dry) add color and flavor. Sun-dried tomatoes (about 1 tablespoon) create interesting texture and sweetness. However, avoid high-moisture vegetables like fresh tomatoes, zucchini, or mushrooms, which release water during cooking and create a soggy, non-crispy result. Additionally, avoid fibrous vegetables that don’t break down easily; they interfere with the texture. The principle is: dry, finely minced, flavor-forward additions work; high-moisture vegetables don’t.
What’s the difference between a chaffle and a regular cheese omelette made in a waffle iron?
Excellent question. A chaffle is a specific ratio of cheese to egg that creates a structure capable of holding together and developing that crucial crispy exterior. A regular omelette in a waffle iron uses more egg relative to cheese, which creates a different texture—typically more tender and less crispy, and often unable to maintain structural integrity when removed from the iron. The magic of the chaffle ratio is that the cheese content is high enough to create structural integrity and crispy browning while the egg content is just sufficient to bind everything together. It’s a genuine balance that creates something genuinely different from existing techniques.
Can I make larger chaffles by cooking longer, or does size matter?
Size definitely matters, though not in the way most people assume. Making one large chaffle instead of four smaller ones typically results in a chaffle with a raw, underdone center and overly dark exterior by the time the center cooks through. The waffle iron’s direct heat can’t penetrate to the center of a chaffle thicker than about one-third of an inch. Four smaller chaffles, each roughly the same thickness and diameter, cook through evenly and develop consistent texture. If you genuinely prefer larger chaffles, invest in a Belgian-style waffle iron with deeper pockets, which distributes heat differently. Otherwise, embrace the smaller size—they’re portion-appropriate and cook perfectly.
More Recipes You’ll Love
- my weeknight pasta – For easy weeknight dinners that deliver comfort while requiring minimal active cooking time
- Blade Beef Recipe – An excellent protein option for chaffle sandwiches and meal prep
- Beef Chuck Shoulder Steak Thin Recipe – Perfect for creating impressive sandwich fillings with minimal effort
Final Thoughts
Standing in my Fairfield kitchen on any given morning, I think back to that first chaffle I made almost accidentally, and I’m genuinely grateful for the simplicity it brought to my family’s routine. This recipe has become so much more than just breakfast for us—it’s become a foundation for conversations about how wholesome food doesn’t have to be complicated, how nourishing yourself well doesn’t require hours in the kitchen, and how sometimes the most elegant solutions come from the most basic building blocks.
Every time I reheat a frozen chaffle or prepare a fresh batch on a Sunday evening, I’m reminded that this is what sustainable, healthy eating actually looks like: simple ingredients, consistent technique, and genuine flexibility. Not perfection. Not complicated. Not something you need special equipment or obscure ingredients to execute beautifully.
I hope you’ll give these a try and make them your own. Add the seasonings that speak to your palate. Layer them with the toppings that genuinely satisfy you. Make them your foundation for quick, nourishing meals that taste like you invested far more effort than you actually did. Join me on this cooking journey!
